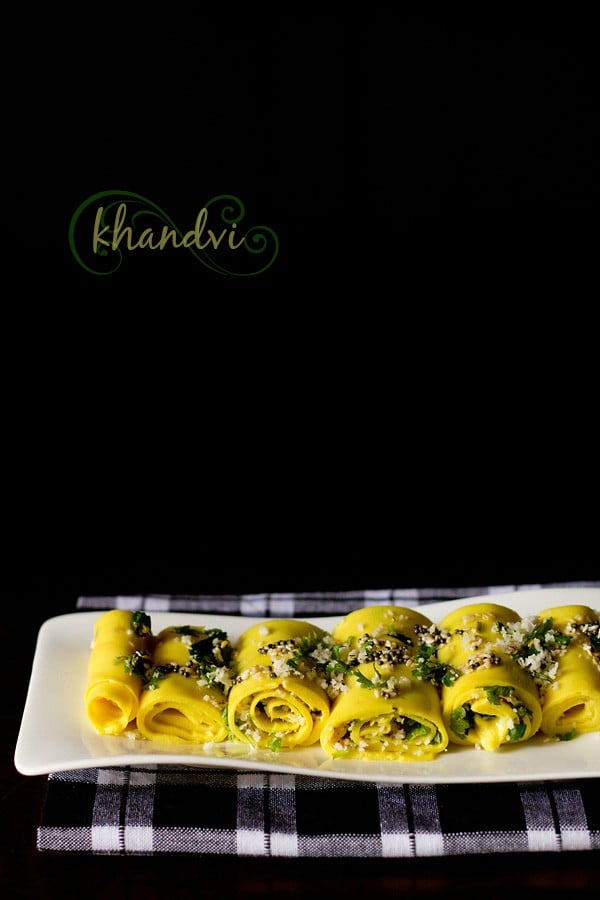
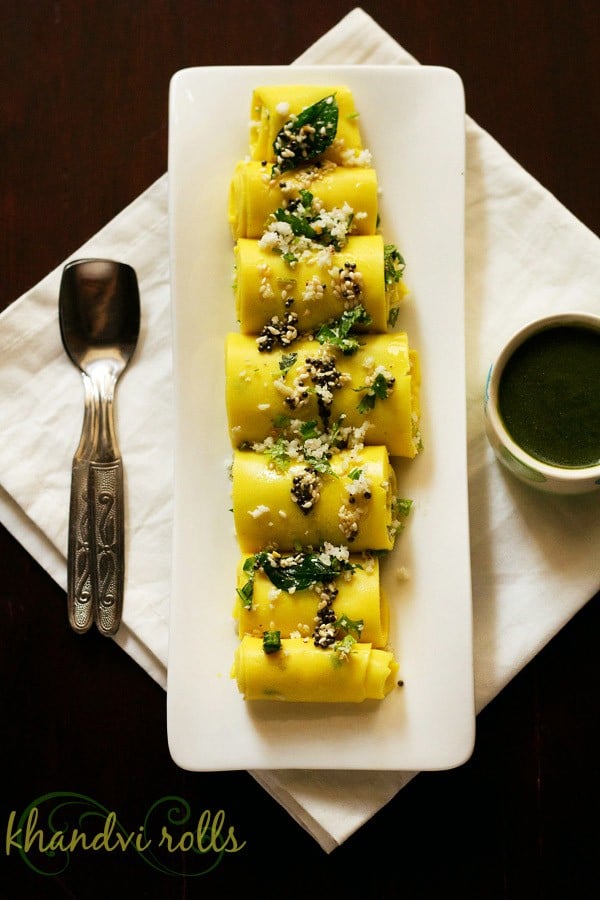
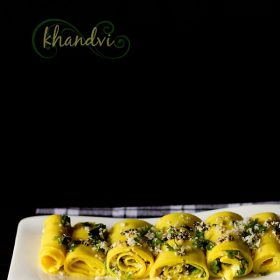
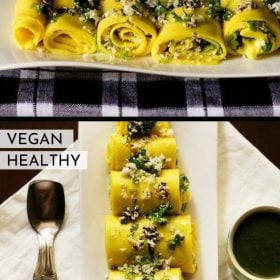
Khandvi Recipe with step by step photos. This is a melt in the mouth, smooth, spiced and seasoned gram flour rolls. Khandvi is a delicious healthy snack from the Gujarati cuisine. If you’ve never made khandvi before, don’t worry! I’ve shared my best tips for making this recipe without any difficulty.
Khandvi is made with a mixture of gram flour and buttermilk. In India what we call buttermilk is a thin solution of yogurt and water. Cooking this smooth batter of the gram flour and buttermilk batter is one tricky part. If you get this right, then more than half of your problem is solved.
What we look for in a khandvi are thin layers and this is achieved by getting the right consistency when cooking the batter. If you even cook it more and the consistency thickens, then spreading the khandvi mixture becomes difficult and what you get are thick layers.
Another important point is that you have to be quick in spreading the cooked khandvi batter. if you delay then the batter thickens as it cools and becomes lumpy while spreading.
I started making khandvi many years back. Once I had read the preparation of khandvi somewhere. The recipe had the measurements in grams and I did not have a weighing machine. i was inspired to try the recipe. So, without any inkling of the proportions or ratio, I made khandvi for the first time and to my surprise, it was a success.
I used to use blind measurements then and still do at times. Since I often cook with the Indian method of estimation called as Andaaz, things rarely go wrong. But I also have my share of disasters once in a while. Only, if I have to blog a recipe, then I use measuring cups and spoons.
I have given details and tips wherever possible so that you can also make this snack at home without any failure. The proportions of this recipe is enough for a family of four to five. The recipe yields 25 to 30 khandvi rolls. Also it depends on how thinly or thickly you spread the batter.
To make khandvi, the proportion of gram flour/besan to buttermilk is 1 : 3. The buttermilk should be neither thin nor thick, but of medium consistency. I have mixed sour yogurt with water for the buttermilk. I always spice up the khandvi batter with ginger and green chili paste. But skip if you don’t prefer the taste or aroma of ginger.
There is a slight variation in this khandvi recipe. Usually in khandvi, coconut and coriander are added as a garnish. Here I have lightly stuffed the khandvi with these. More like the way suralachi vadi (the Maharashtrian version of khandvi) is made. If you don’t prefer the stuffing, then just garnish it with coconut and coriander leaves.
Khandvi is a gluten-free healthy snack if you don’t add asafoetida powder or use wheat free asafoetida. The recipe can also be veganized using vegan yogurt. To get the sourness, just add a bit of lemon juice in the batter.
How to make Khandvi Recipe
1. First prep up all the ingredients required. Take the yogurt in a bowl. You can use dairy or vegan yogurt.
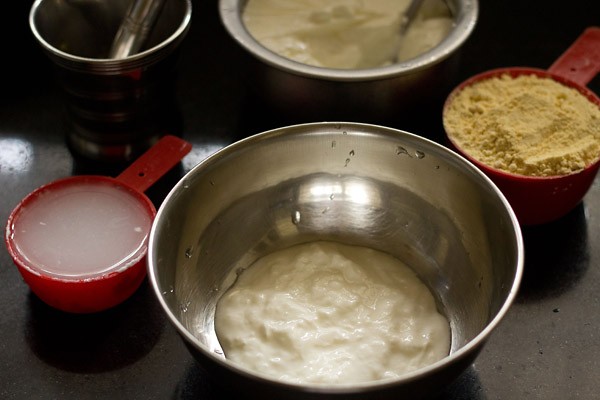
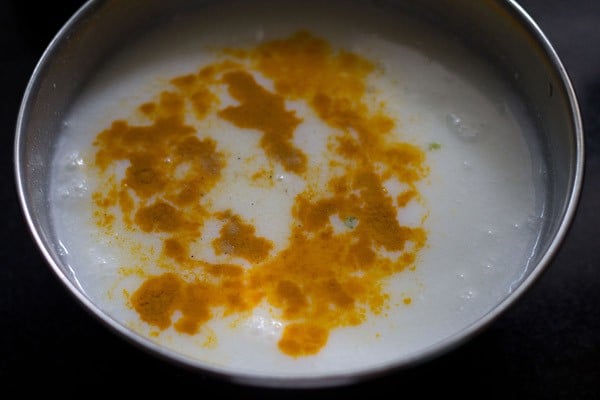
2. Add water and stir well.
3. Add 1 teaspoon ginger-green chili paste, ¼ teaspoon turmeric powder, 1 pinch asafoetida (hing) and ⅔ teaspoon salt or add as required.
If using fresh yogurt, then to add the sourness, add about ½ teaspoon of lemon juice.
4. Add 1 cup gram flour aka besan.
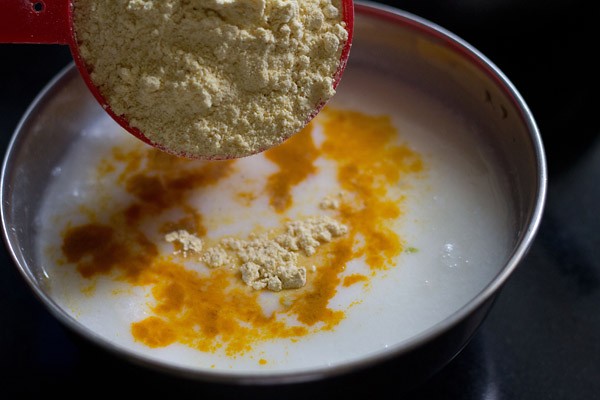
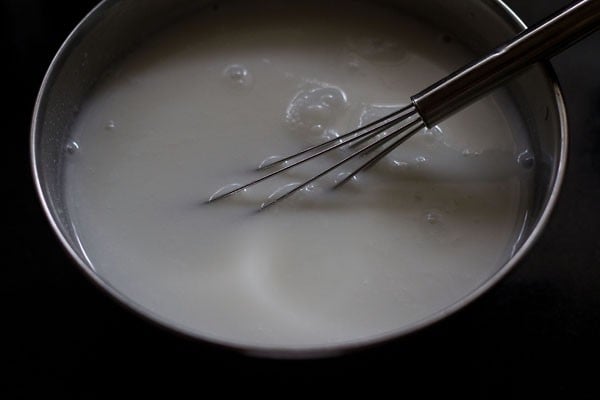
5. With a wired whisk, keep on stirring and mixing till all the lumps are dissolved and you get a smooth batter.
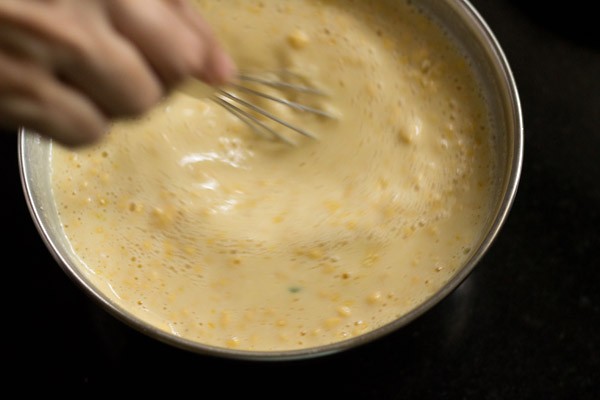
6. Pour this batter in a saucepan or a broad frying pan. Switch on the stovetop and keep the heat to the lowest. Begin to stir.
7. Spread oil on plates or boards or tray. Large steel lids or thalis work very well. You can also use the back of a large baking tray. I had to use 4 steel lids.
A suggestion would be to use your kitchen counter top, if you prefer. Then you just spread the whole cooked batter on it and can spread it in your own pace. A large wooden or metal tray would also be good.
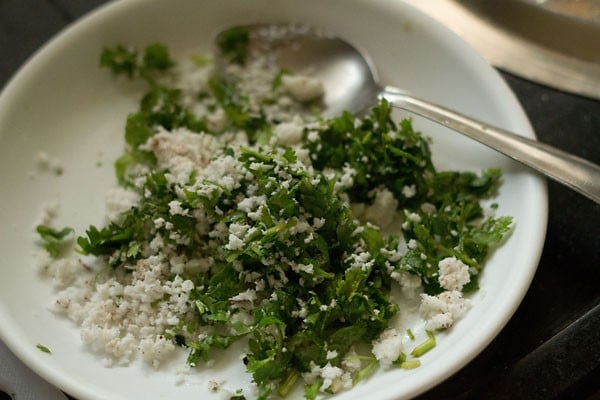
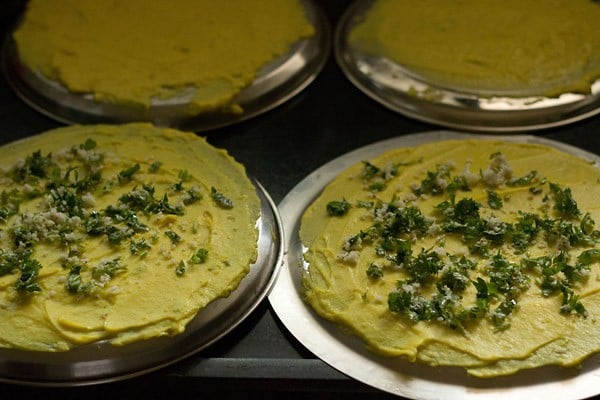
8. Also mix 2 tablespoons of chopped coriander leaves and 2 tablespoons fresh grated coconut. Keep aside.
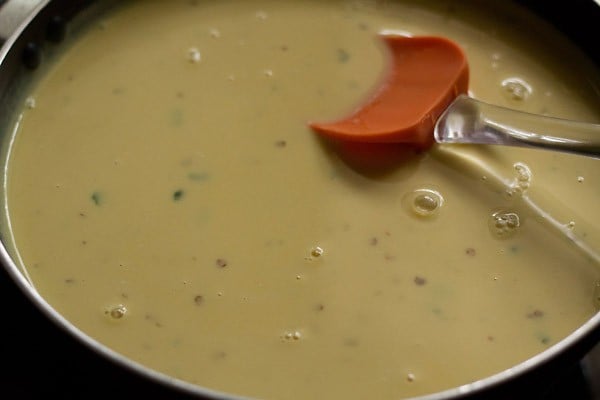
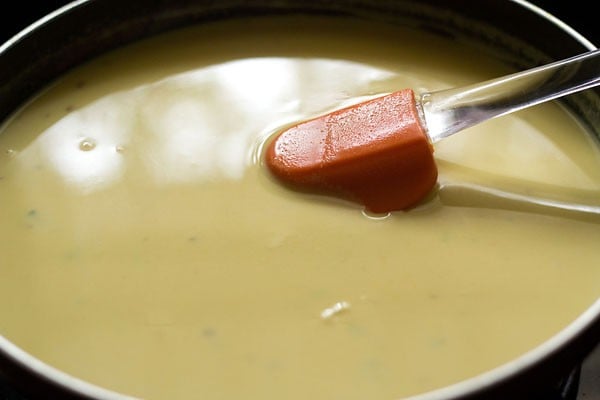
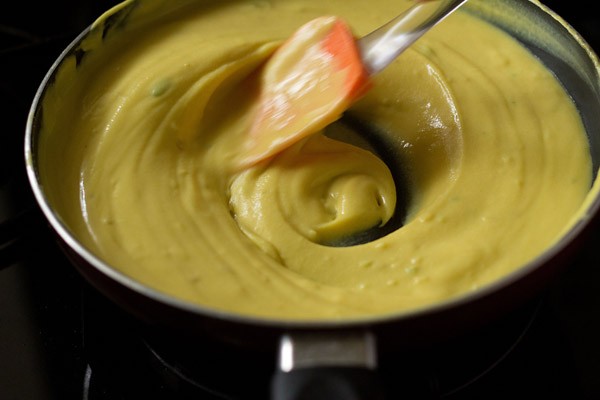
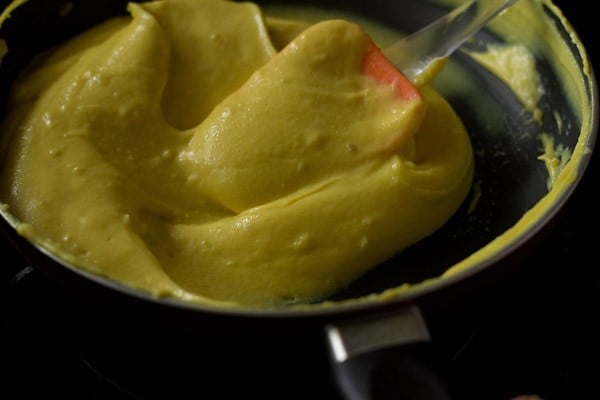
9. Keep on stirring when the khandvi batter is getting heated up. Lumps begin to form and you have to continuously stir so that the lumps don’t form.
10. The batter would thicken and keep on thickening. Keep on stirring. Best to use a wooden spatula or a heat proof silicon spatula.
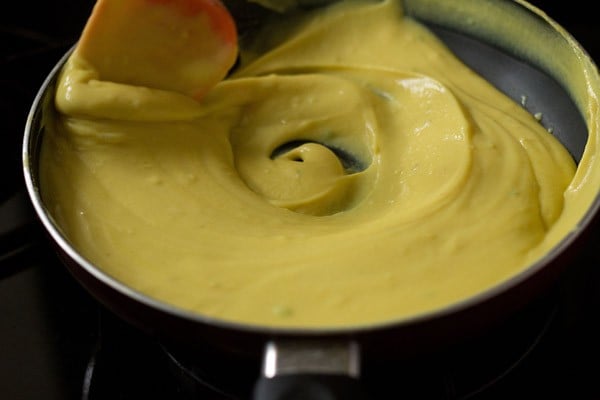
11. You will see the khandvi batter has thickened more than the previous pic.
12. Stir and stir and exercise your hands. The batter also should not be allowed to stick at the bottom. So you have to stir continuously.
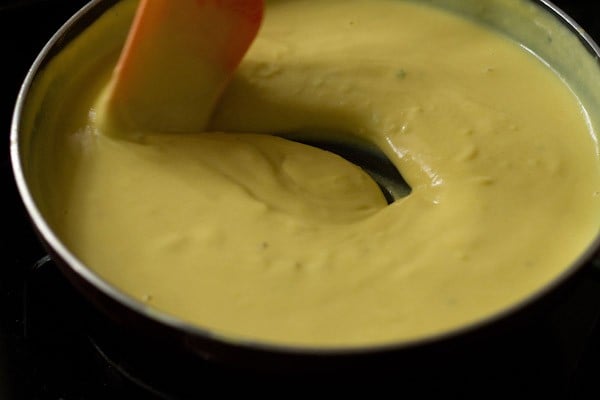
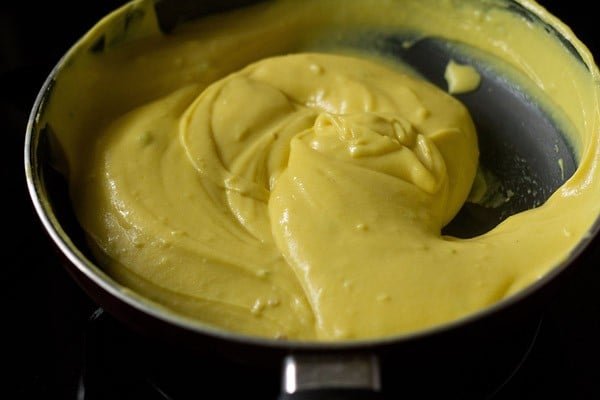
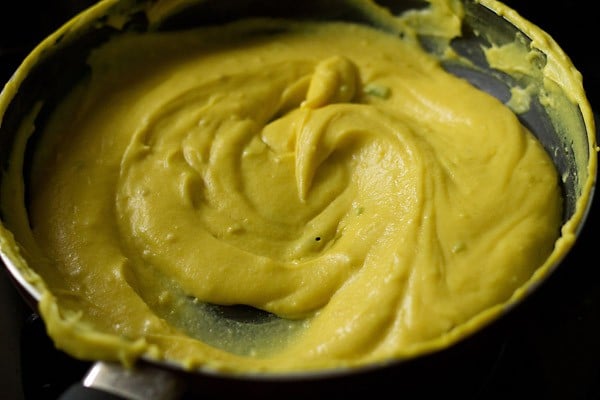
13. A well thickened batter and looks like we are ready.
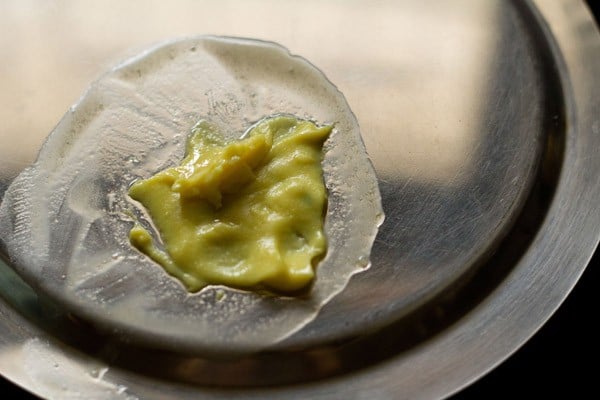
14. So I just spread a few teaspoons of the batter on a greased lid. As you see the texture is still wet.
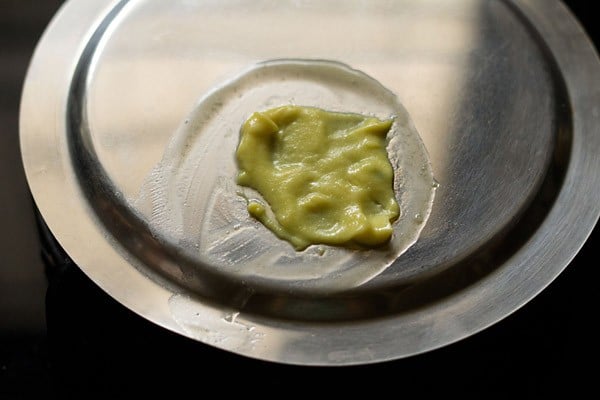
15. Once the spread batter cooled a bit, I tried rolling. As you see the rolls could not be formed. The batter was still pasty, sticky and not properly set.
16. So the batter needs to be cooked more.
17. Continue to stir.

18. This is the Final consistency of the khandvi batter. It took me 17 minutes to get the correct consistency on a low flame. The timing will vary depending on the intensity of the heat, the thickness/thinness of the pan and the size of the pan.
Just do the plate test and when you can form the rolls, then the khandvi batter is ready. If the batter becomes too thick, then it becomes difficult to spread and you don’t get thin layers in the rolls. In this case, still spread the batter. You will get thick slices, but still they taste good.
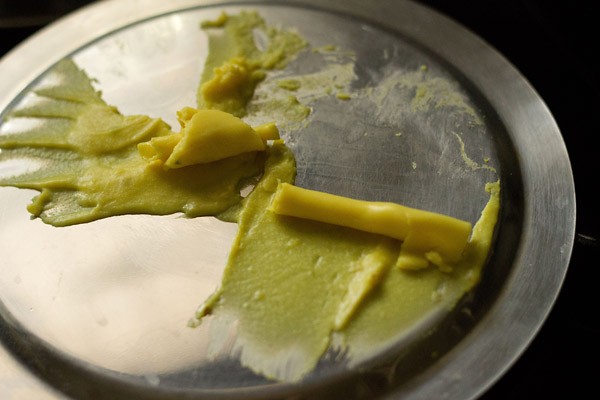
19. Tested again and this time the rolls were happening. This time the batter had spread evenly and there is a smoothness in the layers as well as in the spread batter.
Making Khandvi Rolls
20. Quickly pour about ½ to ⅔ cup of batter on a large plate and spread thinly and evenly with a spatula.
You have to be quick with the remaining batter too. Since even a bit of cooling and the batter becomes likes blob, difficult to spread. If you use a large tray or a parat, then its much easier as you don’t hurry like a harried woman here and there.

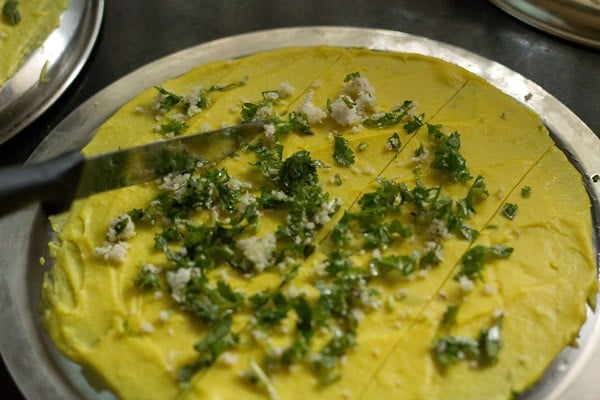
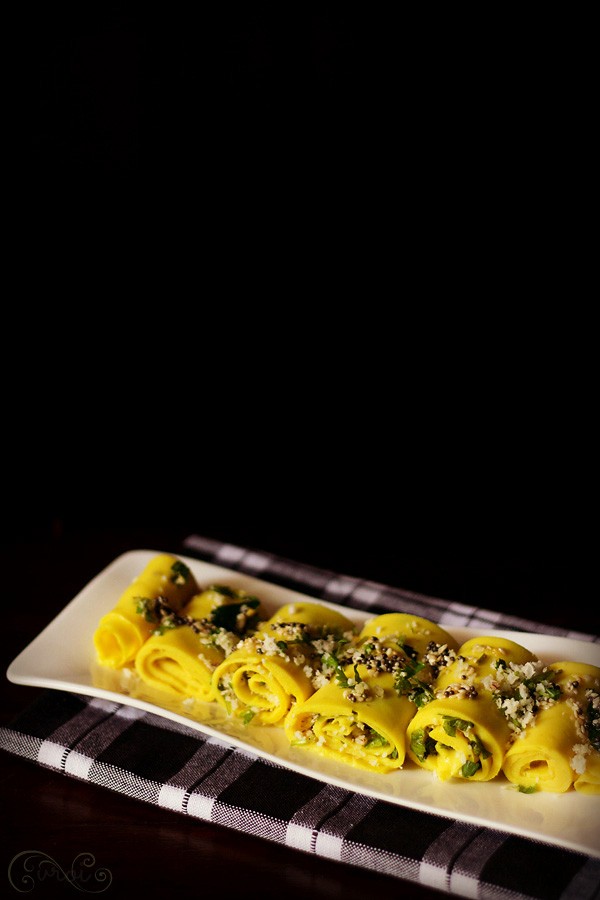
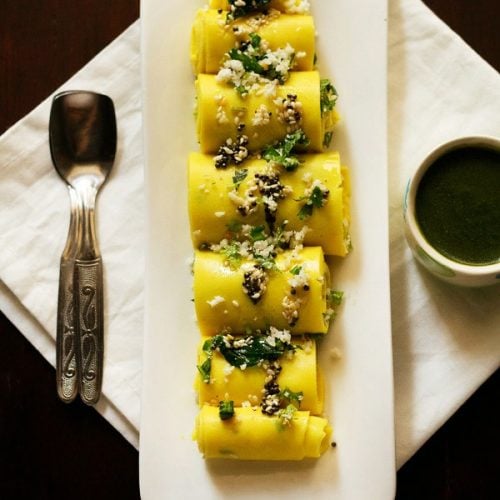
21. Allow to cool and then sprinkle the coconut + coriander leaves mixture sparingly. You can also skip this stuffing part and directly garnish with the coconut and coriander once you temper the khandvi rolls.
22. Cut into equal sized strips.
23. Gently roll each strip tightly. Then place them in a serving tray or plate next to each other or stack them neatly. If the tray or plate is large, then you will get large khandvi rolls. In this case after you finish rolling half, just cut horizontally and make a second roll.

Tempering for khandvi
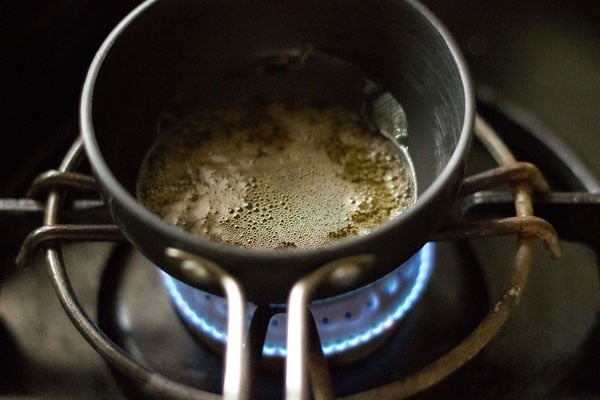
24. For the tempering, heat 1 tablespoon oil and crackle 1 teaspoon mustard seeds.
You can use any neutral flavored oil.
25. Then add 8 to 10 curry leaves and 1 teaspoon green chilies. Fry for a few seconds.
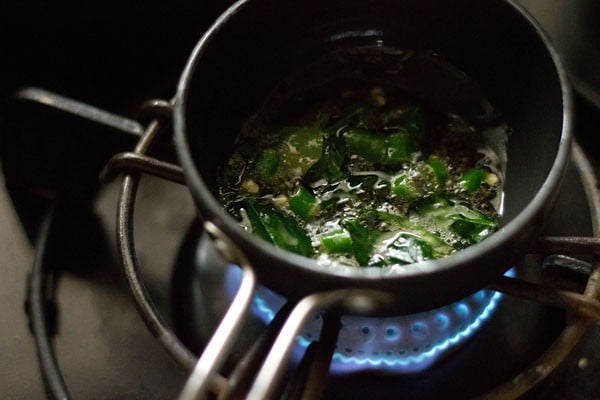
26. Add 2 teaspoons white sesame seeds and when they change color, splutter and crackle.
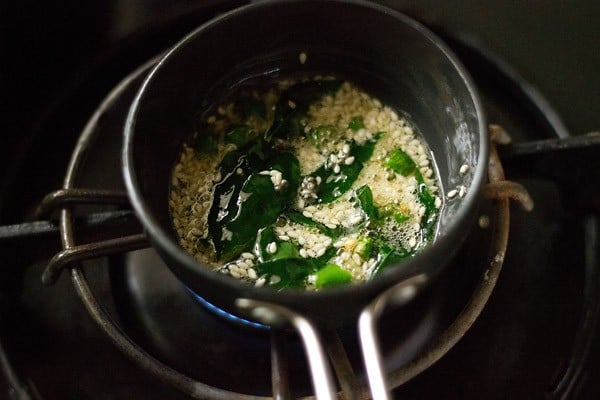
27. Pour this hot tempering mixture along with the oil on the khandvi rolls.

28. You can garnish it with some more coconut and coriander leaves, if you prefer. Serve khandvi with coriander chutney or coriander mint chutney.
If you are looking for more Gujarati recipes then do check:
Please be sure to rate the recipe in the recipe card or leave a comment below if you have made it. For more vegetarian inspirations, Sign Up for my emails or follow me on Instagram, Youtube, Facebook, Pinterest or Twitter.
khandvi recipe
Ingredients
for khandvi batter
- 1 cup besan (gram flour) or 100 grams besan
- ¾ cup sour curd, about 150 grams (dairy or vegan curd)
- 2.25 cups water, to be mixed with the curd (alternatively you can also use 3 cups sour buttermilk or chaas)
- 1 teaspoon ginger + green chili paste, about ½ inch ginger & 1 green chili crushed in a mortar-pestle
- ¼ teaspoon turmeric powder
- ⅔ teaspoon salt or add as required
- 1 pinch asafoetida (hing)
for the filling
- 2 tablespoons fresh grated coconut
- 2 tablespoons chopped coriander leaves
for the khandvi tempering/seasoning
- 1 tablespoon oil
- 8 to 10 curry leaves
- 1 teaspoon mustard seeds
- 2 teaspoons white sesame seeds
- 1 teaspoon green chili , chopped or ½ red chilli powder
Instructions
making khandvi batter
- Take the yogurt in a bowl. Add water and stir well till smooth.
- Add ginger-green chili paste, turmeric powder, asafoetida and salt.
- If using fresh yogurt, then to add the sourness, add about ½ tsp of lemon juice.
- Add the gram flour/besan. With a wired whisk, keep on stirring and mixing till all the lumps are dissolved and you get a smooth batter. There should be no lumps in the batter. You can also use a hand held beater to mix the batter.
- Spread oil on plates or boards or tray. Large steel lids or thalis work very well. You can also use the back of a large baking tray or your kitchen counter top.
- Also mix the chopped coriander leaves and grated coconut. Keep aside.
- Pour the batter in a sauce pan or a broad frying pan. Switch on the stove top and keep the flame to the lowest. Begin to stir.
- Keep on stirring when the khandvi batter is getting heated up. Lumps begin to form and you have to continuously stir so that the lumps don’t form.
- The batter would thicken and keep on thickening. Keep on stirring. Best to use a wooden spatula or a heat proof silicon spatula.
- The batter also should not be allowed to stick at the bottom. So you have to stir continuously.
- Do a plate test when the batter has thickened well.
- Spread a few teaspoons of the batter on a greased plate. Let it cool a bit and then begin to roll. If you are unable to roll, then the batter needs to be cooked more.
- The final consistency of the khandvi batter is shown in pic 17 below. It took me 17 minutes to get the correct consistency on a low flame. The timing will vary depending on the intensity of the flame, the thickness/thinness of the pan and the size of the pan. Just do the plate test and when you can form the rolls, then the khandvi batter is ready. If the batter becomes too thick, then it becomes difficult to spread and you don’t get thin layers in the rolls. In this case, still spread the batter. You will get thick slices, but still they taste good.
making khandvi rolls
- Quickly pour about ½ to ⅔ cup of batter on a large plate and spread thinly & evenly with a spatula. You have to be quick with the remaining batter too. Since even a bit of cooling and the batter becomes likes blob, difficult to spread.
- Allow to cool and then sprinkle the coconut + coriander leaves mixture sparingly. You can also skip this stuffing part and directly garnish with the coconut and coriander once you temper the khandvi rolls.
- Cut into equal sized strips.
- Gently roll each strip tightly. Then place them in a serving tray or plate.if the tray or plate is large, then you will get large rolls. In this case after you finish rolling half, just cut horizontally and make a second roll.
- Arrange the khandvi rolls next to each other or stack them up neatly in a plate or tray.
tempering (seasoning) for khandvi
- Heat oil and crackle the mustard seeds.
- Then add curry leaves, green chilies and fry for a few seconds.
- Add the sesame seeds and when they change color & crackle, pour the hot tempering mixture along with the oil on the khandvi rolls evenly.
- You can garnish it with some more coconut and coriander leaves, if you prefer. Serve khandvi with coriander chutney or coriander mint chutney.
This Khandvi Recipe post from the archives first published in July 2014 has been updated and republished on December 2022.
Perfect recipe…I was able to get it right in my first attempt
Super and thanks for the lovely feedback.
Hi Dassana, tried this recipe and it came out extremely well. Thank you so much because of you i got lots of compliments. I have just one query that when we eat Khandvi from outside it’s always has some sweetness like dhokla. I also want that taste so what should I do for that, kindly help me and Thank you once again. May your fame and flavours spread day by day.
Regards.
Thanks a lot Richa for sharing this feedback. To get that taste, just add some sugar in the batter. So you can add about 2 to 3 teaspoons sugar. Thanks for your kind wishes. I also wish you all the best in your future endeavors.
First time I made and there where yummi!
thanks.
Hi Dassana!i’m sharing a small tip with u & the readers.add 1 tblsp of oil after stage 19,mix it well & then spread the mixture.adding oil gives a tiny bit of more time to spread & further increases it’s smoothness.
For the batter I also add 1 tblsp of wheat flour,juice of 1/2 lemon,3/4 cup of yogurt & 2 cups of water while the rest of the ingredients remain same
thanks a lot meveera for these suggestions. yes it will surely help the readers. thanks again.
your recipe is spot on!! The details on how to check if the batter is ready helped a lot. I have tried to make this dish a couple of times in the past and never got it right, but your recipe worked beautifully when I tried it. Thanks very much
thanks a lot sharmila. nice to know that the details helped you. happy cooking.
Hi dassana ..
I love trying new recipes from all cusine. Everytime I google something I find your blog 80% of the times & I somehow end up trying your recipe among all the search results.
Tried the khandvi yesterday & it came out really well. The only issue was I couldn’t spread the batter evenly & make it thin before it cooled 🙁
thanks kiran for this lovely feedback. glad to know that the khandvi recipe turned out good. the batter has to be hot, when you spread it. a tip is to keep the batter pan in a bowl of hot water, when you are spreading the batter in parts. the hot water won’t allow the batter to thicken. hope this helps.
Your step by step preparation with images helps a lot..one of my fav dish..tried it today..tasted awesome ????..thankyou very much.
Welcome Navi. Nice to know this. Thanks for sharing positive feedback on khandvi recipe.
This was the easiest step by step recipe for Kandwi. The taste was awesome. Will.never use another version again as this was excellent and yummy plus plus
Thanks Fawzia for sharing positive feedback on khandvi recipe. Glad to know that you liked it so much.
For how many days this khandvi longs ?
Khushhroo, for 1-2 days.
As always your recipe is a success. Even though I’m Gujarati we never had khandvi in our household. Now I am trying and making things on my own and your website always offers the best recipes.
If you ever publish a cookbook, I will purchase it without hesitation.
Thanks for always providing fool proof recipes that beginners, intermediate and advanced cooks can enjoy.
Welcome Jenny. Glad to read your awesome feedback. Thanks for your kind and positive words.
Hello ma’am,
My name is Janvi Purohit. I’m 16 yrs old and live with my family in Mangalore,Karnataka. I love cooking. Cooking is my passion, it makes me feel happy and I feel that the kitchen is the only place where I can be myself and truly enjoy. I really like your recipes and they are simple yet innovative. I aspire to become a chef myself when I grow up. And I just wanted to say thank you for sharing your thoughts and ideas.
Thank You 🙂
Well wishes to you and your family.
Welcome Janvi. Glad to know this. Do pursue your passion. As for a career, there is nothing better than following your passion or doing something which you love.
My favourite site. I tried khandvi today.awesome! Well done guys
thanks jyoti for your positive feedback.
My mom used to make this often for an evening snack often and I remember helping her with the cutting and rolling..
I was missing it from a long time…:( Thanks for posting the step by step recipe with pictures. I tried it and it came out well. I tried to do the inner stuffing as you said but it was getting difficult to roll so skipped it. Otherwise, I was very happy with my Khandvis..:)
thanks shubs. glad that the step by step pictures helped you in preparing khandvi. with the stuffing it does take some practice. but without the stuffing also, the khandvi tastes equally good.
sir can you give the recipe for cutlets coated in semolina which we get in market
heena, recipe is here – https://www.vegrecipesofindia.com/vegetable-cutlet-easy-veg-cutlet-recipe/
in the above recipe i have used breadcrumbs, but you can use sooji/semolina to coat the cutlets.
good, very good
thanks heena 🙂 for positive views.
i followed your recipe exactly but it turned out as a huge disaster
the besan is not cooked
the batter isnt rolling after cooking it for about 20-25 mins
nothing is going right
which type of besan you used. something has gone wrong in the cooking process. try cooking for some more minutes.
Thank you for the detailed recipe. Khandvi came out very well 🙂
nice to know bindu. welcome 🙂
Great recipe, thank you!. I’ve tried it twice and whilst the taste and look was perfect but how do you spread this thin? ….rolls came out a bit thick….
one has to be quick enough while spreading. the mixture has to be hot when spreading. if it cools, then it becomes difficult. use a butter knife or thin spatula to spread the khandvi mixture.
Awesome recipe…really turned out well… Thanks for such yummy recipes.
welcome deepshikha
so nice receipe
thankyou asha 🙂
Would you recommend freezing Khandvi, and how would I reheat?
i would not recommend freezing. but you can refrigerate. let them come to room temperature before reheating. for reheating in a pan, add hot boiling water in a pan. place a steamer and then place the khandvi on the steamer. close with a a lid and just steam for some seconds. if using a microwave, then sprinkle some water and microwave for some seconds.
wonderful!!
thankyou so much mehak 🙂
Awsome recipe!! loved it. bhot acha bana aur tasty tha.
thank u sooo much for this beautiful recipe…..
thankyou so much for your positive and kind words ansh glad you liked the khandvi recipe 🙂
I tried the receipe, it was tasty and delicious. Your recipe are too good.
thanks sumit for the feedback.
very cleanly and nicely explained hope that it will come out well
i will try and tell
thankyou so much mahalakshmi 🙂 glad you liked the khandvi recipe. surely try and keep us posted.
Excellent recipe..I had tried making Khandvi once before and it turned out to be a disaster but this time referred your recipe and it was successful.my husband loves Khandvi and I made him feel proud..thank u so much 🙂
pleased to know this renu thankyou so much and you are always welcome 🙂
These were amazing! I ate khandvi for the first time a few days back in a gujarati chaat shop and thought i’ll give it a try.. I followed exact measurements and they were just perfect! Thanks dassana.. 🙂
pleased to know this madhu 🙂 and thankyou.
Hello Dassana ji, I tried your recipe and it was very delicious. Its the first time I tried something cooking from net and it was a wonderful experience. The way you post your recipes with pictures is great and it helps a lot while cooking. Thanks 🙂
welcome anjali. glad to know this. thanks for sharing positive feedback and your experience.
Hey ! Thanks a lot for the detailed step by step recipe ! 🙂 This was the first time I made khandvi rolls… and yes…they were Perfect ! Simply Awesome 🙂 Thanks a lot 🙂
welcome sonal. glad to know this.
Hi dassana, I have try ur khandvi receipe. It’s taste was awsm. Thanks for detailed explanation. Will love to see new receipe in future
welcome reshu. glad to know this.
gmng dasanna, it’s me again. I have always been wanting to try out Khandvi, but so scared that I may not get the correct consistency. After going through your detailed recipe and your note in the beginning I am tempted to try the same in a day or two. I have a friend staying with me and she is equally keen. So there is some interest to push me ahead. Since my dil in US has a plan to come to India, I shall try both varieties and get back to you as my usual self. Do let me know if you need anything typically South , and I can surely send to you. God bless you. DK
thanks durga ji for your kind gesture. right now i do get many things from south where we live. in fact my mother just visited chennai and kerala and she will also get many things for me from there. so i don’t want to trouble you. for khandvi, test the consistency before you start spreading the batter. once you can easily form the rolls, that the right time to stop cooking. you can try both the varieties 🙂 even if they do not come out thinly layered, then tool they taste good especially when one gets thick layers 🙂
I really loved the way u explained surely I’ll try it
thanks manju
Awesome, I was searching for this recipe, thank u
welcome rabeela
I love your detailed explanation. I will definitely try this out. Thanks n keep up the good work!!
welcome sharon
This recipe is really awesome! Try it.thank u
welcome ruksar
welcome mini. i have never tried. so can’t say.
Hi there! I tried your recipe for rawa dhokla and khandavi today. They turned out really well. Taste was excellent. Thank you for the simple steps,especially the images, which helped me a lot. I had some trouble spreading khandvi mixture. If you have any tips for that let me know.
welcome archana. thanks for sharing positive review on rava dhokla and khandvi. it has to be spread very quickly. otherwise it thickens on cooling and becomes difficult to spread.
its reallyyyyyyy simple and attractive too …. ill make it soon
thanks susmita
Thank you very much. Tried it a couple of times before unsuccessfully. This recipe worked like a charm and was enjoyed by the family. Took about 25 mins from the beginning to end.
welcome ram. good to know this. thanks for sharing your experience and positive feedback on khandvi.
Hello! I have always been interested in food, mostly the eating part! (Who isn’t?) But recently I have also begun to learn to cook, having come across some really great food blogs. Your’s is really the helpful one. I was searching for the Khadavi recipe on Google today. ( Because 3 days of curd had gathered in my refrigerator!) The first site I went to wasn’t really helpful and it didn’t make me feel confident, for I knew that Khandavi can be tricky to make. Then I stumbled on your blog. Just looking at the step by step pictures and the instructions I felt confident. The best part was the instructions 14 & 15. But for this, I could have easily goofed up. And I made perfect Khandavi in the first try, no lumps and effortlessly rolled. Everybody liked it. Even my wife was pleasantly surprised!For a novice like me, this was unexpected and the credit goes to you. Your understanding where a novice can go wrong and making an effort to incorporate remedial measure deserves full praise. So kudos to you and thank you very much.
welcome bharat. reading your positive comment makes me feel that all the effort in adding this recipe post was worth it. for the first time you have done a good job. because as you said it correctly, making khandvi is tricky. it looks like you have a knack of cooking recipes. develop this art in you. cooking is creative as well as therapeutic.
Yes, it can be very creative and healing too. Because one does it not for oneself but others too and sharing can be healing. I think this is what drives you in making so much effort. Thanks again.
agree so much. true 🙂
Hi Dassana. I love u’r recipes. I tried making Khandvi. Half the strips rolled pretty easily but the other half just broke. Where do u think I went wrong??? I followed u’r instructions word to word. My family loves Khandvi & I would love to make such beautiful dishes like u do. Thanx so much. 🙂
welcome aparna. did you make a thick layer? thick layer will break. it has to be thinly spread. also what happens is that the mixture should be hot when you spread it. if the mixture becomes warm then it thickens more and you will not be able to spread it thinly and evenly. so keep everything ready and one has to be very quick in spreading khandvi batter.
Yeah u r probably right. I got confused as to when I should stop the cooking and start spreading. I will try again. Thanx though. U’r recipes r great!!! 🙂
welcome aparna. thanks for positive feedback.
The recipe is great; will try it very soon. Just one thing. I think that besan should not be put into the whole liquid. Rather it should be first mixed thoroughly in a little liquid so that there is no lump formation and then that thick batter be mixed with the remaining buttermilk.
do try sushil. if the besan is added in parts then no issues. whether you mix with little or more liquid, still there will be lumps. so i feel its the same amount of work this way or that way 🙂
🙂
Awesome recipe
I really want to try this recipe soon and surprise my family.
I love the detailed recipe and pictures, you make it look so easy.
Thank you for your lovely recipes x
welcome raj. yes, do make it for your family.
hi dassana,im at a learning stage of cooking, thank u for such a detail recipe, i had tried khandvi once,now i know wat went wrong…looking forward to more of your recipes,thanx again
welcome priyanka. nice to know that the blog is helping you. i hope now you can make and enjoy khandvi at home.
Love it.. Thanks for the detailed recipe, want to try it soon..
thanks and welcome anu.
Hi dassana,
I tried paneer tikka pizza and veg pizza and both were just awesome.I stay in tokyo and m a veg so finding good veg Indian food is very difficult here,your recipes are just making my life easy and now I can make tasty food.thanks to you dear.
I have query regarding khandvi.like can I make it a day before and serve on next day?
Hey dassana is it possible to see ur photo?
hi vasanti, thanks for the feedback. i can understand how difficult it is finding good vegetarian indian home cooked food. you can make the khandvi a day before and refrigerate it. either you temper the next day or day before.
Wow..this is one my fav gujarati snack..always like ur recipes..i love the way you present ur recipe with step by step process.
welcome jolly and thanks for the positive feedback.
Perfectly done….you have made it look easy though its tricky to get the perfect texture to roll…Lovely clicks too!
Lovely…. this is my favourite recipe. I like ur all reciepes…. Thanks for this post.
welcome shalini
Can pls post the recipes of veg franky and dal bati…
suvidha, i have a aloo tikki wrap coming up. i have got request for both veg franky and dal bati. i will update these recipes in the coming months.
I think i will try this today, i have also wanted to make khandvi but never made , ur post inspiring me to give it a try ! awesome pics ! We used to eat raw papaya bhaji alongwith khandvi and coriander chutney 🙂 it tastes great with khandvi
thanks tapaswini. its a kind of grated papaya chutney/salad. even i have had it with khandvi. but raw papaya is not easily available.
What a lovely presentation and step by step tutorials. Its always my mother in law who makes this at home. May be I can surprise her one day with your recipe 😉
I was looking for ur khandvi recipe…Thanks for this post…
welcome anjali
Hey i like ur recipe vvvvvv much pls post daliy its beautiful way to give recipe like step wise is like tht method most
thanks karishma. glad to know.
I tried this receipe today and it came out great. Thanks for a detailed info.
welcome deepa, thanks for positive views 🙂