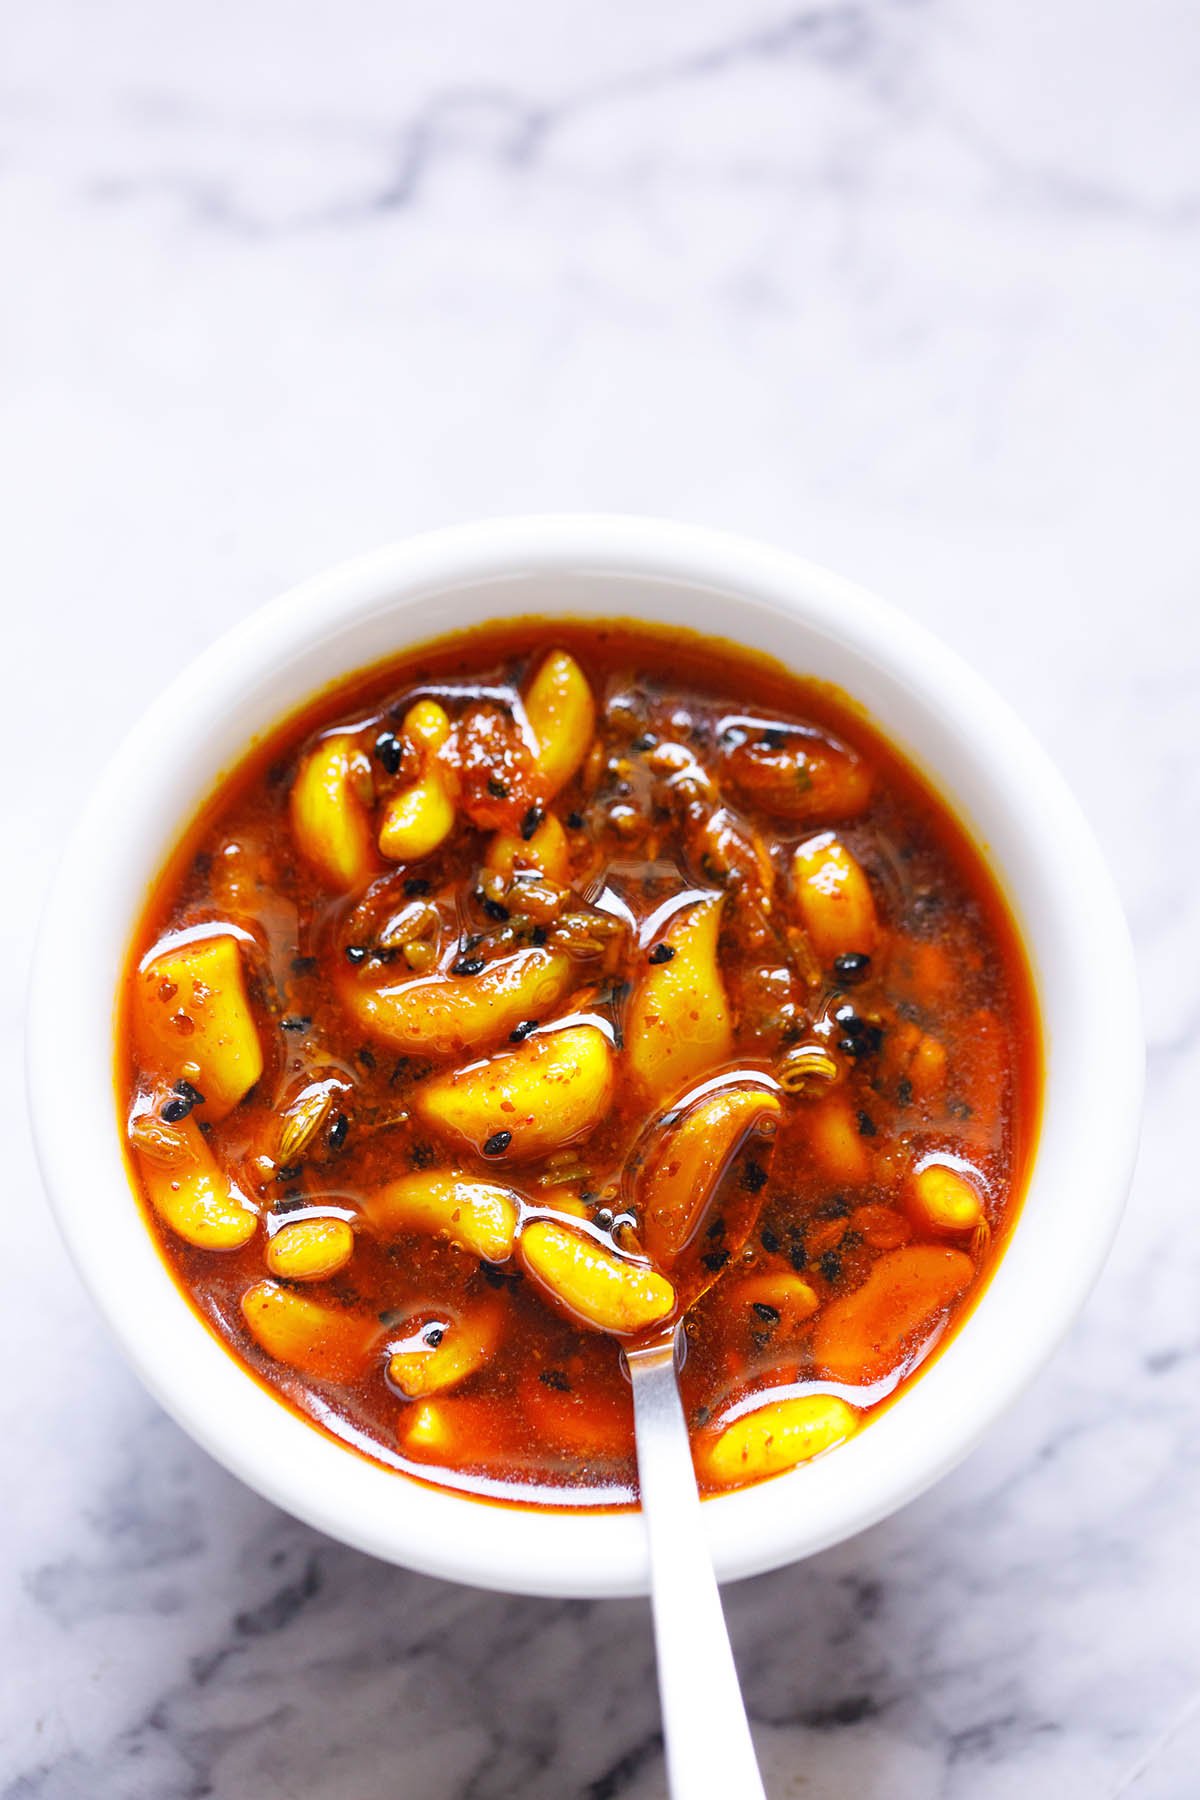
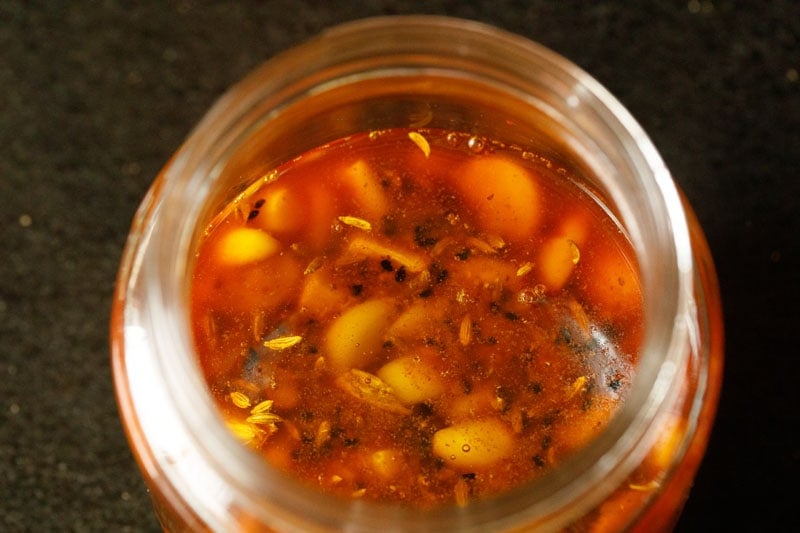
Garlic Pickle Recipe (Lahsun ka Achar)
This North Indian Punjabi style Garlic Pickle known as Lahsun ka Achar is an heirloom family recipe. It has a delightful flavor that hits every note: spiced, salty, sour & sweet. Make a small batch of this yummy pickled garlic and serve with any Indian meal for a burst of flavor and complexity.
Lashun ka Achar!
The word achaar (also sometimes spelled “achar” or “aachar”) simply means Indian pickle. The word lahsun means garlic and as simple as it gets, Lahsun ka Achar is garlic pickle.
While there are hundreds (if not more) different kinds of Indian Pickles, including the internationally popular Mango Pickle (Aam ka Achar), this garlic pickle recipe is near and dear to my heart.
Unlike European style pickles that are traditionally packed in vinegary brines, most Indian pickles are preserved in oil.
South Indian pickles usually relies on sesame oil for pickling, whereas this North Indian Punjabi-style achaar uses my favorite mustard oil, which imparts delicious flavor to the pickled garlic cloves and is also anti-microbial.
Considered part of a complete Indian meal, some form of achaar is often present on any lunch or dinner plate. In fact, some people believe that their meal isn’t complete without something pickled!
While this recipe for garlic pickle does take a bit of time for the flavors to develop, the process of making the achaar is actually quite simple.
Just be sure to allow the garlic cloves to marinate in the pickling liquid for a minimum of 2 to 3 days for the best flavor. As they say, patience is a virtue!!!
Why This Recipe Works
The pungent flavor of mustard oil unites with the flavors of fennel, nigella seeds and spicy red chiles. When paired with partially cooked fried garlic, the result is so good. When I have some on hand, I serve this lahsun ka achar with every meal!
Frying garlic partly cooks it, which helps to ensure that there aren’t any spores or bacteria during the pickling process that can later spoil the batch.
The process of cooking the garlic in oil also helps to mellow the pungency of the cloves, resulting in a mellow, almost sweet taste.
My achaar recipe also calls for adding vinegar. This not only gives a nice sour taste to the garlic pickle, but also increases the shelf life.
You do not want to risk any possible causes for botulism occurring in the pickle, and increasing the acidity of the environment is one way of preventing the growth of bacteria.
Mustard oil, salt and turmeric powder also have anti-fungal and anti-bacterial properties that help in preserving the pickle.

How to Make Garlic Pickle
Prep Garlic
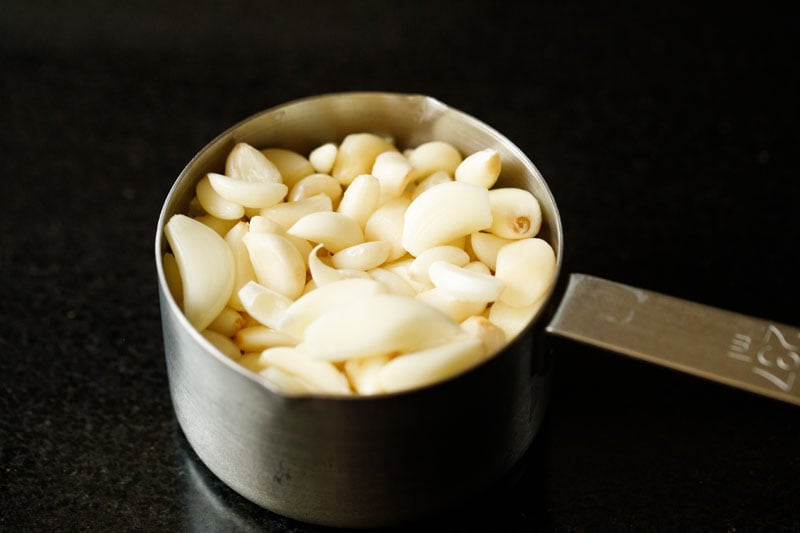
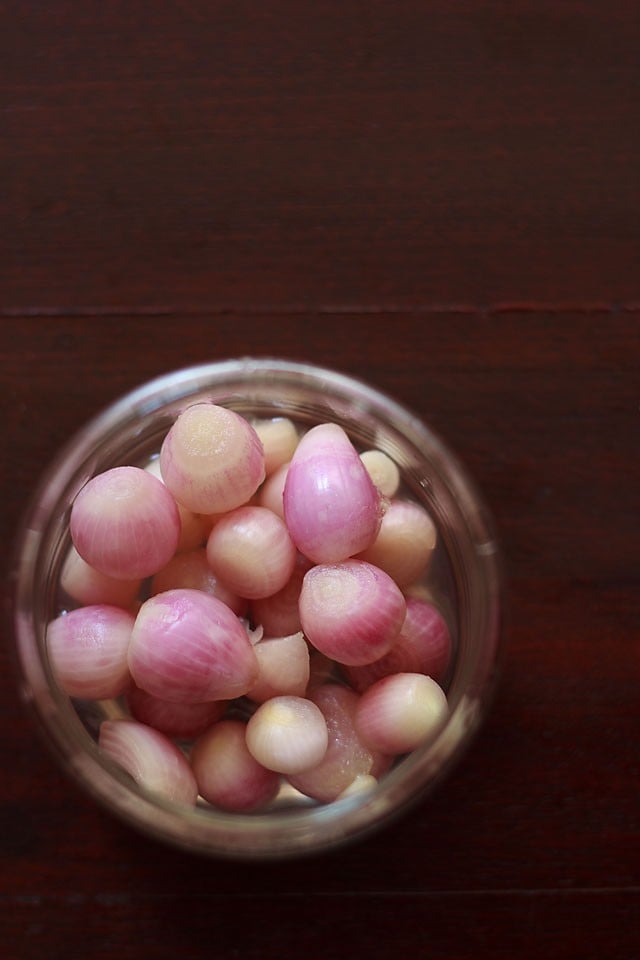
1. Peel about 1 cup of garlic, approximately 3 to 4 heads worth.
Tip: I learned this from my mother in law! Separate garlic cloves from the heads. Measure in a cup. Add them to a bowl of hot water. Cover and soak for 30 minutes. Drain and peel garlic. The skins come off easily after soaking!
Rinse thoroughly in water again. Drain all water. Spread on a plate. Let dry naturally or wipe dry with clean kitchen towel. Note that the garlic has to be completely dry before you begin with the recipe. Any moisture on the garlic will spoil the pickle.
If the garlic cloves are large, chop them in half, otherwise you can keep them whole. I used Indian garlic, which tends to be smaller than Chinese garlic.
Ensure that your use the garlic cloves which do not have any fungal spots on them and are clean, shiny to look at. Slice and discard of the parts which have any brown spots or marks.
Throw away the garlic cloves where you can see a layer of fungi or where the cloves have become powdery.
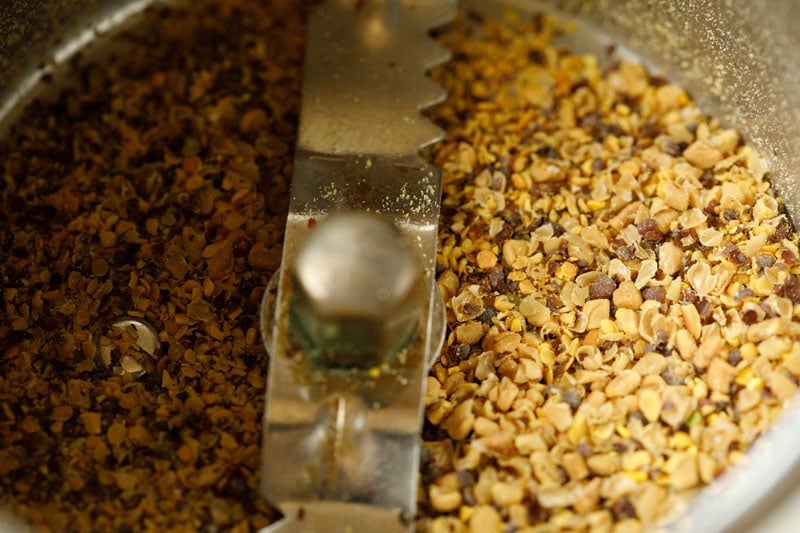
Coarsely Powder Mustard & Fenugreek
2. In a smaller mixer or spice grinder take 1 teaspoon mustard seeds (black or yellow) and 1 teaspoon fenugreek seeds.
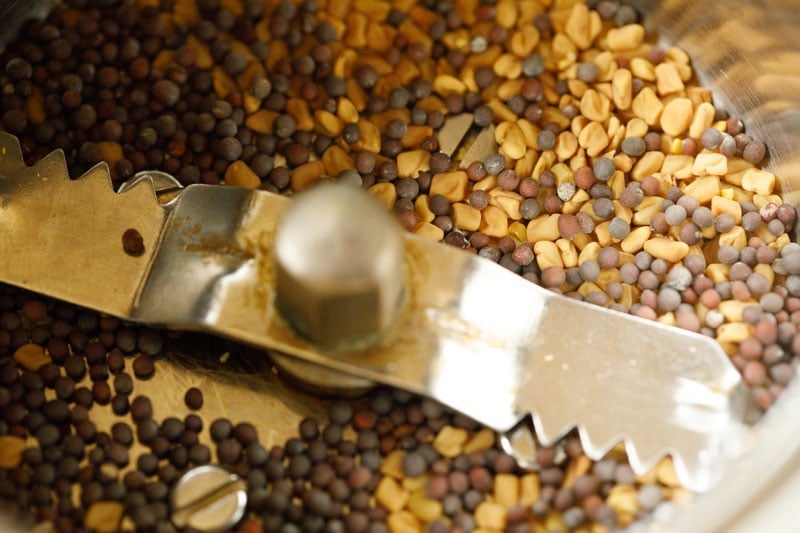
3. Crush the seeds to a coarse or semi-fine mixture. Do not make a fine powder. Set aside.
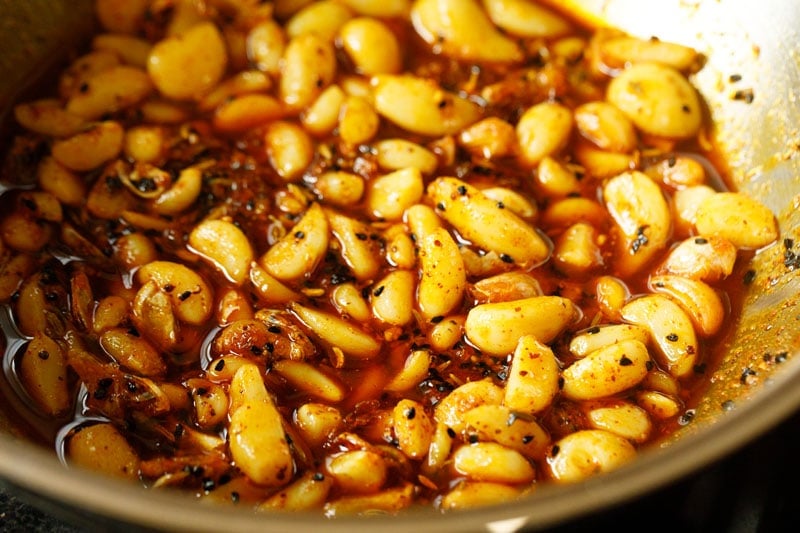
Fry Garlic
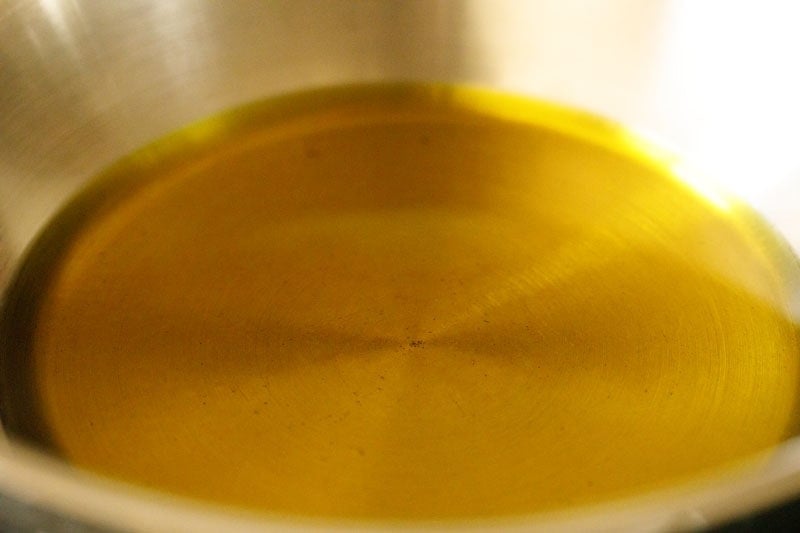
4. Once the garlic cloves have dried well, we move on to second step. Heat ¼ cup mustard oil in a frying pan or skillet on medium heat.
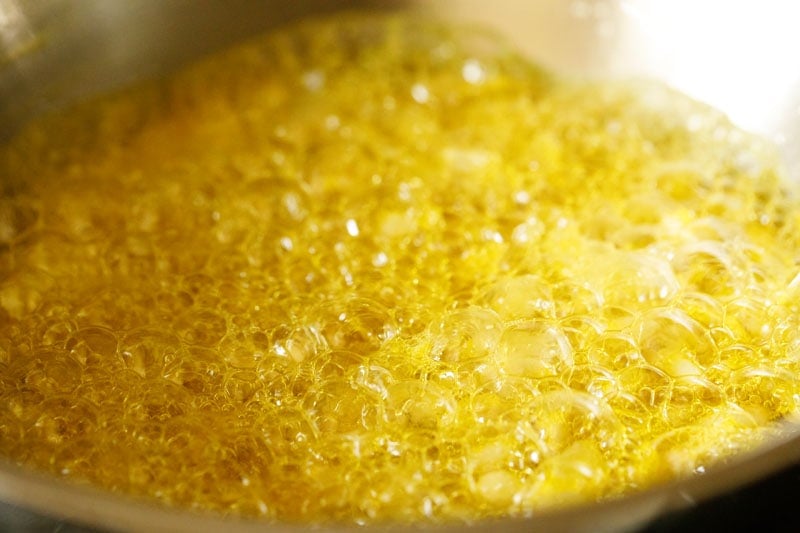
5. When oil is medium-hot, reduce the heat to lowest setting. Add 1 cup of the garlic cloves.

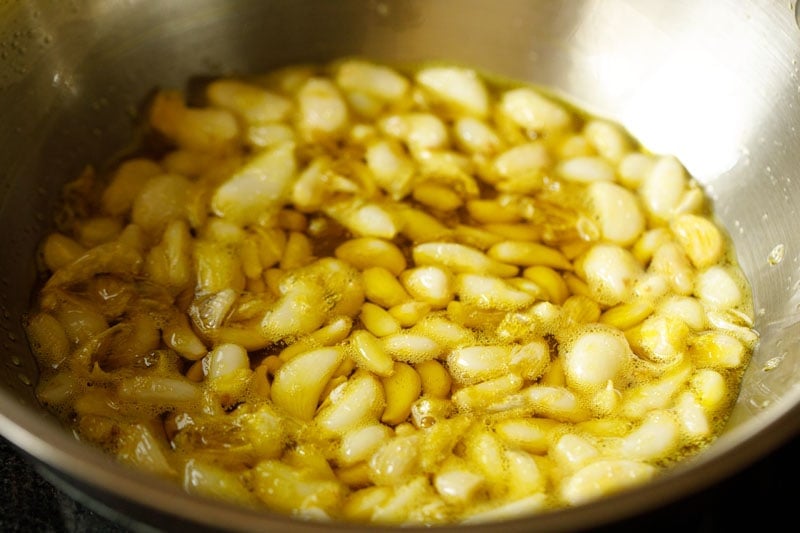
6. Stir, mix and fry them in the oil for 3 to 4 minutes or until pale golden. Do not brown garlic, as the cloves become dense and chewy when pickled. They should only be partially cooked.
7. Place pan on countertop. The oil will stop sizzling gradually.
Mix in Spices and Seasonings
8. First add the coarsely ground mustard seeds and fenugreek seeds. Add 2 teaspoons fennel seeds and 2 teaspoons nigella seeds (kalonji).
Note that the oil will be hot when you add the ground spices and seasonings.
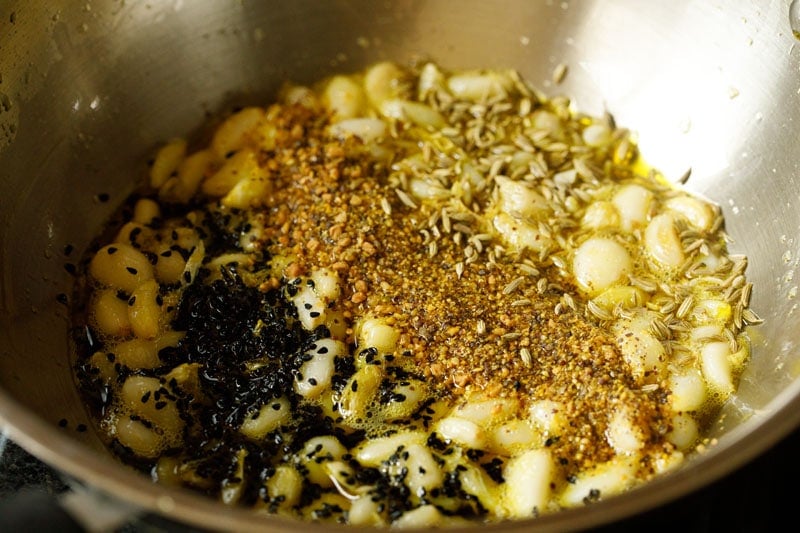
9. Then add the ½ teaspoon turmeric powder, ⅛ teaspoon asafoetida (hing), 2 teaspoons Kashmiri red chili powder and 2 teaspoons of edible food grade rock salt.
Tip: If using red chili powder or cayenne start by adding 1 – 1.5 teaspoons as it can make for a spicy pickle. Instead of Kashmiri red chili powder, you can also use sweet paprika.
For the salt, start with 1 teaspoon. Mix well and check taste. If needed, add ½ to 1 teaspoon more salt.
Tip: If using regular white salt, you will need to add less – about 1 to 1.5 teaspoons total.
NOTE: Asafoetida is optional, though adding it prevents the pickle from getting spoiled. That said, most brands of commercially available hing are processed with wheat flour and should be avoided if you are gluten free. If you still want to add the asafoetida, be sure that the brand you choose is certified gluten free.
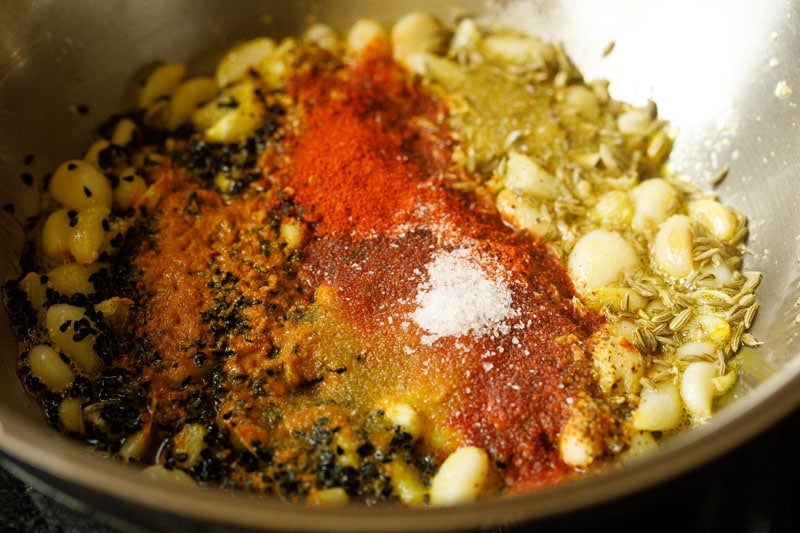
9. Mix and combine very well.
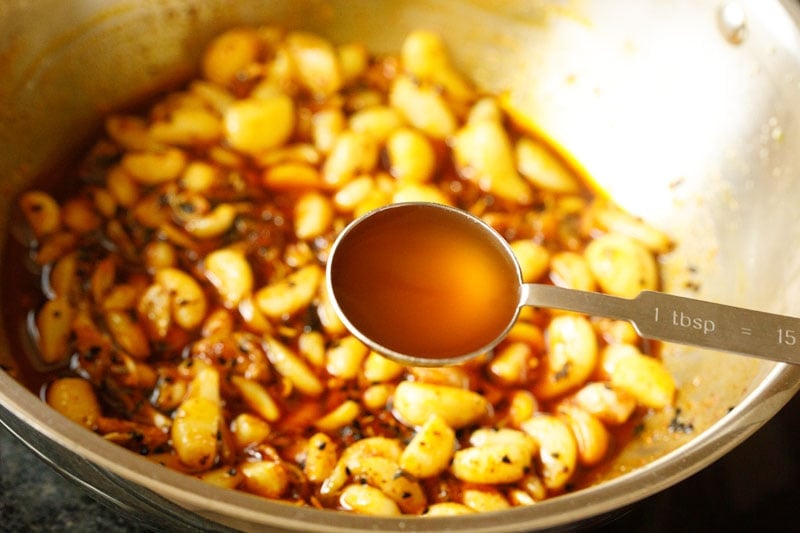
10. Add 2 tablespoons apple cider vinegar or white vinegar. Mix well. Check taste and, if needed, add more salt or red chili powder.
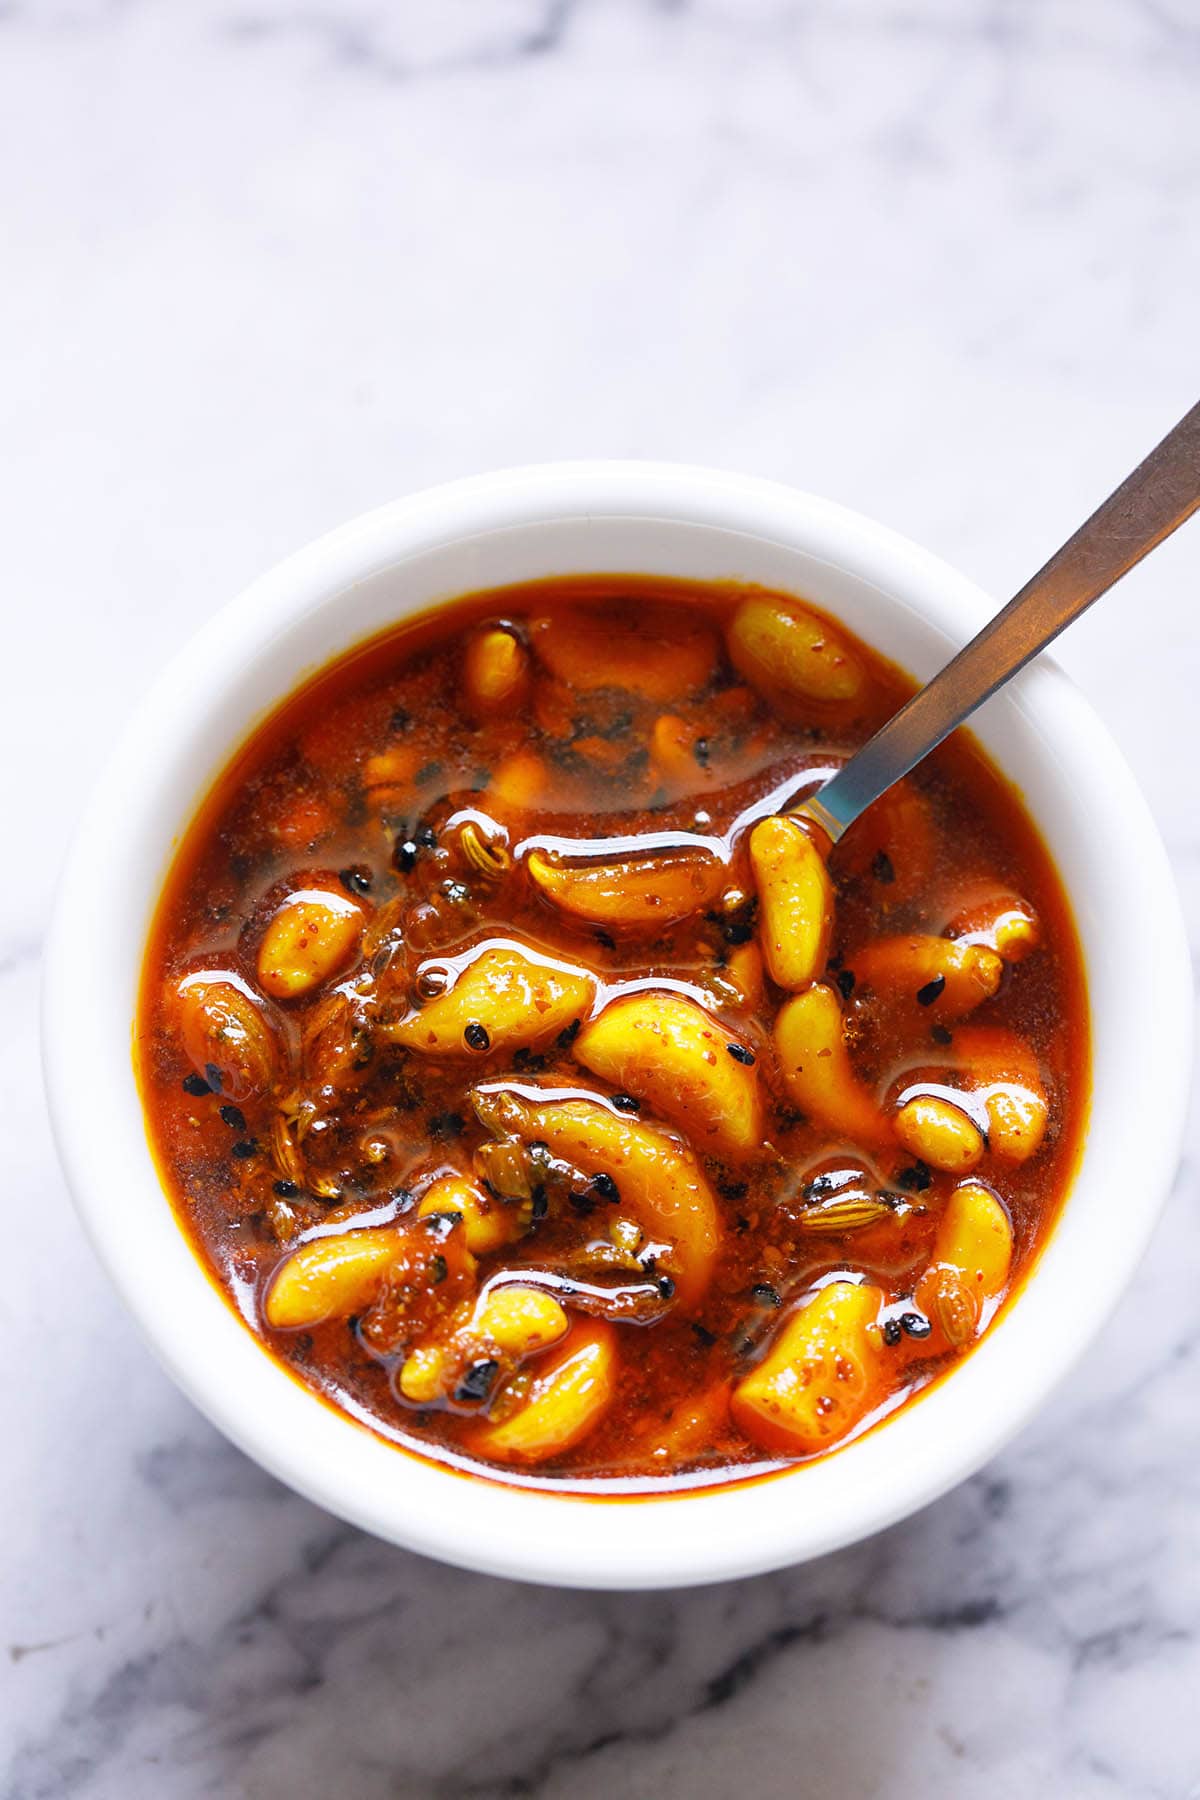
Pickling Garlic
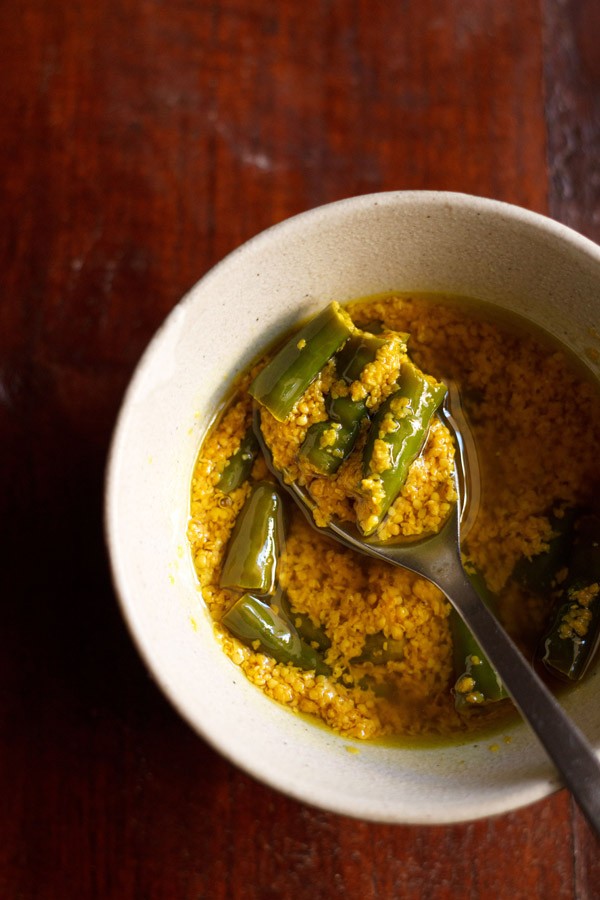
11. Transfer pickle to a clean, dry, sterilized glass or ceramic jar. NOTE: This is very important! Do not invite food borne illness into your achaar by skipping this step.
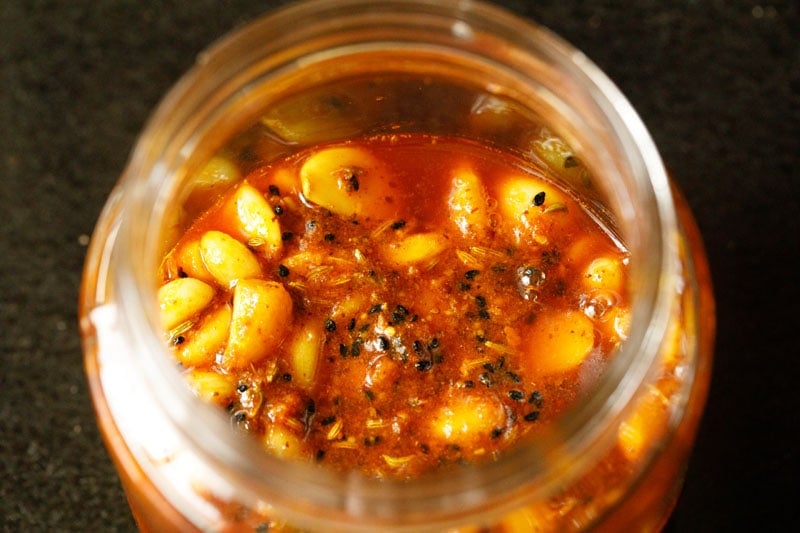
12. Lastly, cover the top layer of pickle with 3 tablespoons mustard oil. The oil should be at room temperature.
13. Tightly cover garlic pickle with lid and place in sunlight for 2 to 3 days. I keep the jar on a window sill which gets plenty of sunlight. Lightly shake the jar everyday without opening the lid.
If you do not get sunlight, place it in a dry place in your kitchen, though the flavor will not be as intense as the sunlight steeped achar.

Storage
After the pickling process is over, place the jar in a dark, dry place. At room temperature, this garlic pickle or lahsun ka achar stays good for about 2 weeks.
If you have any pickle remaining after 2 weeks, refrigerate it. Or you could keep it in the refrigerator all the time. It stays good in the refrigerated for about a month.
If the top oil layer is removed as you eat the pickles, add 1 to 2 tablespoons of mustard oil again to cover the top layer. This will prevent the cloves from coming into contact with air and spoiling.
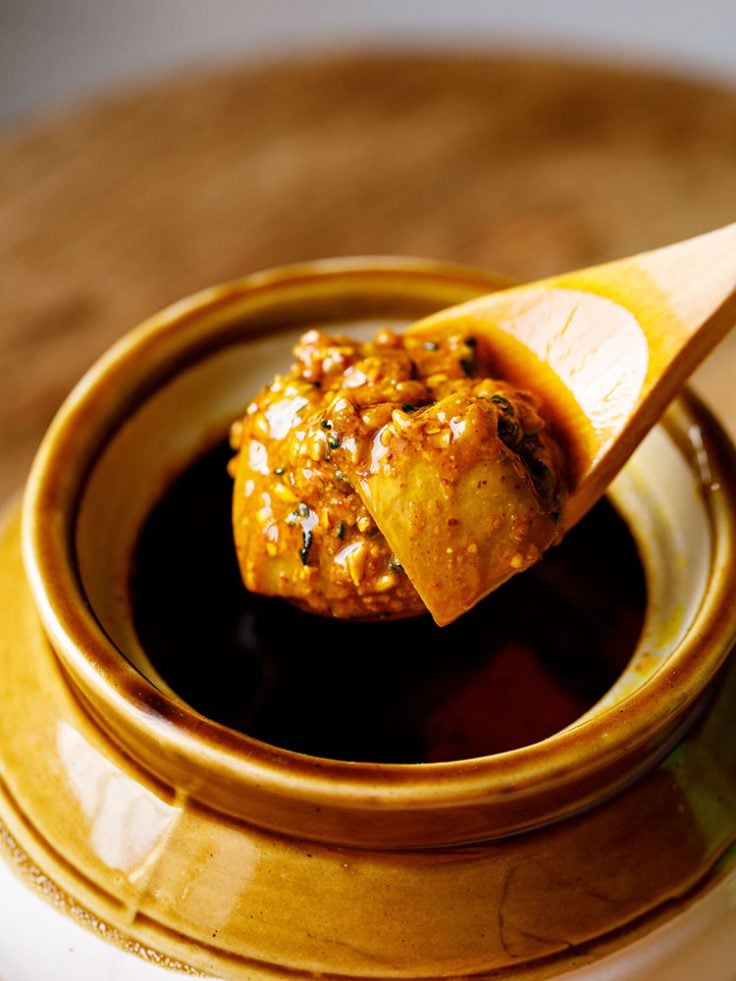
Serving Suggestions
Remove the pickle with a clean dry spoon every time. Do not add water logged spoon into the pickle.
Serve about ½ to 1 teapoon of the lahsun ka achar with any Indian main course meal for one. This pickle tastes good with any Indian lunch or dinner be it North, South, East or Western Indian.
We love it with a simple Khichdi, Dal Fry served with basmati rice, Sambar and rice, or Pulao. I also like to have it with Paratha, Lachha Paratha or Aloo Paratha and Gobi Paratha.
Expert Tips
- Peel garlic well. While peeling, slice of the parts which have any brown spots. Rinse peeled garlic very well in water. The garlic has to be completely dry before you begin with the recipe. Any moisture on the garlic will spoil the pickle.
- Use fresh spices. Make sure all your spices are fresh and not rancid or stale.
- Use the right kind of salt. Sea salt, pink salt, edible rock salt or kosher salt will all work in the recipe.
- Use the right kind of vinegar. Apple cider vinegar, white vinegar and brown vinegar work well in the recipe.
- Scale your recipe as needed. This recipe can easily be made larger or smaller depending on your needs.
- Use the right oil. Although traditionally this punjabi garlic pickle is made with mustard oil, if you do not have it due to availability, use any neutral flavored edible oil like sunflower oil or grape seed oil. In a pinch include peanut oil as a substitute.
FAQs
How long will garlic pickle last?
I recommend that you eat your pickled garlic within 2 weeks, or transfer them to the refrigerator for a longer shelf life. Remember that the cloves should always be covered with oil to prevent spoilage. If the jar lid is bulging or the achaar smells “off” in any way, please discard the remainder for safety reasons.
Is achaar good for health?
While I always recommend that you consult with a health care practitioner to decide which diet is best for your needs, pickles are a very common condiment in Indian cuisine and are often eaten with every meal.
Pickles are high in sodium and oil, which can have detrimental health effects if eaten in large quantities, but they are also considered good for your gut. I recommend eating achaar of any type in small quantities so that you can still enjoy them with every meal.
How do you eat achaar?
Traditionally speaking, small bites of pickle are taken with each bite of Indian food. I recommend serving about a teaspoon or so of garlic pickle with your meal – that should be enough to get a little bit in every bite!
More Pickle Recipes To Make
Step by Step Photo Guide Above
Garlic Pickle
Ingredients
- ¼ cup mustard oil
- 1 cup peeled garlic cloves – 130 grams
- 1 teaspoon mustard seeds – black or yellow
- 1 teaspoon fenugreek seeds
- 2 teaspoon fennel seeds
- 2 teaspoons nigella seeds (kalonji)
- ½ teaspoon turmeric powder (ground turmeric)
- ⅛ teaspoon asafoetida (hing) or about 2 to 3 pinches – optional
- 2 teaspoons kashmiri chilli powder
- 2 teaspoons rock salt (food grade, edible) or pink salt or white salt – add as needed
- 2 tablespoons apple cider vinegar or white vinegar
- 3 tablespoons mustard oil at room temperature, added later to cover the pickle
Instructions
Prep Garlic
- Peel about 1 cup of garlic, approximately 3 to 4 heads worth.
- TIP: For easy peeling, separate garlic cloves from the heads. Measure in a cup. Add them to a bowl of hot water. Cover and soak for 30 minutes. Drain and peel garlic. The skins come off easily after soaking! Rinse thoroughly in water again. Drain all water. Spread on a plate. Let dry naturally or wipe dry with clean kitchen towel.
- Note that the garlic has to be completely dry before you begin with the recipe. Any moisture on the garlic will spoil the pickle.
- If the garlic cloves are large, chop them in half, otherwise you can keep them whole.
- Ensure that your use the garlic cloves which do not have any fungal spots on them and are clean, shiny to look at. Slice and discard of the parts which have any brown spots or marks.
- Throw away the garlic cloves where you can see a layer of fungi or where the cloves have become powdery.
Coarsely Powder Spices
- In a smaller mixer or spice grinder take the mustard seeds (black or yellow) and fenugreek seeds.
- Crush the seeds to a coarse or semi-fine mixture. Do not make a fine powder. Set aside.
Fry Garlic
- Once you are sure the garlic is well dried, heat mustard oil in a frying pan or skillet on medium heat.
- When oil is medium-hot, reduce the heat to lowest setting. Add the peeled and dried garlic cloves.
- Stir, mix and fry them in the oil for 3 to 4 minutes or until pale golden. Do not brown garlic, as the cloves become dense and chewy when pickled. They should only be partially cooked.
- Place pan on countertop. The oil will stop sizzling gradually.
Add Spices and Salt
- First add the coarsely ground mustard seeds and fenugreek seeds. Add fennel seeds and nigella seeds (kalonji).
- Then add the turmeric powder, asafoetida (hing), Kashmiri red chili powder and edible food grade rock salt or pink salt. TIP: If using red chili powder or cayenne start by adding 1 to 1.5 teaspoons as it can make for a spicy pickle. Instead of Kashmiri red chili powder, you can also use sweet paprika.
- For the salt, start with 1 teaspoon. Mix well and check taste. If needed, add ½ to 1 teaspoon more salt. TIP: If using regular white salt, you will need to add less – about 1 to 1.5 teaspoons total.
- Asafoetida is optional and you could skip adding. Check the notes section below for more info.
- Mix and combine very well.
- Add 2 tablespoons apple cider vinegar or white vinegar. Mix well. Check taste and, if needed, add more salt or red chili powder.
Pickle Garlic
- Transfer pickle to a clean, dry, sterilized glass or ceramic jar.
- Lastly, cover the top layer of pickle with 3 tablespoons mustard oil. The oil should be at room temperature.
- Tightly cover garlic pickles with lid and place in sunlight for 2 to 3 days. Lightly shake the jar everyday without opening the lid.
- I keep the jar on a window sill which gets plenty of sunlight. If you do not get sunlight, place it in a dry place in your kitchen, though the flavor will not be as intense as the sunlight steeped achaar.
Storage
- After the pickling process is over, place the jar in a dark, dry place. At room temperature, this garlic pickle stays good for about 2 weeks.
- If you have any pickle remaining after 2 weeks, refrigerate it. Or you could keep it in the refrigerator all the time. It stays good in the refrigerated for about a month.
- If the top oil layer is removed as you eat the pickles, add 1 to 2 tablespoons of mustard oil again to cover the top layer. This will prevent the cloves from coming into contact with air and spoiling.
Serving Suggestions
- Remove the pickle with a clean dry spoon every time. Do not add water logged spoon into the pickle.
- Serve about ½ to 1 teaspoon of the garlic pickle with any Indian main course meal for one. This pickle tastes good with any Indian lunch or dinner be it North, South, East or Western Indian.
- We like it with a simple Khichdi, Dal Fry served with basmati rice, Sambar and rice, or Pulao. I also like to have it with Paratha, Aloo Paratha and Gobi Paratha.
Dassana’s Notes
- Peel garlic well. While peeling, slice of the parts which have any brown spots. Rinse peeled garlic very well in water. The garlic has to be completely dry before you begin with the recipe. Any moisture on the garlic will spoil the pickle.
- Use fresh spices. Make sure all your spices are fresh and not rancid or stale.
- Use the right kind of salt. Sea salt, pink salt, edible rock salt or kosher salt will all work in the recipe.
- Use the right kind of vinegar. Apple cider vinegar, white vinegar and brown vinegar work well in the recipe.
- Scale your recipe as needed. This recipe can easily be made larger or smaller depending on your needs.
- Use the right oil. Although traditionally this punjabi garlic pickle is made with mustard oil, if you do not have it due to availability, use any neutral flavored edible oil like sunflower oil or grape seed oil. In a pinch include peanut oil as a substitute.
- Asafoetida: Note that Asafoetida is optional, though adding it prevents the pickle from getting spoiled. That said, most brands of commercially available asafoetida (hing) are processed with wheat flour and should be avoided if you are gluten free. If you still want to add the asafoetida, be sure that the brand you choose is certified gluten free.
Excellent recipe. I have been making this every year for the last three years and all my family and friends love it.
Thank you so much for sharing this. I am really glad to know you have been making the garlic pickle every year and that it’s loved by your family and friends. It means a lot to hear that the recipe has become part of your yearly tradition.
It’s a good starting point for an excellent garlic pickle. I have improved on it considerably to my personal taste. 👍🏻
Thank you and that’s great to hear. Garlic pickle is one of those recipes you can easily adjust to your taste — more tangy, spicy, or mild. I’m glad you tried it and made it your own.
I have been following your recipes for several years now. Each one is excellent ??. I especially love your Punjabi aloo poori recipe which has taught me to make pooris in my Punjabi household (I am non-Punjabi). I live in Toronto.
The lahsun achar recipe was a great success. The jar has lasted for about a year. Now my son in laws are clamoring for more! Thank you so much for your wonderful tips to make my food so tasty!?
Thanks so much and glad to read your feedback on the recipe. I appreciate the time you took to write this lovely feedback.
Wonderful ……..