How to Make Paneer (Indian Cottage Cheese)
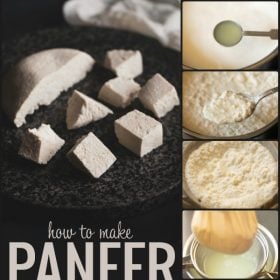
Paneer is a fresh, non-melting cheese widely used in Indian cooking. It is made by curdling hot milk with an acidic ingredient like lemon juice, vinegar, citric acid or yogurt. It needs just a few basic ingredients and no special equipment. Learn how to make paneer at home for soft, fresh cubes without any preservatives.
About Paneer
Paneer, also known as panir or Indian cottage cheese, is a fresh cheese made by curdling milk with an acidic ingredient such as lemon juice, vinegar, yogurt or buttermilk. The curds are strained, wrapped in a muslin cloth, and either drained or pressed to form a firm block of paneer.
Unlike many other cheeses, paneer is not aged or fermented and does not require rennet. It has a mild flavor, a soft yet firm texture, and does not melt when cooked.
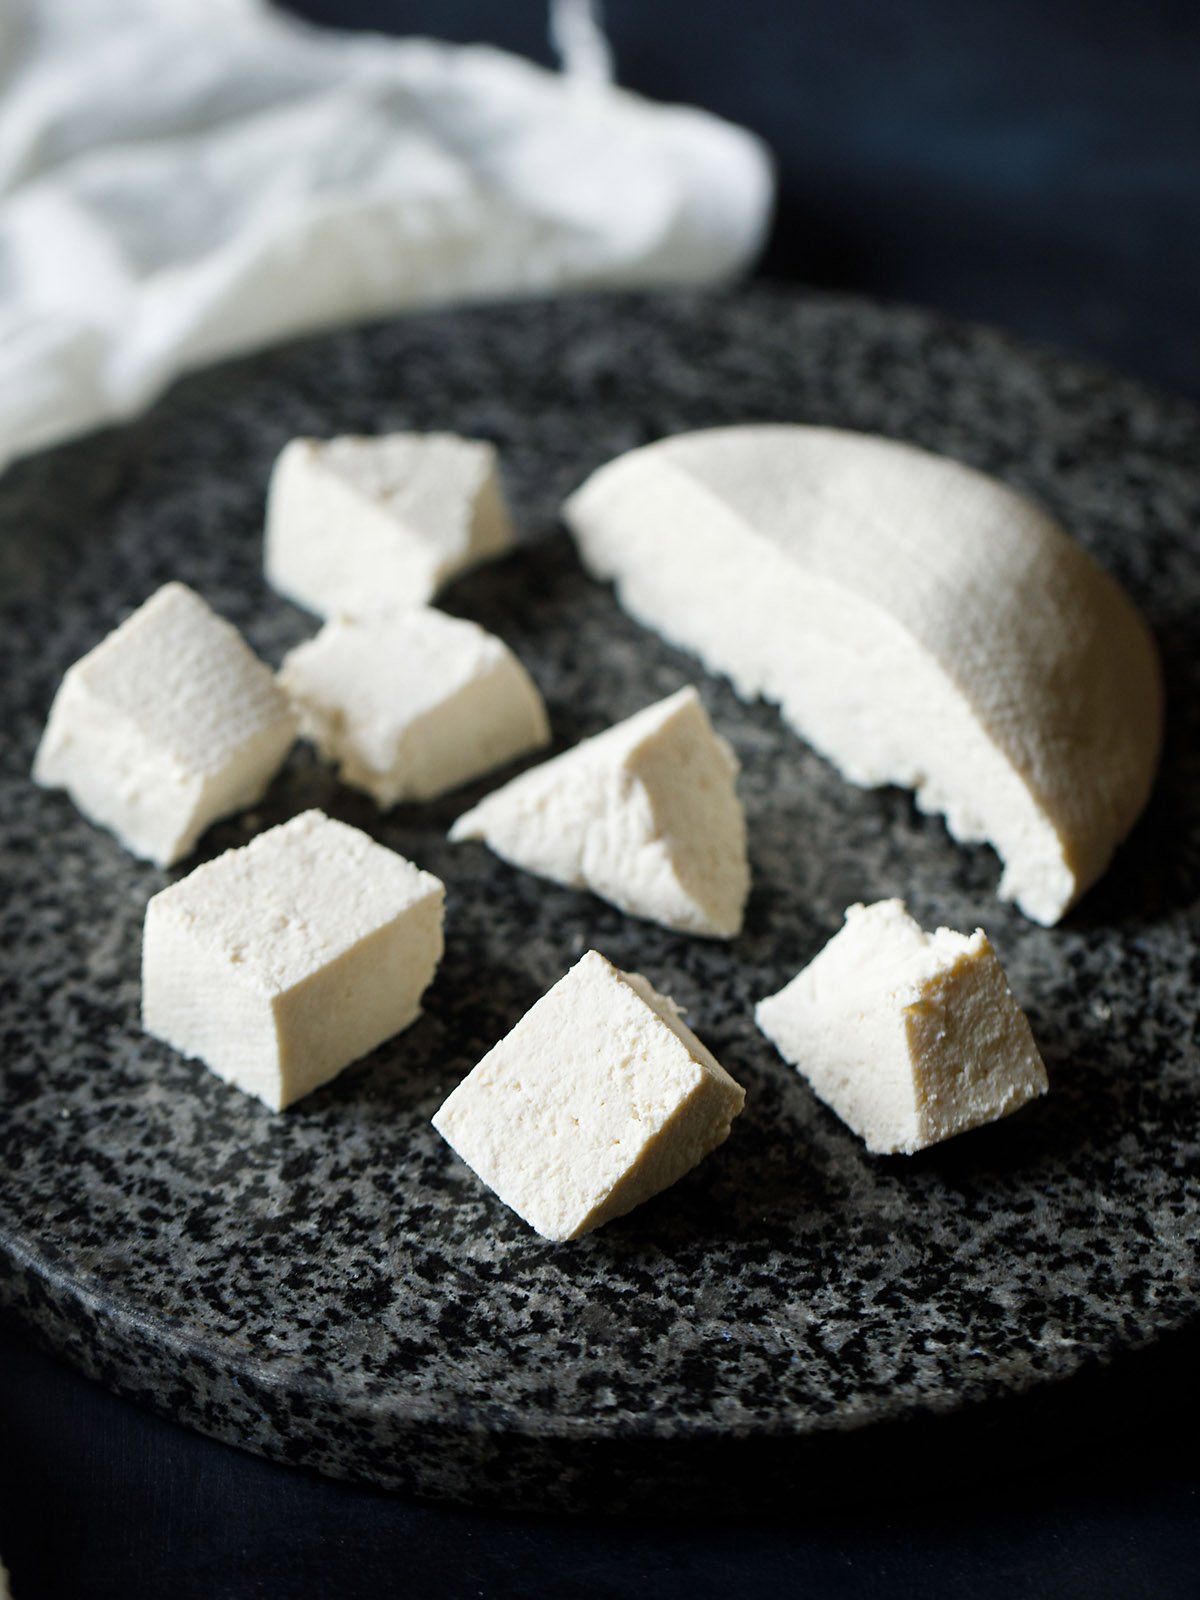
Table of Contents
Homemade paneer is fresh, economical and easy to make with just a few ingredients. It can be used in many Indian Paneer Recipes such as Palak Paneer, Paneer Butter Masala, Kadai Paneer and Paneer Tikka.
I learned how to make paneer during my cooking school training and have been making it at home ever since.
The process is simple. Milk is first brought to a boil and then curdled with an acidic ingredient such as lemon juice, vinegar, yogurt or buttermilk. The curds are strained, wrapped in a muslin cloth and pressed to form a block of paneer.
I have been making paneer from scratch for many years and rarely buy it from stores. Homemade paneer is fresh, economical and gives you complete control over the ingredients.
With just milk and a food acid, you can make pure paneer at home without preservatives, additives or other unnecessary ingredients.
Note: For the best results, use whole milk or full-fat milk. The milk can be either pasteurized or unpasteurized. Avoid low-fat, toned or skimmed milk, as it may give a lower yield and can result in crumbly paneer that does not set well.
Food Acids Used To Curdle Milk
- Lemon juice or lime juice: Gives soft yet firm paneer. Use 2 to 4 teaspoons per litre of milk.
- Vinegar: Curdles milk quickly and produces firm paneer. Use 2 to 3 teaspoons per litre of milk.
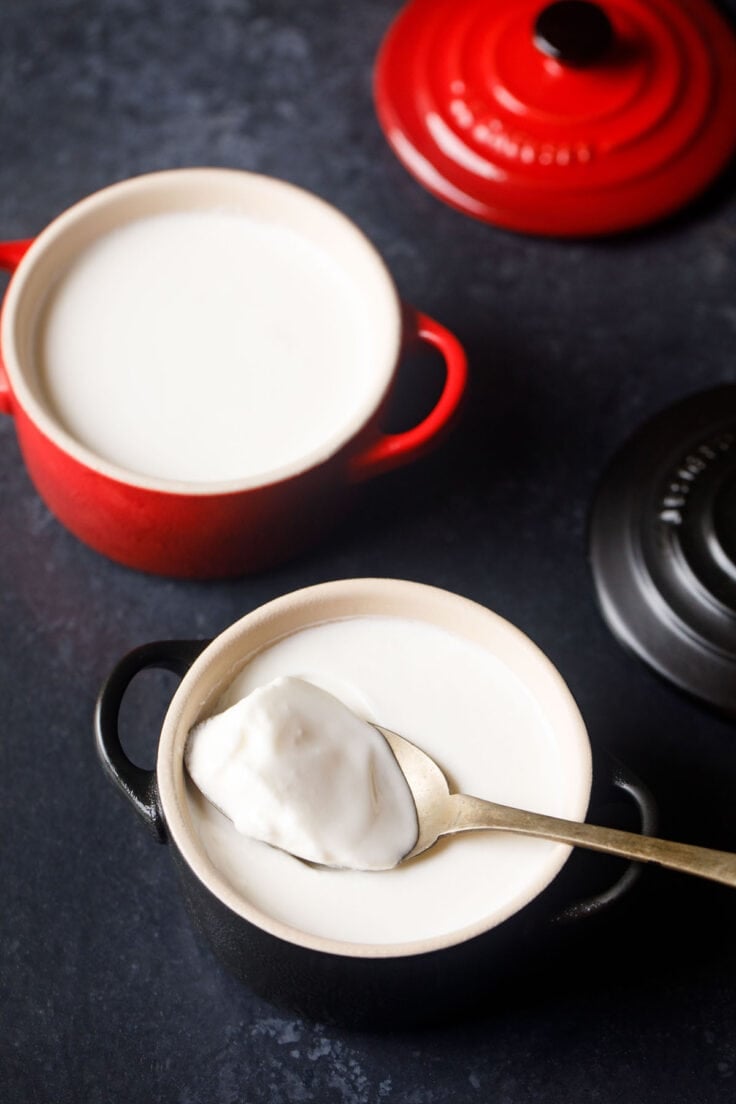
- Curd (yogurt): Makes a softer and slightly moist paneer. Use 3 to 4 tablespoons per litre of milk.
- Buttermilk: Produces soft and firm paneer. Use 4 to 5 tablespoons per litre of milk.
- Citric acid: Can be used, but it tends to make paneer firmer than other options.
Besides homemade paneer, you can also try making these staple dairy ingredients from scratch:
- How to Make Ghee
- How to Make Butter
- How to Make Curd
- How to Make Khoya
- How to Make Chenna
- How to Make Hung Curd
How To Make Paneer (Step-By-Step)
Let’s go step-by-step to make soft and fresh paneer at home. The first step is boiling the milk properly so that it curdles well later.
Boil Milk
1. First, rinse a large, heavy duty pot with water to ensure that it is completely clean. Add 1 litre (approximately 4 cups) of milk to the pot.
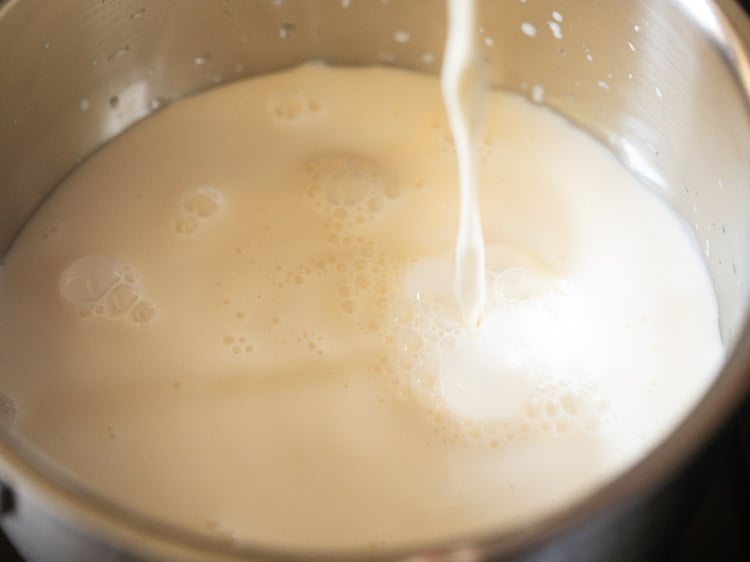
2. Then begin to heat the milk on a medium-low flame.
3. As the milk heats, stir occasionally so that a skin does not form on the surface and the milk does not burn on the bottom of the pot.
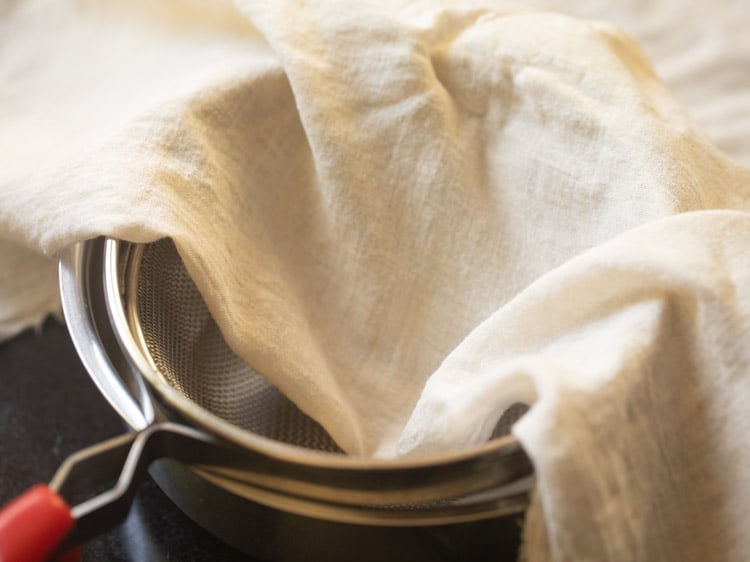
4. Meanwhile, prep your workspace: Place a metal strainer or sieve over another large sauce pot. Then line the strainer with clean muslin or cheesecloth, or a cotton napkin.
You can line the pan directly with the muslin, but using a strainer is very helpful for avoiding messes.
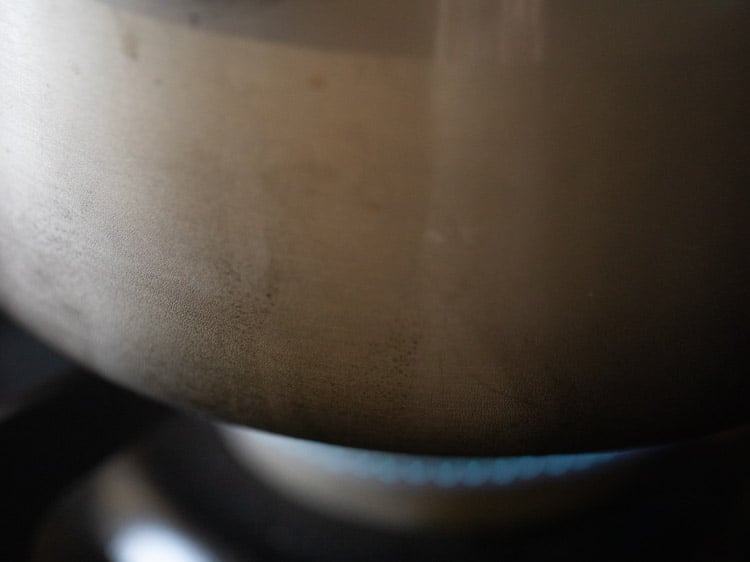
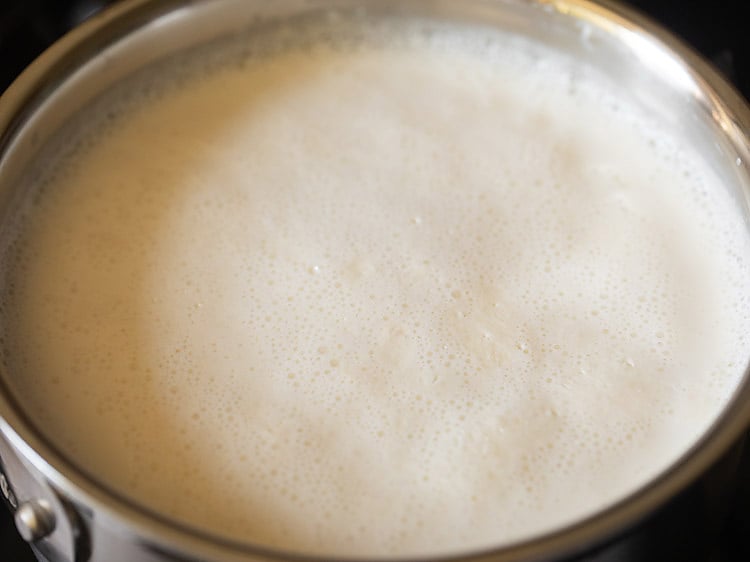
5. Let the milk come to a boil, until it starts foaming and rising.
Add Food Acid
6. Now it’s time to add the one food acid of your choice:
- Lemon juice – 2 to 4 teaspoons
- Vinegar – 2 to 3 teaspoons
- Buttermilk – 4 to 5 tablespoons
- Curd – at least 3 to 4 tablespoons
The amount of acid needed will depend on the quality of milk used. More fat in the milk will require more food acid to make this paneer recipe.
For this batch of paneer I am using lemon juice as the acid. It’s my favorite for its mild flavor and freshest tasting cheese.
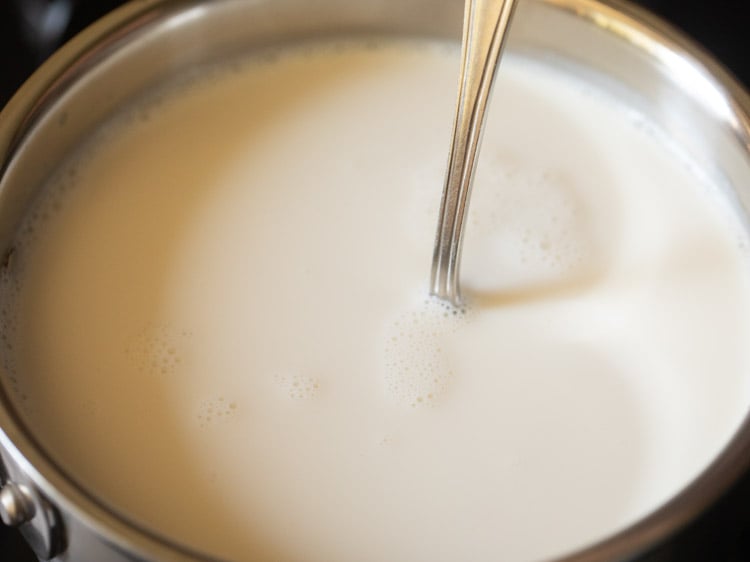
7. Stir in the lemon juice (or acid of choice). The milk will begin to curdle immediately.
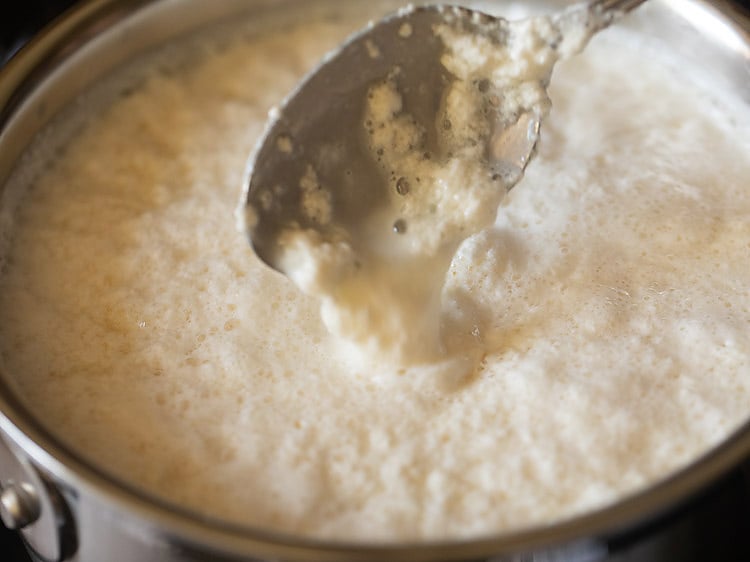
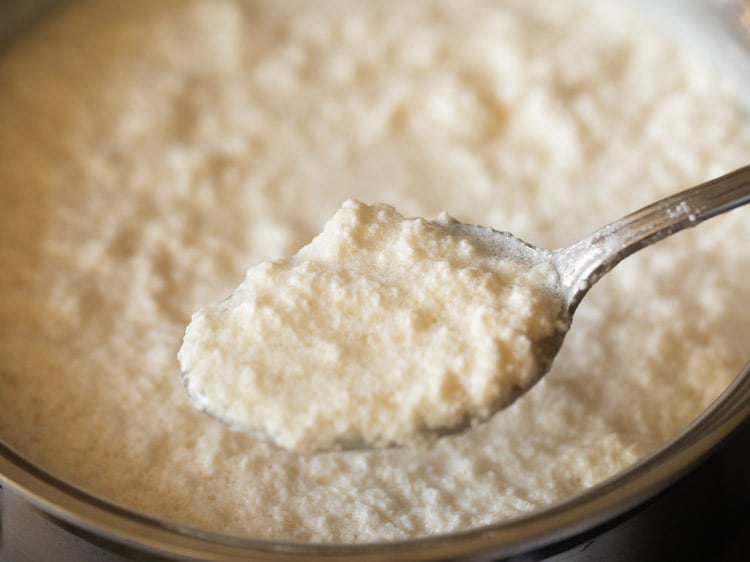
8. The milk must curdle completely before you can make paneer. Continue to stir the milk to help keep it from sticking to the pot.

9. Add 1 to 2 teaspoons more of the food acid if it doesn’t seem to be curdling fully.
Make Paneer
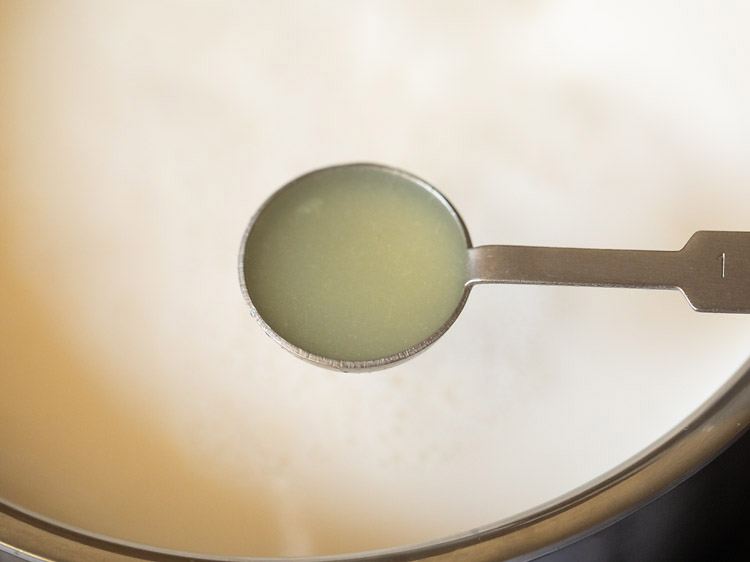
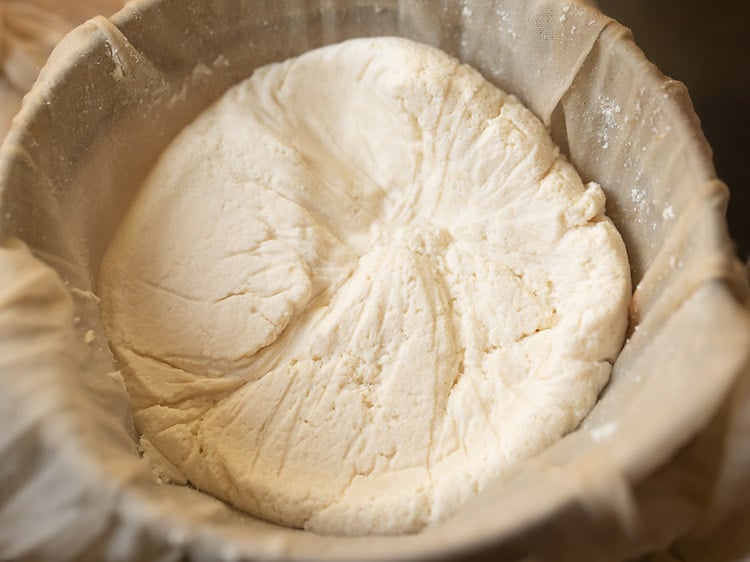
10. After the milk has fully curdled completely and you see a greenish whey, switch off the heat. Then immediately pour the mixture into the lined strainer.
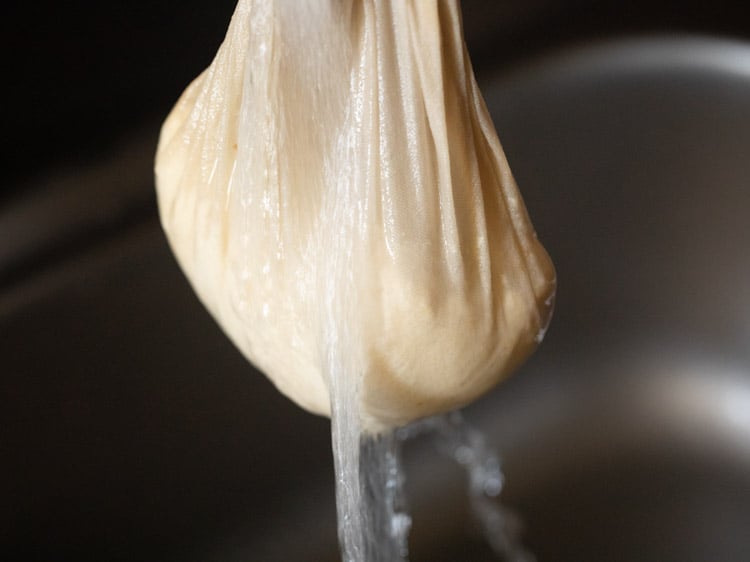
11. Next, gather the edges of the cheesecloth – be careful, the coagulated milk mixture will be very hot. Lift the bundle and allow to drain until no longer dripping.
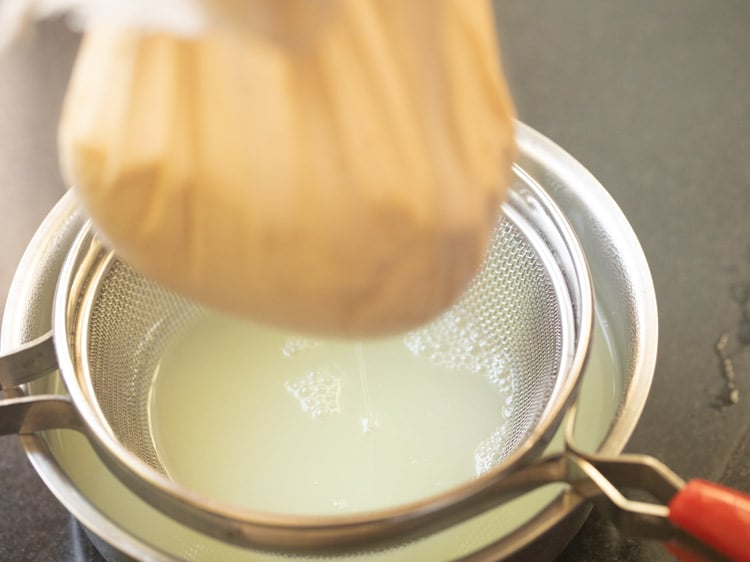
12. With the ends tightly gathered, run clean, fresh water all over the cloth to rinse. This ensures that the lemon or vinegar flavors are also rinsed with the water.
If you have used curd or buttermilk, then you do not need to follow this step.
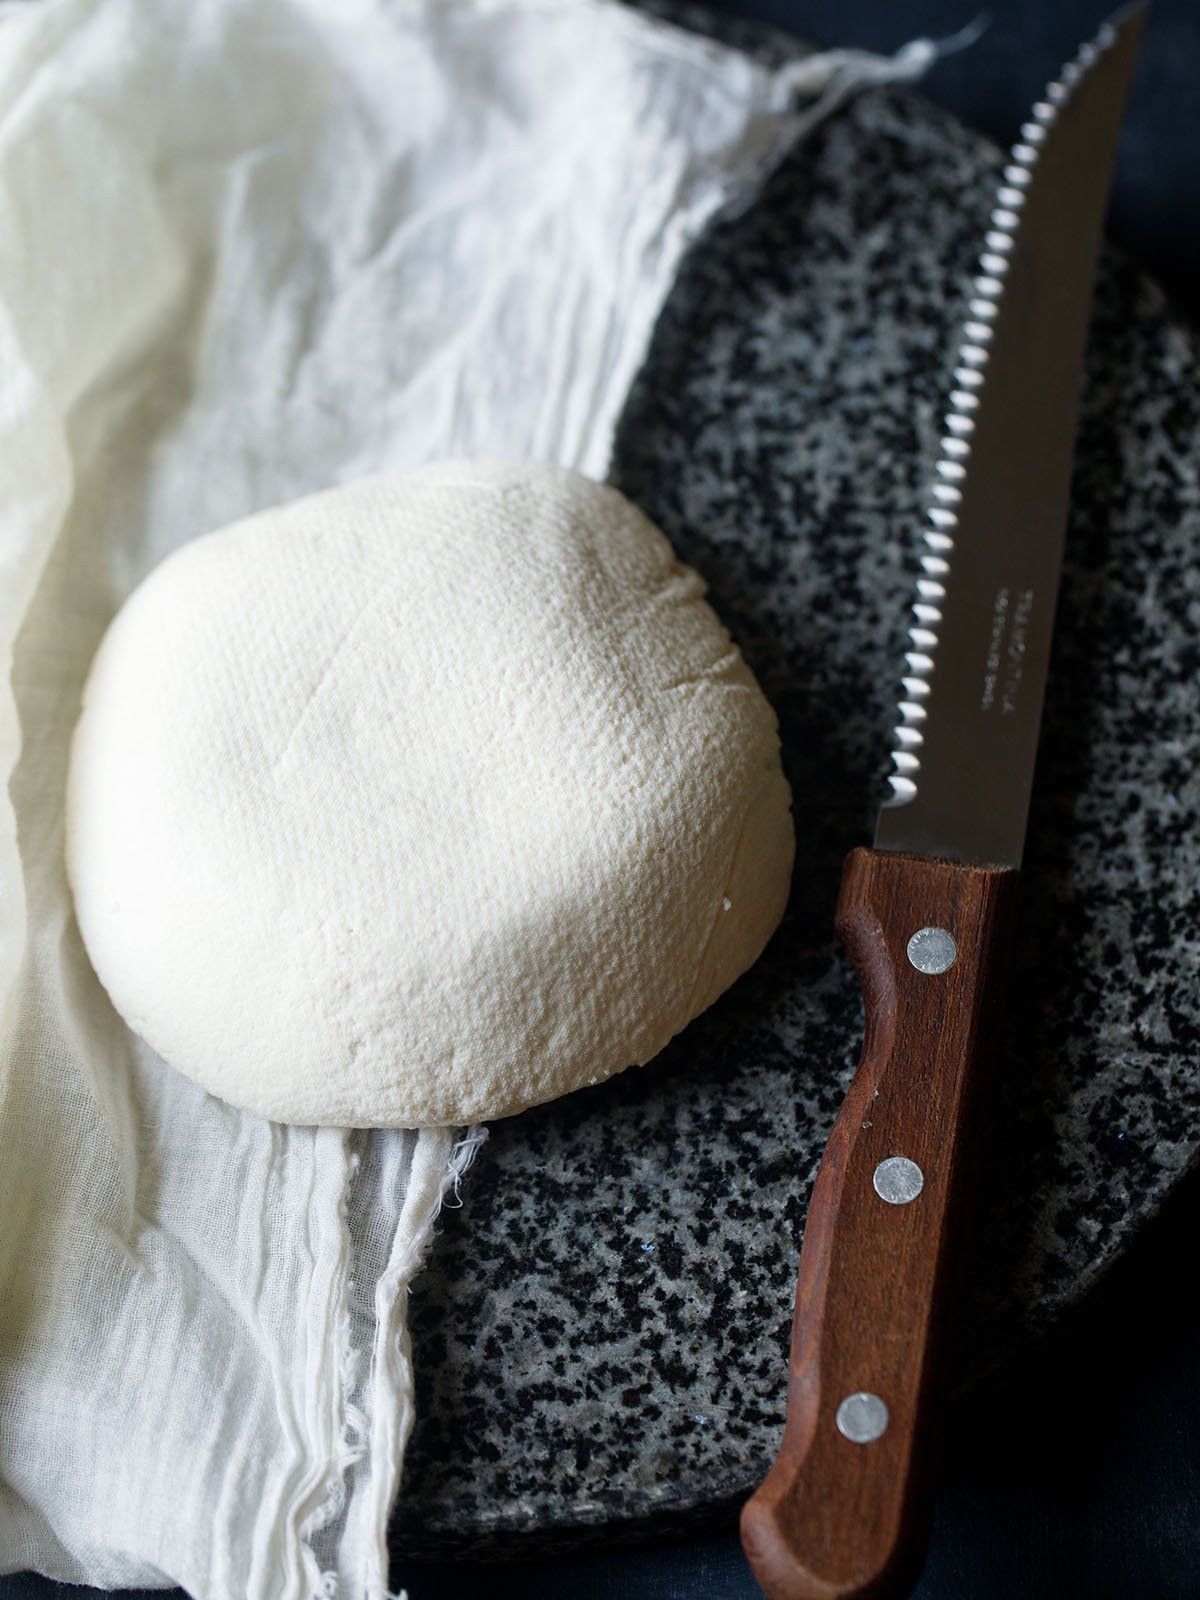
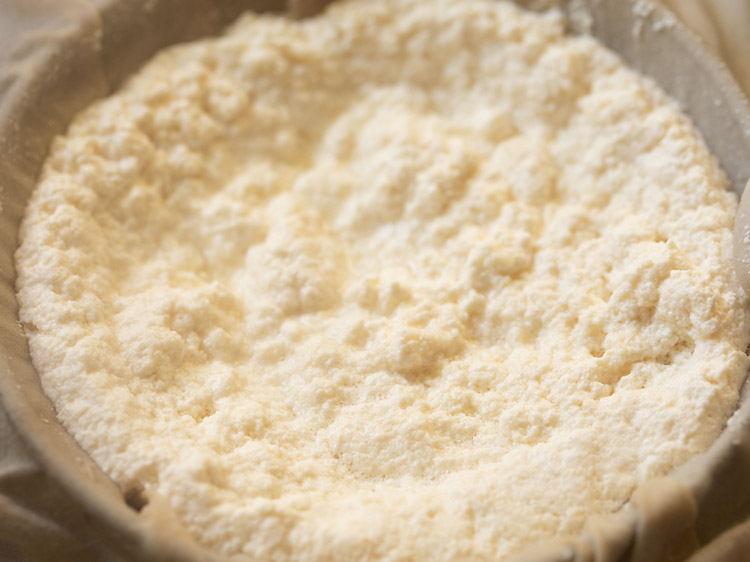
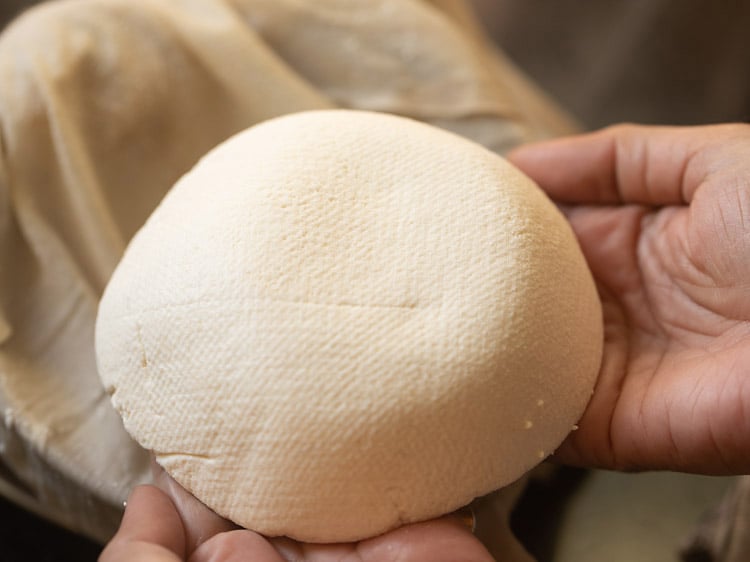
13. Tightly secure the ends of the cloth to keep the chenna wrapped, then place the bundle back in the strainer on a plate or over a clean bowl.
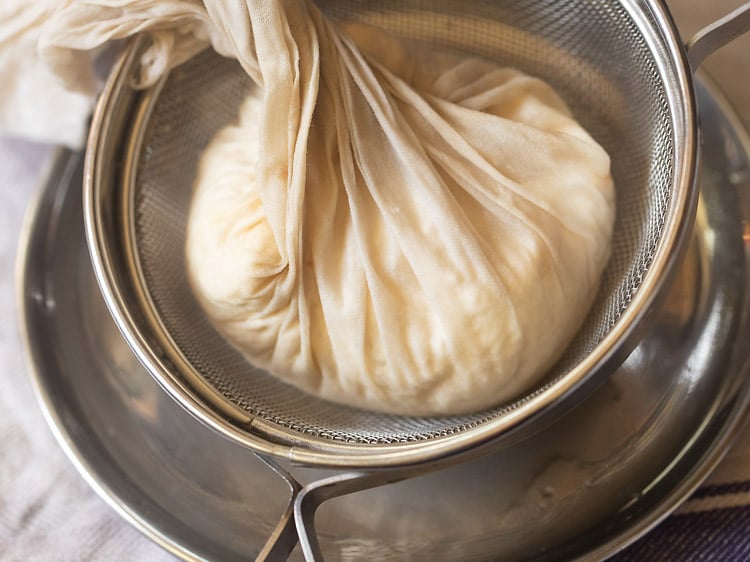
14. You can either hang the bundle (on your kitchen basin faucet) or press to form the cheese.
Hanging the bundle will require about an hour, and should be done over a bowl or in your kitchen sink. This method tends to produce a softer, more loose texture.
I prefer to make a firmer paneer cheese by pressing the whey out with an object that weighs at least 500-600 grams (or at least 1 pound).
This method only requires 30 to 40 minutes and can be done in the strainer over a pan or bowl.
In the picture below I’ve used the mortar from my mortar and pestle set. You could even stack up with some plates.
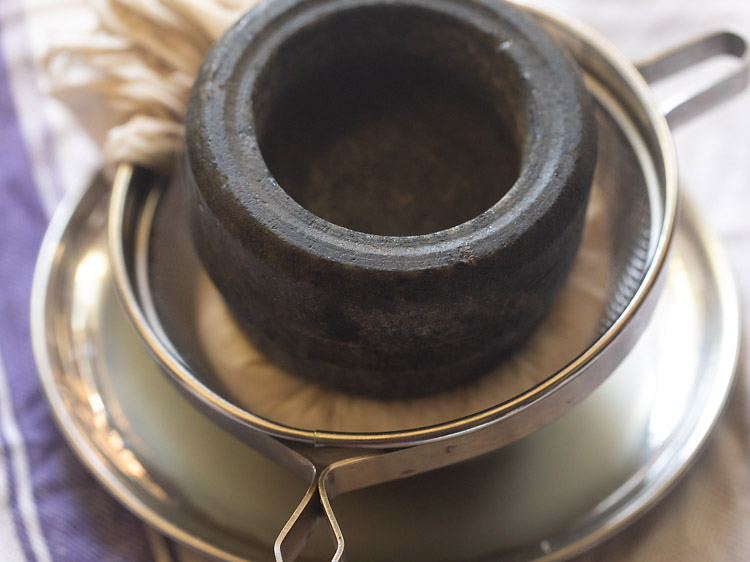
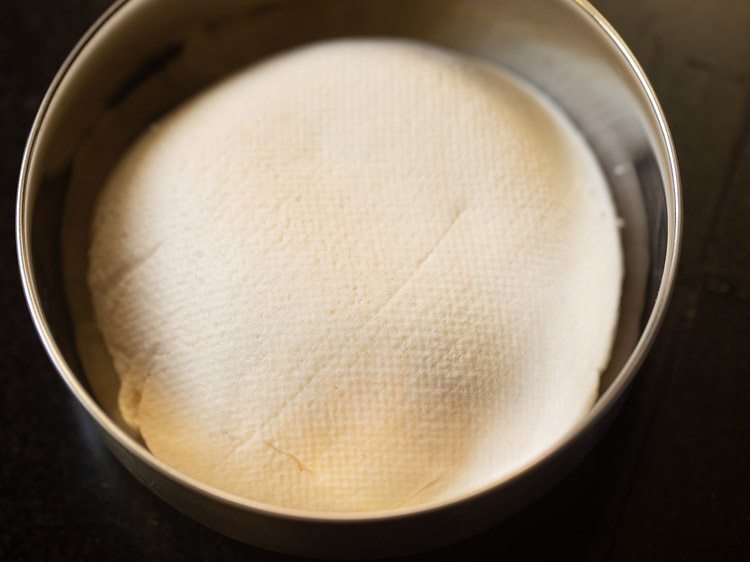
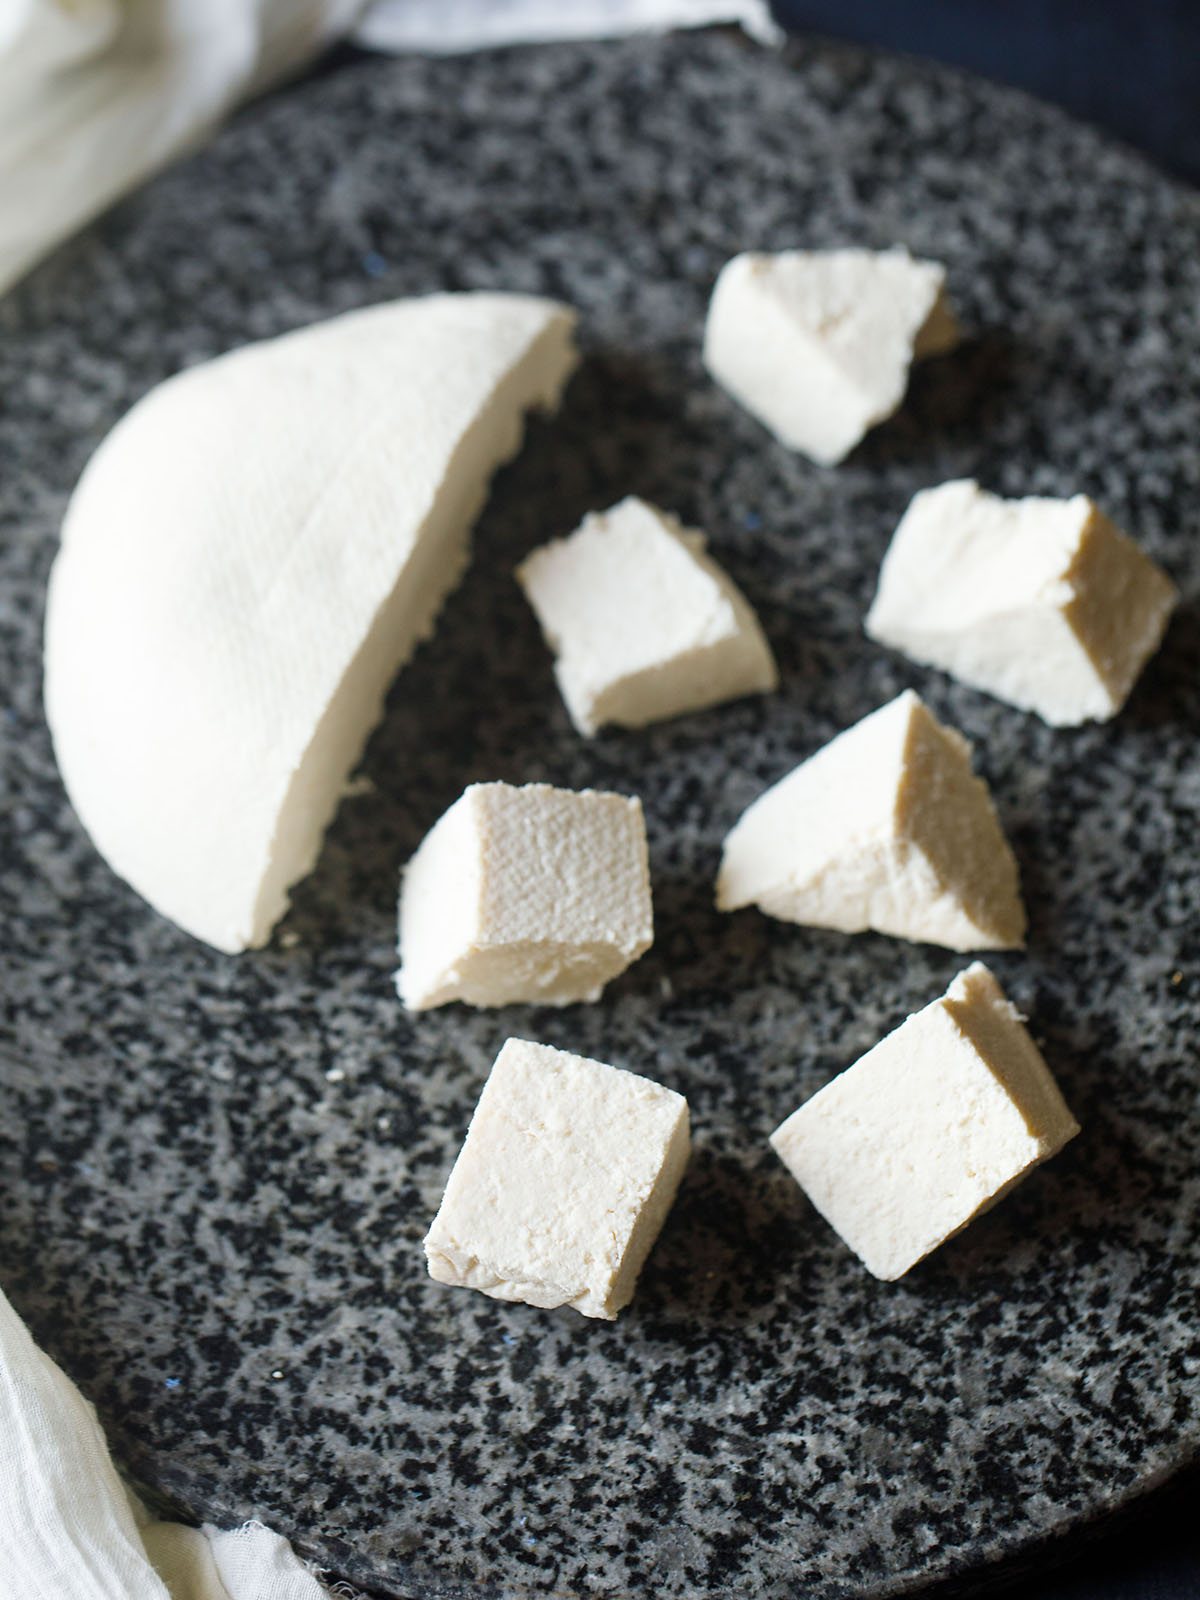
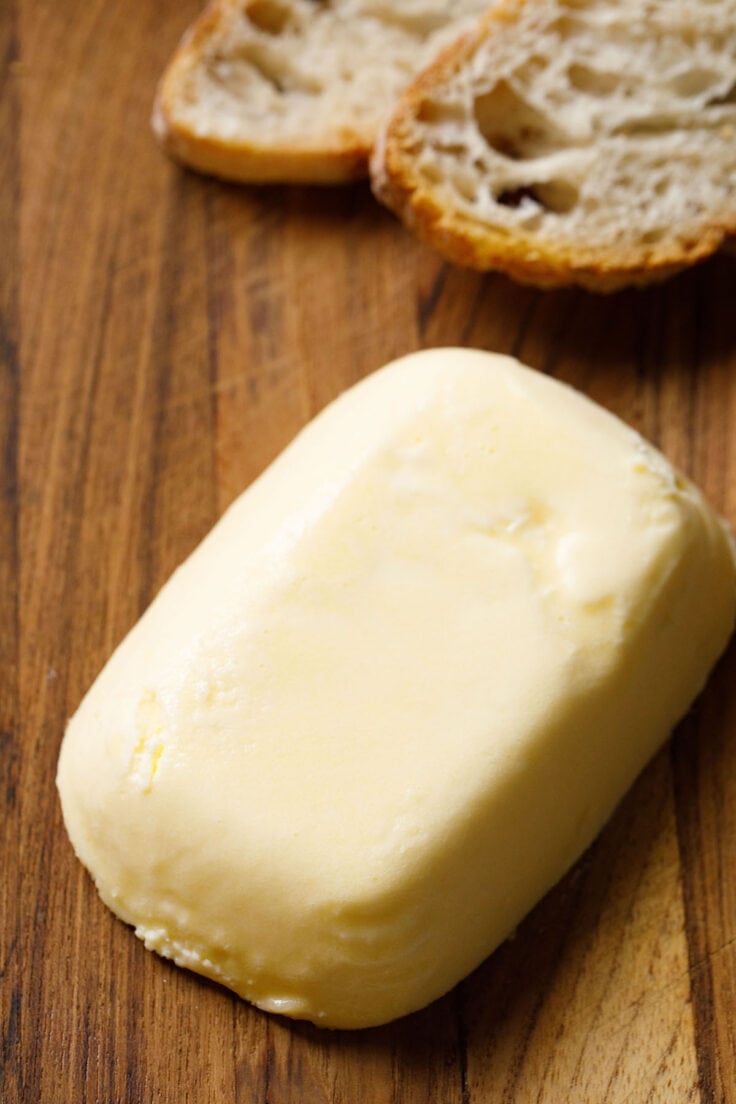
15. After 30 to 40 minutes of pressing the paneer is ready. The longer it sits with the weight the firmer your cheese will be. So for a softer cheese be sure to take off the weight sooner rather than later.
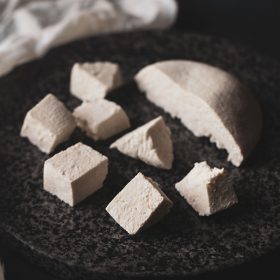
Remove the weight and open the cloth. I used one litre (4 cups) of milk and therefore made roughly 200 grams, or 7 ounces, of homemade paneer.
16. You now have a beautiful block of smooth and tender paneer cheese.
17. Use the paneer right away to cook, or you can refrigerate it for later.
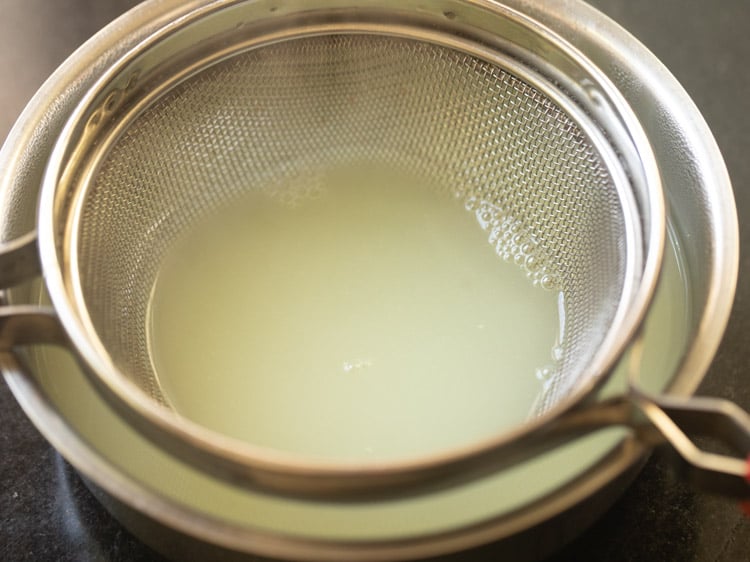
18. Do not discard the whey. It can be used in roti dough, rice dishes, curries and many other recipes. Keep reading for more ways to use it.
Ways To Use
When ready to use, slice or cube the paneer as needed for your recipe. Homemade paneer works well in many Indian dishes.
Try it in Kadai Paneer, Matar Paneer, Chilli Paneer, Paneer Tikka Masala, Shahi Paneer or your favorite curry.
Storage
You can store paneer in the refrigerator for 2 to 3 days. Keep it in an airtight container. To prevent it from drying out, you can store the paneer block submerged in water inside the fridge.
If it feels firm after chilling, soak it briefly in warm water before cooking. If you want to store it longer, paneer can be frozen for up to 1 month.
What to Do with the Whey
After making paneer, you will be left with a greenish-yellow liquid called whey. It is rich in nutrients and can be refrigerated in an airtight container for up to 2 to 3 days.
Keep in mind that the flavor of the whey will depend on the acid used to curdle the milk. For example, whey from lemon juice will have a slightly tangy taste.
Here are some ways to use whey:
- Use it instead of water when kneading dough for chapati, paratha or bread.
- Add it to cake batters and cookie doughs.
- Use it in dals like Dal Fry or Dal Tadka.
- Add it to Pulao, Biryani, gravies and curries in place of water.
- Mix it into smoothies, juices and soups.
- Use it for cooking pasta or pasta-based dishes.
- You can also dilute the whey with water and use it occasionally to water houseplants and garden plants.
Dassana’s Cooking Notes
Want to make sure your paneer is perfect every time? Be sure to follow my tips:
- Milk: For the best paneer I recommend using full fat whole milk. Pasteurized or unpasteurized is fine, but it should be high quality for the best results. Do not use low fat milk, toned milk, skimmed milk, or UHT (Ultra High Temperature) milk for making paneer. Without lots of fat the paneer cheese will come out far too crumbly and dry. Always use fresh milk that is not expired.
- Food acid: You can use any one of the four ingredients that coagulate the milk as mentioned above, but remember: each of these will add a hint of flavor to the paneer. Therefore use buttermilk or curd to make paneer with the most mild flavor.
- Cream: There is no need to remove any cream that you might see floating in the milk as it cooks. In fact, the natural cream present in the milk is what makes the paneer soft. Additionally you could add 2 to 3 tablespoons heavy cream in the milk before heating which will make for a more softer paneer.
- Simmering: Do not continue to boil the milk once it curdles completely. Immediately remove it from the heat and strain the milk. Otherwise, overcooking will yield an unpleasantly hard, crumbly cheese.
- Storing: Keep the paneer soft in the fridge by placing in a bowl and soaking the paneer block in water. If the paneer does become hard you can soak the block in warm water for a minute or two on the countertop.
Troubleshooting
1. Why does paneer break in curry?
Use whole milk or full-fat milk when making paneer. Paneer made with toned, low-fat or skimmed milk tends to break while cooking and does not set well. Also make sure to drain the whey thoroughly. Chilling the paneer before using helps it firm up further.
2. Can paneer be frozen?
Paneer can be frozen for about a month. To thaw, place it in warm water or let it come to room temperature. It works well in most recipes after thawing.
3. Can I use paneer for Gulab Jamun?
Yes. You can use it to make sweets that call for fresh chenna or paneer.
4. Why is the milk not curdling?
Some milk varieties require more acid to curdle properly. Add a little more lemon juice in small amounts until the milk separates completely into curds and whey.
5. Why is the paneer crumbly?
Overcooking the curds after the milk has curdled can make paneer grainy and crumbly. Using too much lemon juice or vinegar can also affect the texture.
6. What is the difference between chenna and paneer?
Chenna is the fresh, moist curdled milk solids that have been drained but not pressed. Paneer is chenna that has been pressed into a firm block.
7. How long does milk take to curdle?
If the correct amount of acid is added, milk usually curdles within a few seconds to a minute.
Step by Step Photo Guide Above
How To Make Paneer (Homemade Indian Cheese)
Ingredients
Ingredients
- 1 litre milk – whole milk or full fat
- 2 to 4 teaspoons lemon juice or vinegar or 3 to 4 tablespoons curd or yogurt
Materials required
- cheese cloth or muslin or a thin cotton napkin
- some bowls and a heavy weight object or plates
Instructions
Boiling milk
- First, rinse a large, heavy duty pot with water. Add milk to the pot.
- Then begin to heat the milk on a medium-low heat.
- Stir occasionally so that the skin does not form on the surface and also so that the milk does not get burnt from the bottom.
- Meanwhile, take a pan or a bowl. Place a strainer on the pan. Line the strainer with clean muslin or cheesecloth or cotton napkin. You can even line the pan directly with the muslin.
Adding food acid
- When the milk starts boiling, add the lemon juice or vinegar. Begin to stir.
- The milk has to curdle completely. Stir the milk when it is curdling so that the curdled milk does not stick to the base of the pan.
- Sometimes you will see the milk has curdled partly but no watery whey can be seen. In this case also add 1 to 2 teaspoons more of the food acid and stir again. You should see the greenish colored whey in the milk.
- After the milk has curdled completely and you see the greenish whey, switch off the heat and then immediately pour the entire mixture in the strainer lined with the muslin, cheesecloth or cotton napkin.
- Carefully gather the edges of the muslin as the coagulated milk mixture will be very hot. While doing this more of the whey will be strained.
- Run some clean fresh water on the gathered muslin all over.
Making paneer
- With the ends tightly gathered, run clean, fresh water all over the cloth to rinse.
- Keep a heavy weight on top of the muslin or cheesecloth for 30 to 40 minutes. Use a heavy object having 500 to 600 grams weight. You can even hang the muslin bundle for an hour on your kitchen basin faucet if not using a heavyweight object.
- Some more whey will be strained when you place the heavyweight object. So remove the whey from the plate.
- After 30 to 40 minutes the paneer will set.
- Once warm or cooled cut homemade paneer into cubes or any shape.
Storage
- You can also refrigerate the paneer. Keep it in an air tight container or immerse the paneer block in a bowl of water and keep in the fridge.
- Homemade paneer stays fresh for 2 to 3 days in the fridge in an air-tight container. You can slice the paneer cheese later and use it any recipe.
Video
Dassana’s Notes
- Milk: Use good-quality whole milk or full-fat milk for the best yield and texture. Both raw and pasteurized milk work well.
- Food Acid: You can curdle the milk with lemon juice, yogurt (curd), buttermilk or vinegar. Each may impart a slight flavor to the paneer. If you prefer a milder taste, use yogurt or buttermilk.
- Cream: If the milk has a layer of cream on top, leave it as is. The natural milk fat helps make the paneer soft.
- Curdling Milk: The milk should separate completely into curds and whey. Once it has fully curdled, stop cooking immediately and strain. Overcooking can result in firm or grainy paneer.
- Storage: Refrigerate paneer in an airtight container for 2 to 3 days. To keep it soft, store it in a bowl of water in the refrigerator. If it becomes firm, soak it in warm water for a few minutes before using.
- Scaling: This recipe can be doubled or tripled. Cut the paneer into cubes and refrigerate for up to 3 days or freeze for up to 1 month.
Nutrition
Paneer recipe from the archives was first published on May 2012.
Thank you for the clear instructions!
I love sag/palak paneer but the places near me have been raising prices (or only offering sag chicken) so I was excited to give it a go at home.
Found 4.4% milk at my usual supermarket and it worked well. Ended up needing about 1.5 tbsp of apple cider vinegar to curdle everything up. I like a dense (but not rubbery) paneer so I pressed it for about 3 hours. Maybe too long, but it turned out great with no discernible vinegar taste.
Now I’m excited to find ways to use all the lovely whey left behind.
Thank you again!
Hi Nate, thank you so much for sharing your experience. I’m glad the instructions helped you make paneer at home.
Using 4.4 percent milk is perfect, and yes, sometimes the milk needs a little more acid to separate completely, so your 1.5 tablespoons of apple cider vinegar makes sense.
Pressing for 3 hours will naturally give you a firmer paneer, and if you like a dense texture, then you did it just right. It’s nice that there was no vinegar taste at all.
You can use the whey in lentil dishes, flatbread or bread doughs, soups or even for cooking rice. It adds a gentle tangy flavor.
Thanks again for taking the time to write back.
Thank you for the receipe Ma’am. I used curd 2 tablespoon in one liter buffalo milk with fats. And I got very soft paneer approx. 250 grams.
Thanks a lot.
Hi Bhumika, glad to hear the paneer turned out soft. Using curd works really well. Thanks for sharing your result.
It’s the little things which really make the difference in this recipe: don’t heat the milk on too high a heat and wait for it to come to the boil properly.
I’ve tried making paneer before but it’s never come out well; your recipe worked first time. I used it for the butter paneer masala recipe on this site – delicious!
Agree and thanks so much for this lovely feedback. Glad! Thanks for the rating too.
Easy and delicious!
Can you use lime juice if you don’t have lemon?
Yes you can use lime juice.
Amazing recipe as always! Big thanks to you!
thanks and welcome.
❤️
Thank you for this and all other recipes. I am a regular reader of your recipes and the effort you put into description is laudable. I always search on this site for the recipe I want and follow your instructions. The alternative options you give are also very useful and practical.
thank you piyush. glad to read your comment. thanks again.
I tried making paneer for years. But I never succeded in making it with lemon.
I used a chemical acid (allumen) before but I had the impression it was not totally good for health.
Your recipe is fantastic. I never had better paneer than this one. The description is perfect. I am so happy to have paneer again… now I can try all your wonderful recipes with it. Thank you!
thanks sabrina for the sharing this as well as the rating. yes sure do try the recipes.
Hi Dassana,
Thanks for this and your entire archive of wonderful recipes. I love how you curate recipes from all over India! One question: how does this paneer stay firm when it’s fried in a recipe like kadhai paneer? Mine tend to disintegrate. Thanks!
gitanjali for making paneer, use full fat or full cream or whole milk. do not use toned milk or low fat milk as the paneer breaks while cooking and also does not set well. the paneer cubes in the post were made from full fat milk and even after frying they stay firm.
Hi Dassana,
Your website is wonderful and so inspirational!!. I spend a lot of leisure time browsing through.
Thanks
Anu
Welcome Anu. Glad to know this.
Hi Dassana,
How long does paneer stay good frozen?
Thank you.
Anu
Welcome Anu. Frozen paneer can stay well for a month.
Can I use diz fr making paneer gulab jamun
Revathy, yes you can use.
Hi Dasana
Thank you for your super easy recipes. I have tried many and they have turned out really well.
But I could never see whey forming when I make paneer. I made it more than once. It came fine. But once I add lemon juice. I keep stirring it till the milk reduces in volume afraid it might stick at the bottom.
When I add lemon juice the milk curdles but I can only see small parts separating. I cannot see whey separating as you show in the picture.
For 30 mini just keep stirring the milk. But you mentioned only 5 min to completely curdle.. what is the mistake?
welcome bhargavi. this is happening due to the fat content in the milk. use full fat milk. do not use skimmed or toned milk. in fact it takes just ½ to 1 minute for the milk to curdle. in case the milk does not curdle, then add some more lemon juice.
Have you tried freezing this?
Does it work well after defrosting? Thank you!
you can freeze paneer. you can keep the paneer in warm water for defrosting or let it defrost at room temperature. yes paneer can be used well after defrosting
Dear Dassana!!
Thank you, thank you, thank you!! 🙂 Your recipes are easy to follow and the food becomes yum and makes me feel im back in India!
I found your website 3months back when i was searching for an aloo baingan recipe. I had enjoyed what I had eaten at a restaurant here in Auckland and kept asking who ever was serving if they knew what was in it 🙂 I love food and I love experimenting. And I found your easy peasy recipe and it was a hit! I have used your website to make different dishes.. And i just made paneer using your recipe! 🙂 🙂 🙂
Keep up your awesome work and thank you for sharing your awesome recipes and tricks and tips of making yummy food! God bless!
Welcome Christina. Thanks for your kind words and best wishes. Glad to know that you liked the website.
This site is very useful and easy to follow steps
Thanks Gomathi
Hello..
I tried to make paneer many times but it was never upto my expectations. I used this method and i got a very good block of soft paneer. Thanks a lot for solving our kitchen problems. I want to know the shelf life of this paneer block and please do mention the method too. Thanks once again.
Welcome Bhavna. Glad to know this. In the refrigerator, Paneer will stay good for 3 to 4 days. Just keep it cover in the container while keeping in fridge.
Is this muslin cloth or something specific? ? I have muslin cloth but paneer doesn’t come out clean when I drain the water. Thanks for your help!
i use muslin for straining paneer and even for preparing hung curd. use a finely woven muslin. in these pics its a cotton kitchen towel. so you can use either a cotton kitchen towel or a finely woven muslin.
Hi Dassana, May I know where you bought your muslin cloth from? The one I’ve got is not as good. Thanks ?
Welcome Ranjini. I bought it from a local clothes shop.
First, I’m loving this website. I’ve made several recipes and have loved EVERYTHING! Regarding paneer, in the U.S. we use ounces, quarts, and gallons. Would a liter be about the same as a quart?
thanks a lot michele. 1 litre is approx 1 quart (1 litre = 1.05 quart). so you can easily use 1 quart of milk.
I did it and it’s perfect! I’m so happy because I will be able to cook many more recipes from your blog! I’ve tried a lot already and they were all successful and I’m proud of myself because I hate cooking except Indian recipes(I’m french) because it’s so easy and colorful and tasty! And I’m a vegetarian too. Next step, I want to try naan bread!
Thank you so much for your blog and your hard work!
thats nice stephanie. thanks for such a lovely comment. indian cooking is colourful and tasty too as you mention. i am a fan of french cooking. though just tried a couple of recipes. do try naan and i hope you will like it.
What can we do with the whey we get after preparing paneer?
Heard the whey is very nutritious. How long can the whey be preserved.
kavitha, you can use the whey in making chapatis, parathas, dals, gravies and even pulaos & biryanis. generally i add it to chapatis or gravies. i keep in the fridge for 2 to 3 days only. just note that there will be a slight sour taste in any dish that you add the whey. it is due to the lemon juice/curd/vinegar added while making the paneer. so you can easily use in recipes where a faint sour taste is there, eg biryanis or some sour gravies or curries.
Hello Mrs.amit
May I know what is the difference between chenna and paneer? 🙂
on the face both look same. but are not. chenna is the coagulated milk and paneer is the coagulated milk which has been set firmly. chenna is more moist than paneer.
I am from the Cayman Ishands ant find paneer at all, so I made my very own. It turned out great. Thank you for your help
welcome and thankyou sharon 🙂
How long should it take for the milk to curdle?
if the right amount of lemon juice is added, it just takes a few seconds to curdle.
Hi I am from Pakistan.thanks for your recipes.they make my work easy and tasty.
glad to know this afsheen and thankyou 🙂
I used your recipe last night and I admit that it was SO EASY and SO GOOD that I’m amazed. Thank you for posting. I did use regular whole milk but I did have to have a tablespoon of vinegar, a bit more than you recommended. Turned out beautifully and super tasty. I’ll be making this all the time now because I love paneer and since I’m vegetarian this is a much better option that having tofu in recipes. Too much soy is not a good thing.
thanks for the positive feedback, beth. making paneer is very easy. yes sometimes the proportion of acidic agents like lemon juice o vinegar can be less or more depending on the quality of milk.
I made paneer from cows milk. Its has come out really very good. And I used it for paneer tikka. I was lil worried as to whether it will hold the scewer or not but it was firm enough to hold.
Thanks for sharing.
welcome rachna. nice to know this. thanks for sharing your experience.
I just made this paneer and it turned out excellent as do all of your dishes. I did add a bit of extra lemon juice to get all of the milk to curdle. I left mine to sit about 2 or 3 hours to help it fully drain.
My husband is from India and I am American, and your blog is my go-to place when I am trying to learn a recipe he loves. My mother-in-law and sister-in-law are always so shocked that I can make things like khandvi or paneer, but I really owe all my success to your blog!
thank you very much liz. i can imagine your mom in law and sis in law wondering how you manage and whats the secret. keep them guessing 😉
I never thought that it was this easy to make your own paneer cheese! Thank you so much Dassana, for the recipe and the step-by-step methods. I will be making this asap, I can’t wait to try your delish paneer recipes. 🙂
welcome saya. glad to know this.
Hi! just wanted to know whether it is possible to store the whey in the fridge to use it later??
amuda, it will stay good for 1-2 days only in the fridge.
Found it, thanks!!! I can’t get paneer here, so I’ll try to makee it by myself for the recipes from your site 🙂 .
welcome sari
OH! ..and the whey, I have been using it in broths and smoothies. What an amazing pure protein. LOVE IT!
I was so pleased with this. It was the first time I made paneer. I used raw milk (I always drink it too even though govt has demonized it) and apple cider vinegar. I made it for vegetable biryani and it came out perfect. I did pick up on the vinegar in the taste but not after it was in my dish. I think I may try the lemon next time. It was quite easy to make and was perfect in my dish. Thank you 🙂
welcome denise. glad to know this. just rinse the hot curdled milk solids with water and after taste of vinegar or lemon will go away.
Thank you so much for such wonderful recipe, followed your recipe step by step you made it look so easy to make. It turned out great ended up using it in matar paneer. Recipe is totally a keeper. Stay blessed ♥
welcome Kuku. thanks for your positive feedback and blessings.
Thanks a lot for the recipe/process. Of course it took repeated additions of lemon juice (total 1 medium size lemon for 1.5 lt) for it to work. But the result was fresh, soft homemade paneer plus bonus whey! Now I’ll always make it at home.
One query tho, the paneer had a distinct tho mild flavour of lemon, is that to be expected? Any way to avoid it?
welcome pradha. after you add the paneer in the muslin, the squeeze the whey carefully and rinse the muslin under a tap of running water. this will remove the mild lemon flavor. homemade paneer is always best.
I used food grade 50% phosphoric acid to set my cheese. It has almost no flavor. For 500 ml of milk, I added 2.5ml acid. I have also tried 88% lactic acid and it works too. Still much more neutral than vinegar or lemon juice. Both those types of acids are sold at homebrew stores.
Just a tip – for those having trouble getting their milk to curdle, it could be the milk. The milk can be pasteurized, but avoid ultra-pasteurized, as the ultra-pasteurization process keeps the milk from curdling properly. Here in the US, the milk cartons are labeled, and I always make sure.
Also, I often use lime juice my acid. I think it leaves a wonderful flavor, depending on what I am using my paneer for.
I just found your blog today, and I am hooked! Thanks so much!!
welcome bonnie. thanks for sharing the tips. i am sure its going to help other readers. in india we get both raw milk and pasteurized milk. so the curdling happens easily.
Thank you for all the recipies ! It’s an amazing job that you are doing !
I have a question. Can I add little bit of curd and let’s say one teaspoon of lemon. I love when paneer is soft and that’s what I’m trying to do, to make it soft.
welcome pati. either add curd or lemon. curd you will have to add 2-3 tbsp or more to curdle the milk.
I would love to hear more about your uses for the leftover whey! Great recipes and instructions. Thank you.
thanks. i just add them to chapati doughs or to curries or dals.
Just tried this and it worked out great. Much better than paneer from supermarket in my opinion. Thanks for the recipe and clear instructions. Pictures were really helpful.
welcome lauren. thanks for this positive feedback. i agree homemade paneer is better than from super market.
It is very nice recipe. ..
Thanks for uploading. …
welcome.
Just made my first truly home made palak paneer curry and it tasted great. Thank you for sharing such great yet surprisingly simple knowledge which produces paneer so much nicer than supermarket bought! My only slight issue was yield, I ended up with about 150g from 1L of full fat fresh cows milk which still had a milky looking liquid remaining. From reading the instructions and the Q&A below, perhaps I was taking the milk off heat too soon? How long from putting the lemon juice into boiling milk would you say is maximum for getting a ‘full curdle’ without overcooking?
thanks a lot andy for your feedback. generally from 1 litre of milk, you can get about 200 to 250 gms of paneer. this depends on the quality of the milk. as you mention there was a milky looking liquid. which means that the milk has not curdled completely. the milk has to come to a complete boil. then you add the lemon juice. stir well and if the milk still does not curdle completely, then add some more lemon juice. generally the milk begins to curdle as soon as the lemon juice or vinegar is stirred in it.
I love paneer recipe. Thank you for this article and its really helpful.
thanks.
So happy to see my 1st homemade paneer block.sooo soft.
Thnx dassana.
welcome vibha
Hey Dassana,
Thanks for the easy instructions. I was wondering since both lemon juice and curd can be used, is there any difference with the texture of paneer that comes. I was confused with which one to use. Does lemon juice give a different texture as compared to curd?
with curd you get a bit softer texture in the paneer. plus with curd you won’t get the after taste if you add vinegar or lemon juice. depending on what you have, you can use any.
Can you also store the paneer in the whey, or would that toughen it?
generally paneer is not stored in the whey. not sure of the reason though. some people keep the set paneer in water in the refrigerator. this is so, so that the paneer stays moist.
Salam Dassana!
Sidra from Pakistan…I was looking for new and into the budget recepies…and I am happy that I clicked the very right place…I am really inspired by the way you guide the people…this honest try of yours reveals your enthusiasm to cooking…
God bless you for giving us the very best directions for cooking…I will be a regular visiter Inshallah….
thanks sidra. glad to know that you liked the blog and our love for cooking. big thanks for your blessings. keep visiting.
Hi dear dassana I’m so happy and surprised on seeing my paneer block. I could not believe my eyes. No one can explain clearly like u. Thank you so much. I became a big fan of you .
Welcome Dr.Saranya Vikram. keep visiting the site and try some recipes;.
Wow I made it
Thanks a lot Dassana
welcome sangita
Oh my. I made this tonight and cannot believe how easy it was to make delicious, soft paneer! Better than a lot of paneer I have eaten, in India and Australia. Thank you so much.
welcome alice. glad to know that you liked the method.
Hi, I have been hesitating to prepare paneer as many of my friends could not get a firm paneer. Yesterday finally followed your recipe and it came out wonderfully. Its soft, firm and tasty. Thanks for sharing the recipe.
welcome giridhar. now you can easily make paneer at home !!
Hi dassana
Lovely!!! Thanks for sharing
Also I need to say that you have got a fantastic Blog
I need to try them all one by one soon
Also, can you please tell us how to make tofu at home
I’m just longing for this recipe. Plz do share on how to make tofu as soon as possible
thanks priya. making tofu is a bit complicated as you need some special stuff for it which is not available in india. you can search on google as there are a lot of recipes showing how tofu is made.
Brilliant, came out so well.
this is a fantastic idea
Super fantastic recipes.
thanks ganesh
Excellent.
Hi Dassana. I followed the directions and ended up with awesome quality paneer, much much better than the store brought, frozen version. Thank you for all the wonderful recipies on this site, including this simple paneer. Keep it up! 😀
welcome ashu.
Can I use Limbu Ka Phool
(Cytric Acid ) to curdle the milk?
And how would I store paneer or
Khoya in the freezer ? Thank U
you can use citric acid to curdle the milk. i usually keep the home made paneer in an air tight box and keep on the rack below the freezer if using in a couple of days. you can also keep in the freezer. if using the next day, then i just refrigerate it. keep the khoya in an air tight container or the khoya packet in the freezer.
Really a wonderful recepie. I just tried it in my home today. So tasty. Thanks a lot.
welcome fathima
Perfect recipe!
Hi Dassana,Thank you for sharing such an important aspect of vegetarian cooking – step by step process of making home made paneer. The pictures and write up are very informative!
tehminaaz, thanks for this sweet comment. i am glad you liked the step by step recipe of making paneer.
Hi dassana ,even thou i knew how to make paneer ,i was not comfortertable to make it .now after i read your recipe,i went strate in the kitchen and started showing my kids how to make it.you don’t only teach us ,but you bring the confident in to the people , that means you don’t only reach in to the reader’s computers but you knew how and how deep to reach in to their mind also .these words of mine should explain you how well and how perfectly your recipes are written and explained.keep up good job.
dear hemlata, those were really inspiring and encouraging words. a heartfelt thank you to you.
thanks a lot to u dassana….u have made cooking very easy for people like me..becoz of u i have started cooking once again…thanks for ur good recipes….bye
thanks vandana. cooking is easy, but just that at times we require more patience while cooking, especially some of the indian dishes.
Thank you so much for posting homemade paneer, now i can make it easily at home and whenever i need. thanks once again.
welcome srijana and thanks.
Your post on paneer was very well explained & came as a saviour as I was having trouble keeping it from crumbling…
I tried your method & suceeded in keeping it in one piece…thanks a ton for the post..
welcome jayashree.