Ragi Mudde Recipe
More a technique than a recipe, Ragi Mudde are healthy balls made from finger millet flour and water. They are a delicacy and a staple food mainly in Karnataka and in some parts of Tamil Nadu and Andhra Pradesh. These delicious and nutritious balls could be considered the original “protein bites,” intended to keep farmers and working folks full during the day.
About Ragi Mudde
Ragi Mudde is a simple but wholesome healthy food of soft balls made with two basic ingredients – finger millet flour and water.
Finger millet is called as Ragi in Kannada, Mandua in Hindi, Nachni in Marathi and Ragulu in Telugu. The word “Mudde” means lump in Kannada language.

If you have ever before attempted to make this hearty peasant food before, you may have had the unfortunate result of an undercooked or floury tasting ball at the end.
My friends, I can promise that I’m sharing THE recipe that always works for me. You won’t have to struggle if you follow along with my pictures and instructions.
I also love how quick and easy these tasty energy bites are to assemble. The entire process is done in 20 to 30 minutes; you can’t beat that!
Finally, with a very short list of humble ingredients, ragi mudde is a deeply nourishing meal that costs very little to make. Read on below for more reasons to fall in love with this simple meal.
Holistic Health Benefits of Finger Millet
Ragi (a.k.a. finger millet) has more calcium than milk and is rich in protein. It is a very healthy grain that is often used in South Indian cuisine.
Ragi Malt or porridge is given to small babies to give them bone strength, lactating women and convalescing adults for faster recovery times.
Finger millet is also high in B vitamins, which are excellent for maintaining stamina and energy during the day. Ragi’s high potassium levels are also a great source of nutrition.
Since it is low on the glycemic index and high in fiber, ragi is also a heart healthy food that may be suitable for those suffering from diabetes. Fiber is also a necessary prebiotic that is helpful with keeping your digestive system intact.
In short, this recipe for ragi mudde is an excellent introduction to the superfood you didn’t know you needed in your life – finger millet! Now let’s get cooking, shall we?
Advisory: Please note that I always recommend you consult with a physician for any health related diet advice.
How to make Ragi Mudde
Prep Equipment & Make Ragi Slurry
1. Before beginning, set aside a heavy-bottomed pan or dutch oven, some water in a bowl and wooden stick to mix the mixture.
You can use a spatula with a wooden handle/base or the bottom of a wooden spatula. I used a wooden spatula.

2. Measure 1 cup of ragi flour. Remove 2 teaspoons of the ragi flour and set aside.

3. Take 2 cups water in a saucepan or pot. Add the 2 teaspoons ragi flour to the water.

4. Mix well with a small wired whisk or spoon.

5. Add salt and mix again. NOTE: Traditionally salt and ghee are not added, but I like to add some salt for added flavor.

Boil Ragi Slurry
6. Place a thick bottomed pan on the stove over medium heat.
Note: Using a good, sturdy pan is very important as you do not want the ragi to burn at the bottom of the pan.

7. Stir occasionally. Let this slurry come to a boil.

Make Ragi Dough
8. When the slurry begins to boil, lower the heat and sprinkle the remaining ragi flour evenly all over the pan.

9. Ensure that the ragi flour is evenly distributed across the top of the liquid. Do not mix or stir.

10. Let it cook undisturbed for 3 to 4 minutes on low heat.

11. After this undisturbed cooking period, mix very thoroughly with the wooden stick. Prepare yourself for an arm workout! That’s an added health bonus, no? 😉

12. Ensure that there are no dry flour specks or lumps visible as you go on mixing.

13. Incorporate any visible dry flour into the wet mixture by continuing to stir. The mixture will thicken and become sticky.
Note: 2 cups of water works perfectly for me in my climate. But if the dough mixture looks dry, add in a few tablespoons of hot water. If it is too moist, then add 1 to 2 tablespoons of ragi flour.

14. Keep on mixing for a few minutes and you will see the mixture clumping together and gathering around itself.

Steam Dough
15. Scrape any remaining dough off the wooden stick and return to the pan. Cover and steam for 6 to 7 minutes on low heat.

16. When the steaming is complete, turn off the stove and remove the pan from heat. Allow it to remain covered and continue to steam for 5 minutes off heat.
The below photo shows the consistency of the cooked ragi dough after removing it from the stove-top

17. In the below photo you will see the ragi consistency after steaming in the residue heat on the countertop.

18. You will also see a thin layer of the dough stuck at the bottom and looks dry or overly cooked. This is an indication that your ragi dough has been cooked properly.

19. When you take a tiny portion of the dough and shape it into a ball, it will easily form a ball without sticking to your fingers.

Make Ragi Mudde
20. Brush or spread some water on a plate.

21. Transfer the cooked ragi mudde mixture onto the plate using the stick. Remove any small lump from the bottom of the pan and add on the plate.
Leave the mixture that is stuck to the bottom or the sides; they cannot be removed without some soaking time.

22. Spread water in your palms and begin to knead the mixture.
This mixture will be very hot, so the water in your palms and fingers will help you to be able to knead.
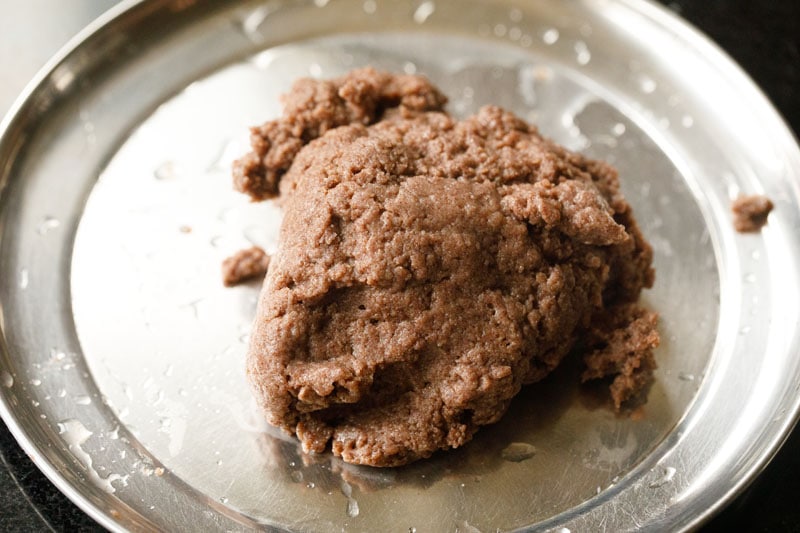
23. Knead very well to a smooth dough. If you like, add 1 teaspoon ghee for some extra healthy fat while kneading.

24. Portion the dough and make medium-sized balls from it. Shape into neat balls by rolling the dough between your palms.

25. Place them in a steel box. I keep them in the roti box, so that they stay warm and soft.

26. Serve these healthy ragi balls with soupy lentil dishes like saaru, basaru, Rasam. You can also serve with Sambar or chutneys like red chili chutney*, Onion Chutney, Coconut Chutney or Tomato Chutney.
*I have shared the recipe of red chili chutney in the recipe card.

How to Serve and Eat Ragi Mudde
I would recommend that you first make your saaru, rasam, sambar or chutney, and then make the mudde. They take less time to cook and are easy to make.
While eating, pinch a tiny portion from the mudde, shape into a ball with your thumb and forefinger. Dip it and coat with the saaru or rasam.
Place it in your mouth and swallow it. Ragi mudde are not to be chewed, but swallowed. Make sure to make tiny balls so that they do not get stuck in your throat. If they are feeling lumpy in your throat, then drink water.
Variations
There are few variations of this recipe such as Ragi Sangati and Ragi Kali which have rice flour or cooked rice grains included. Please note that ragi mudde is made with only ragi flour and water.
Storage
Eat Ragi mudde within 2-3 hours of making them. Any leftovers should be refrigerated for up to 1 day.
FAQs
What is ragi mudde made of?
Ragi Mudde is made traditionally with only two ingredients – finger millet flour and water. Seasonings like salt and fats like ghee or oil are optionally added.
Is Ragi ball good for health?
Yes, these ragi balls are healthy being as ragi is a rich source of calcium, fiber, potassium and protein. It is also an Indian super food.
Can we chew Ragi Mudde?
Tiny balls are made from the Ragi mudde and dipped in a soupy lentil dishes (saaru, rasam, basaaru) or chutney and then eaten by swallowing and not chewing.
Why my Ragi Mudde is sticky?
You have perhaps not cooked the dough mixture completely and hence the stickiness. If the ragi dough is cooked perfectly, there won’t be any stickiness.
Is Ragi hot or cold?
Ragi has cooler properties and hence considered to be cold food. It is best to have it during hot summers.
Step by Step Photo Guide Above

Ingredients
For Ragi Mudde
- 1 cup ragi flour – finger millet flour or sprouted finger millet flour
- 2 cups water or add as required
- ¼ teaspoon salt – optional
For Chilli Chutney
- 9 to 10 kashmiri red chillies
- 1 teaspoon tamarind – tightly packed
- 1.25 cups water – for cooking red chillies
- 2 tablespoons water – for blending or grinding
- salt as required
- 1 tablespoon oil
- ½ teaspoon mustard seeds
- 6 to 7 curry leaves
- 1 pinch asafoetida
- 5 to 6 fenugreek seeds (methi seeds)
Instructions
Prep Equipment and Make Ragi Slurry
- Before beginning, set aside a heavy bottomed pan or dutch oven with some water and wooden stick to mix the mixture. You can use a spatula with a wooden handle/base or the bottom of a wooden spatula. I used a wooden spatula.
- Measure 1 cup of ragi flour. Remove 2 teaspoons of the ragi flour and set aside.
- Add to 2 cups water in a sauce pan or pot. Add the 2 teaspoons ragi flour to the water and mix well.
- Add salt and mix again. Note that traditionally salt and ghee are not added, but I like to add some salt.
Boil Ragi Slurry
- Place the thick bottomed pan containing the slurry on the stove over medium heat.
- Stir occasionally. Let this slurry come to a boil.
Make Ragi Dough
- When the slurry begins to boil, lower the heat and sprinkle the remaining ragi flour evenly all over the pan.
- Ensure that the ragi flour is evenly distributed across the top of the liquid. Do not mix or stir.
- Let it cook undisturbed for 3 to 4 minutes on a low heat.
- After this undisturbed cooking period, mix very thoroughly with the wooden stick.
- Ensure that there are no dry flour specks or lumps visible.
- Incorporate any visible dry flour into the the wet mixture by continuing to stir. The mixture will thicken and become sticky. NOTE: 2 cups of water works perfect for me. But if the dough mixture looks dry, add in a few tablespoons of hot water. If it is too moist, then add 1 to 2 tablespoons of ragi flour.
- Keep on mixing for a few minutes and you will see the mixture clumping together and gathering around itself.
Steam Dough
- Scrape any remaining dough off the wooden stick and return to the pan. Cover and steam for 6 to 7 minutes on low heat.
- When the steaming is complete, turn off the stove and remove the pan from heat. Allow it to remain covered and continue to steam for 5 minutes.
- When you take a tiny portion of the dough and shape into a ball, it should easily form a ball without sticking to your fingers.
Knead and Shape Ragi Mudde
- Brush or spread some water on a plate.
- Transfer the cooked ragi mudde mixture onto the plate using the stick. Remove the small lump at the bottom of the pan. Leave the mixture that is stuck to the bottom or the sides; they cannot be removed without some soaking time.
- Spread water in your palms and begin to knead the mixture.
- This mixture will be very hot, so it the water in your palms and fingers will help you be able to knead.
- Knead very well to a smooth dough. If you like, add 1 teaspoon ghee.
- Portion the dough and make medium-sized balls from it. Shape into neat balls by rolling the dough between your palms.
- Place them in a steel box. I keep in the roti box, so that they stay warm and soft.
- Serve with saaru, basaru, Rasam, Sambar, red chili chutney*, Onion Chutney, Coconut Chutney or Tomato Chutney. *I have shared the recipe of red chili chutney below.
Making Chili Chutney
- Take 1.25 cups water, red chillies (broken and seeds removed) and tamarind in a frying pan.
- Cook for about 5 to 6 minutes on medium-low to medium heat until the red chillies soften.
- Drain the water and set aside the softened tamarind and red chillies. When warm, add them to a spice grinder or blender. Add salt as needed and 2 to 3 tablespoon water. Blend to a smooth chutney. Transfer to a heat proof bowl.
- Heat 1 tablespoon oil in a small pan. Crackle ½ mustard seeds. Add 6 to 7 curry leaves, 1 pinch asafoetida and 5 to 6 methi seeds.
- When curry leaves become crisp, pour the tempering ingredients in the chutney. Mix and serve.
- Note that with kashmiri red chillies, the chutney is not very spicy. For spicy chutney use chillies which have a higher pungency.


Awesome! Very neatly described. Do you have any tips for reheating Ragi Mudde?
Thanks. You could steam them in an idli cooker or a pan until lightly warmed or heated through. Steaming also does not dry them out. I hope this helps.
I tried making ragi mudde for the first time and followed this recipe. It came out just awesome!!! Loved the taste, texture appearance, everything. Too good ???
Great and thanks for sharing this wonderful feedback and the rating too. Glad!
Best food for all ages ?
Agree!