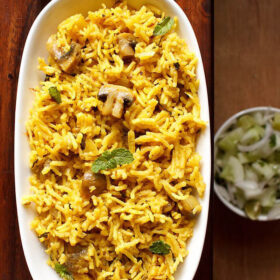
This Veg Biryani recipe is an authentic Indian vegetarian dish packed full of your favorite rice, veggies, and spices. Made with patience and lots of love, this delicious Hyderabadi Veg Dum Biryani requires both care and attention to detail. The savory flavors in your first bite are well worth the time and effort spent in the kitchen.
About Biryani
Biryani also spelled as Biriyani is a popular dish not only in India but in South Asia as well. In simple words Biryani is a rice and curry casserole. The curry can be meat based or vegetable based and also made with mushrooms, soy chunks or paneer.
Similar to some layered and baked pasta dishes, the curry is layered with semi-cooked rice – later to be baked or dum cooked until the rice is completely done and the curry or gravy has been absorbed by the rice.
Usually the meat is marinated and cooked later for the curry, but for vegetables marination is not done or is needed.
Though mostly biryani is layered and cooked there are several one-pot biryani dishes, specifically in the Southern parts of India where the biryani is cooked much like the way a pulao is made by adding all the ingredients in a pot and dum cooking them.
Table of Contents
Biryani, though usually made with meat is also made with seafood, eggs, paneer (Indian cottage cheese), mushrooms, unripe jackfruit and vegetables. In some versions of biryani, the curry or gravy is made with both eggs and vegetables or meat and vegetables.
The spices, aromatics, flavoring ingredients also differ widely from state to state in India. Example in South India you will see the addition of curry leaves, black pepper, coconut milk, cilantro etc. So no two biryani dishes will taste the same.
Sometimes biryani is made using a special type of ground spice blend known as the Biryani Masala. This spice blend is made by grinding whole spices that are usually added to a biryani. In this recipe you don’t need to add biryani masala. Just the whole spices are enough.
About Dum Cooking Method
A traditional and conventionally made Biryani is always cooked on dum. Wondering what is dum cooking?
Dum cooking is also known as dum pukht or cooking on dum. The dum pukht method of cooking comes from Persia.
It is a technique or method of slow cooking food in tightly sealed earthen pots. The various layers of food or the ingredients are kept in a clay pan or pot which is then sealed tightly using wheat flour dough.
As the pot is tightly sealed, steam cannot escape from it. The result is that the food ingredients or layers are slow cooked in the steam emanating in the pot and in their own juices which makes the food very flavorful.
Traditionally clay pots are used while making dum biryani. Nutrients are not lost in this process and thus dum cooked food is nutritious.
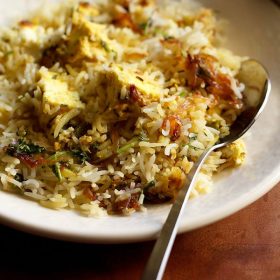
About This Veg Biryani Recipe
This Hyderabadi veg biryani is one of the best vegetarian biryani recipe I make – loved by friends, family, and readers alike for more than 10 years.
There are hundreds of different variations for making a veg biryani recipe, each having their own unique tastes, ingredients, and flavors – but my tried and true recipe is loosely inspired from my mom’s version and a Jigg Kalra’s book that I had purchased decades back.
Over the years, I have experimented with this veg biryani recipe with different ratios of ingredients. And finally I came to the perfect recipe that is insanely delicious and keeps you asking for more.
I have forgotten the number of times I have made this veg dum biryani recipe for family, friends and get-togethers. It has always been a much loved dish on the dining table.
In my opinion, recipes always turn out even better when tied to love and care!
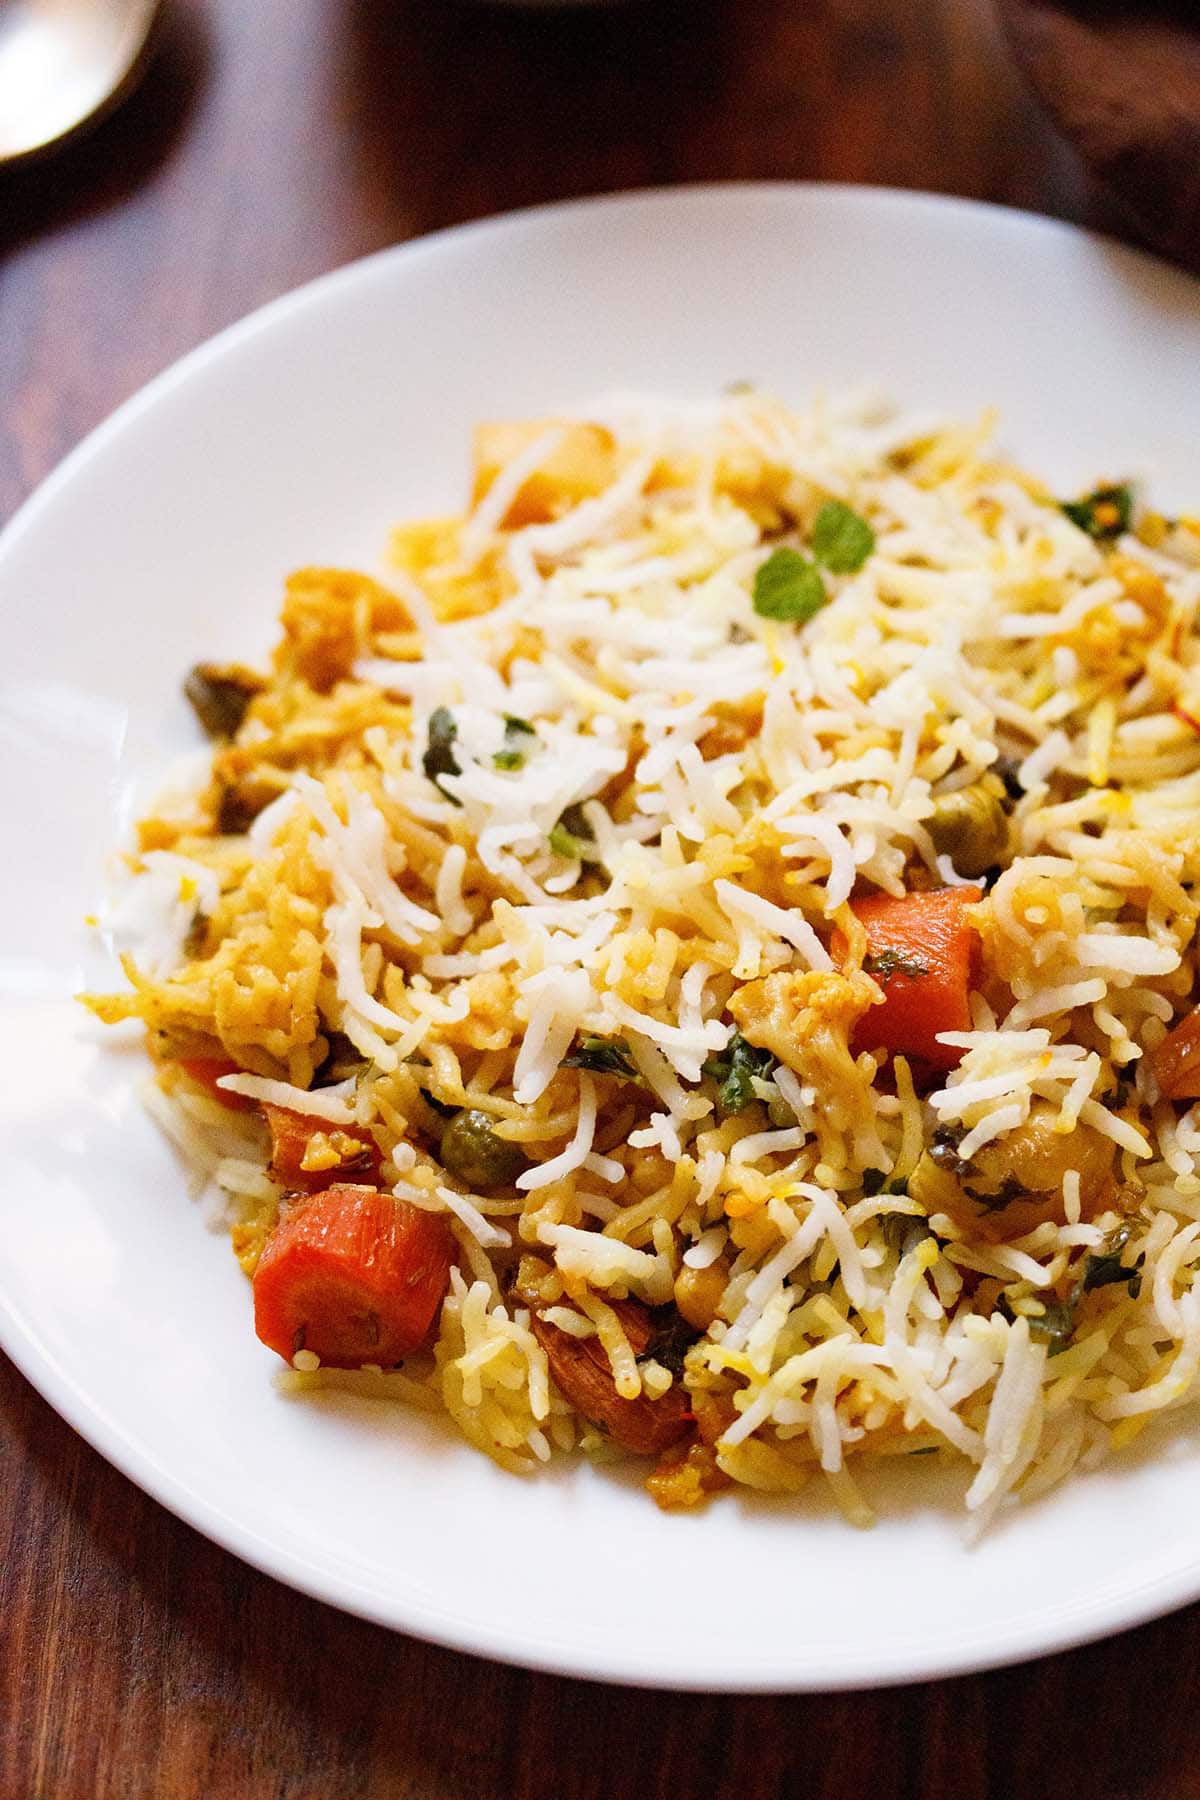
This version of veg dum biryani is light, a bit spicy and super delicious. The subtle flavors of the garam masala, caramelized onions and yogurt are perfectly infused in the vegetable chunks.
Each bite has the taste, flavor and aroma of the masala, as well as the unique taste of the vegetables. It truly is a perfectly balanced dish.
What Ingredients Should I Use
Rice: I prefer to use aged basmati rice, but regular basmati rice is also appropriate.
Water: For soaking rice and for cooking the vegetable gravy and rice. You will also need kewra water (pandanus extract) or rose water for layering the dish.
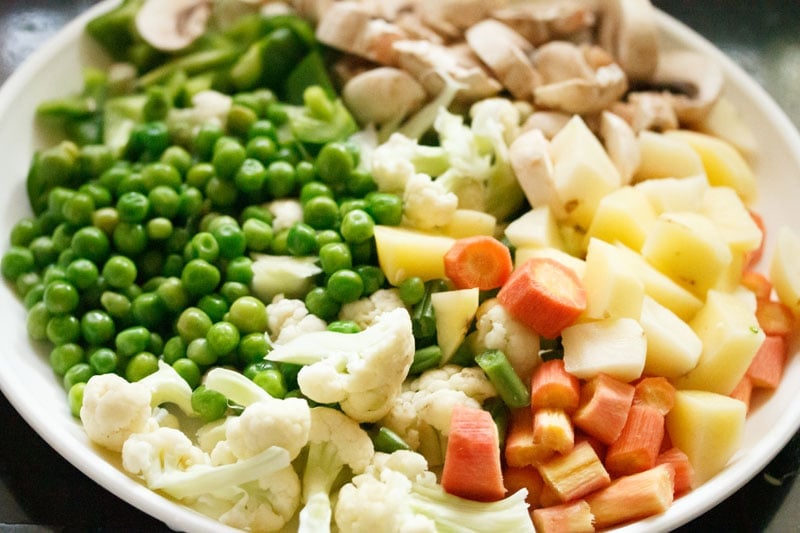
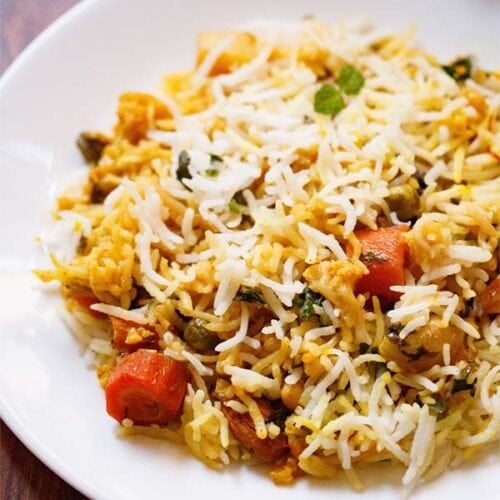
Veggies: Veg biryani can actually be made with just one vegetable or several different kinds of of veggies. I like to add a variety of vegetables when making this vegetarian dish. In this recipe, I have added a mix of cauliflower, onions, potatoes, carrots, french beans, bell pepper (capsicum), button mushrooms and green peas. You can even add aubergines, cabbage, broccoli, spinach and kale in your veg dum biryani.
Dairy: Ghee or clarified butter, Curd (yogurt) and milk.
Nuts: Cashews and almonds.
Seasonings: Cardamoms, cloves, cinnamon, tej patta (Indian bay leaf), mace and saffron strands, salt, turmeric powder, red chili powder or cayenne pepper or paprika
Other Ingredients: Shah jeera (caraway seeds), raisins (without seeds), ginger, garlic, chilies, coriander leaves or cilantro, mint leaves
How to Make Veg Biryani
Soak Rice
1. First, rinse 1.5 cups of basmati rice (300 grams) in clean water until the water runs clear of starch. You can use a bowl or colander to rinse the rice. Make sure you soak the rice grains in water for 30 minutes after rinsing them.
Tip: If possible try to use aged basmati rice or sella basmati rice (parboiled basmati rice) to make this hyderabadi veg biryani.
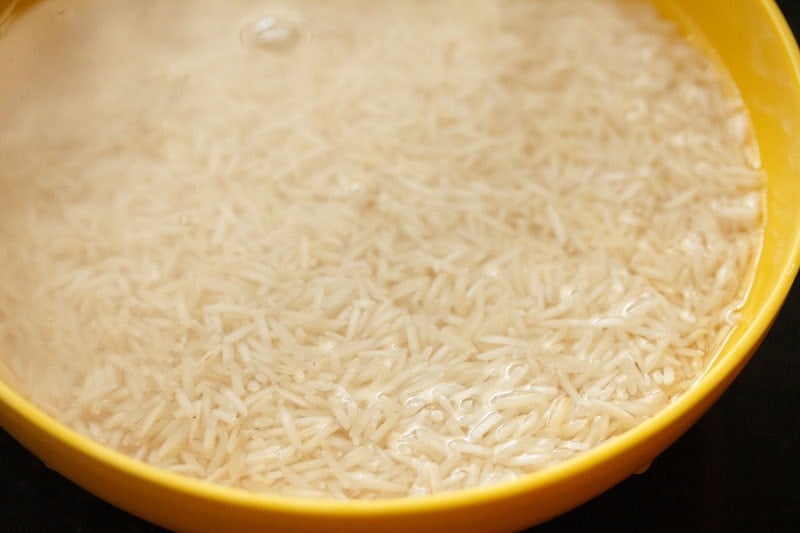
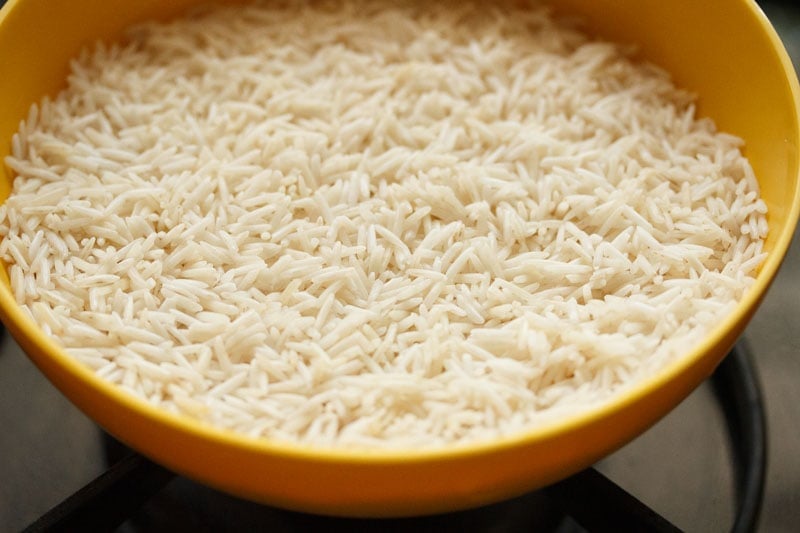
2. Once the rice has been able to soak for 30 minutes, drain all the water and set aside.
Prep Vegetables
3. While the basmati rice is soaking, use that time to prep the other ingredients. First, you will want to rinse, peel and chop all of the veggies. This will make the process of cooking go by much quicker.
What to use: I have used 3 cups mixed veggies including green peas. You can use your choice of mixed vegetables for your veg dum biryani.
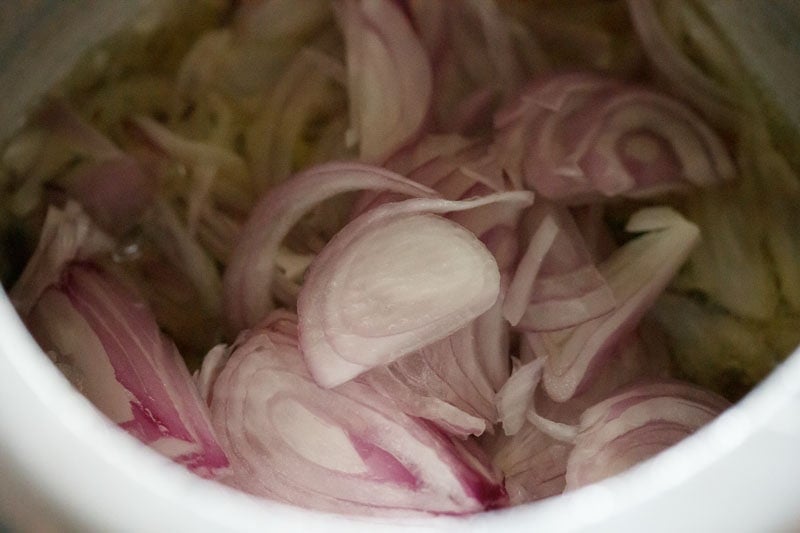
- Onion: Slice 1 large onion thinly (about 1 heaped cup thinly sliced onion).
- Ginger: Finely chop or crush 10 grams ginger (2 pieces of 2 inch ginger or 1.5 tablespoons finely chopped ginger). You should get 1 tablespoon of ginger paste.
- Garlic: Finely chop or crush 5 grams garlic (10 to 12 medium garlic cloves or 1 tablespoon finely chopped garlic). You will need ½ tablespoon garlic paste.
- Chilies: Slit 3 to 4 green chilies.
- Cilantro: Chop coriander leaves (cilantro) and mint leaves. You should get ⅓ cup each of chopped coriander leaves and mint leaves.
Cook Rice
4. After you have organized and chopped all of your vegetables, it is time to cook the basmati rice. You can use any method to cook your rice – microwave, pressure cooking, instant pot or cooking in a pot.
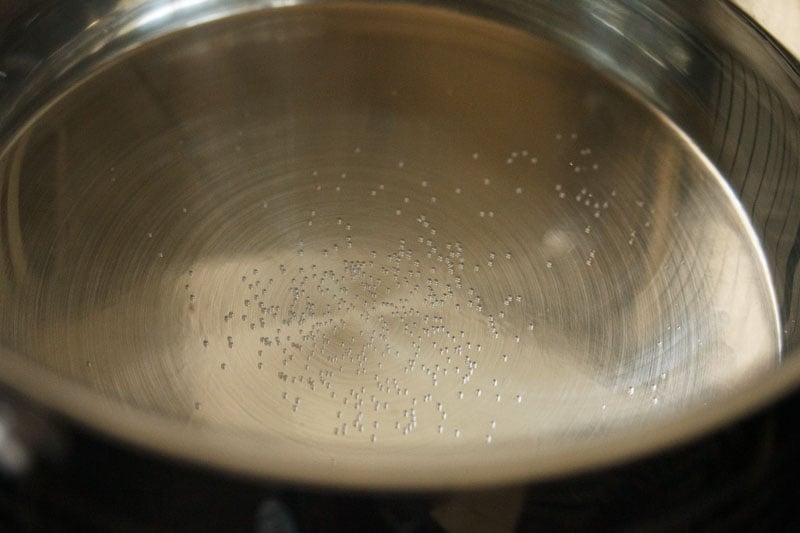
If cooking your rice in a pot, use a deep bottomed pan and add 5 cups water.
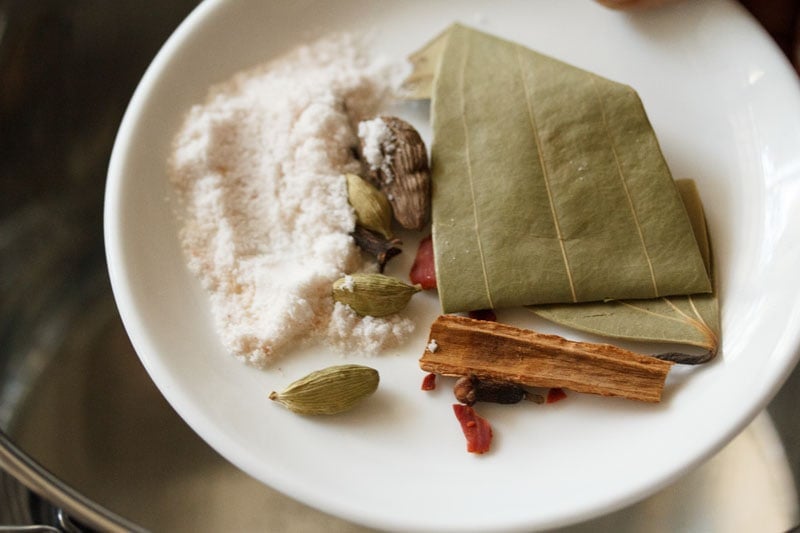
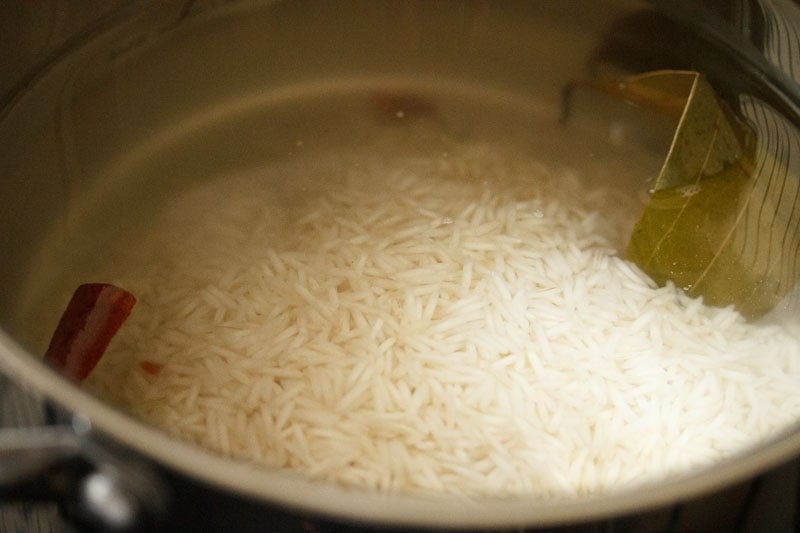
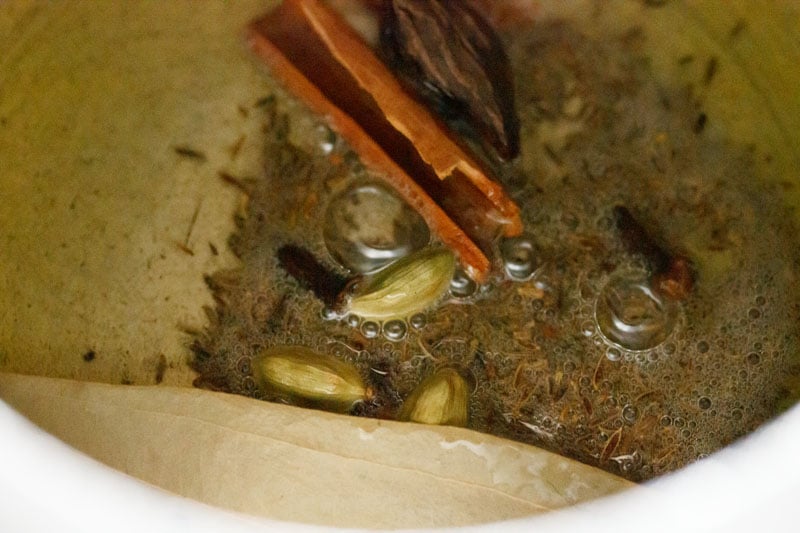
5. When the water is hot, add all the spices and 1 teaspoon salt. Here’s what you want to include for your veg dum biryani in this step:
- 1 tej patta
- 3 green cardamoms
- 3 cloves
- 1 black cardamom
- 1 inch true cinnamon or 1 inch cassia cinnamon
- 2 single strands of mace
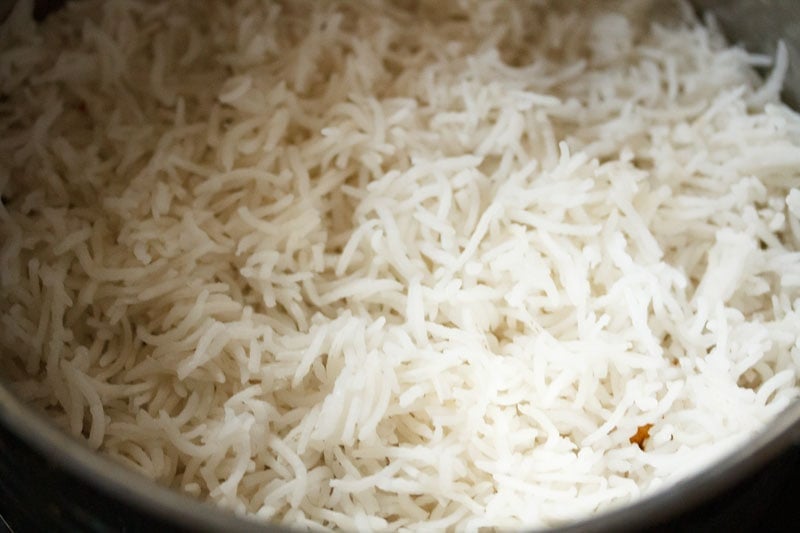
6. After adding the ingredients, bring the water to a boil on a high heat.

7. Now it is time to add the rice for your veg biryani to the spice mixture in the pot.
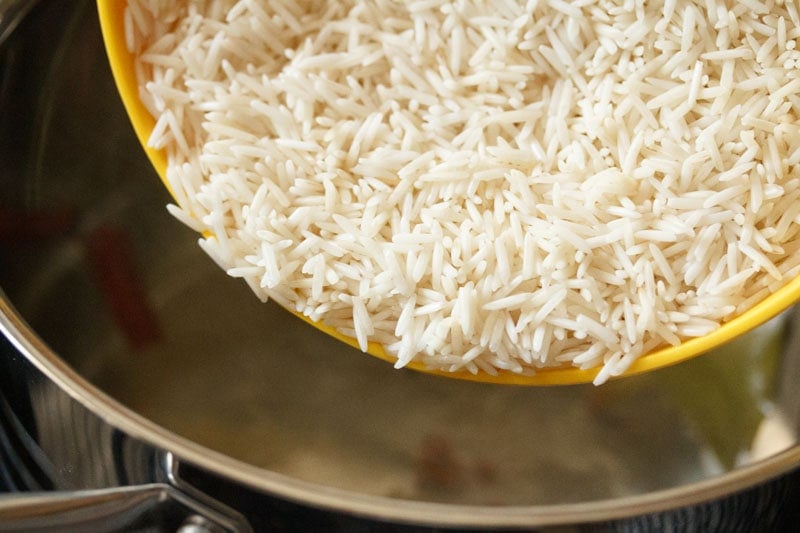
8. Gently stir with a spoon or fork after you add the soaked basmati rice. Check the taste of water and ensure it is slightly salty.
Tip: If the water is not tasting slightly salty, then add some more salt.
9. Do not reduce the heat and continue to cook the rice grains.
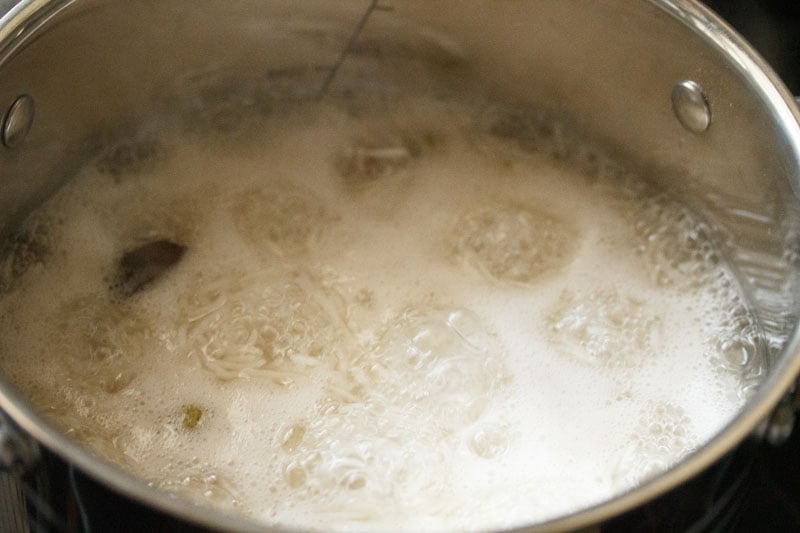
10. The rice should not be fully cooked, but a bit undercooked or about 75% or ¾ of the way cooked.
Tip: Taste the rice! The grains should still have a slight bite to them.
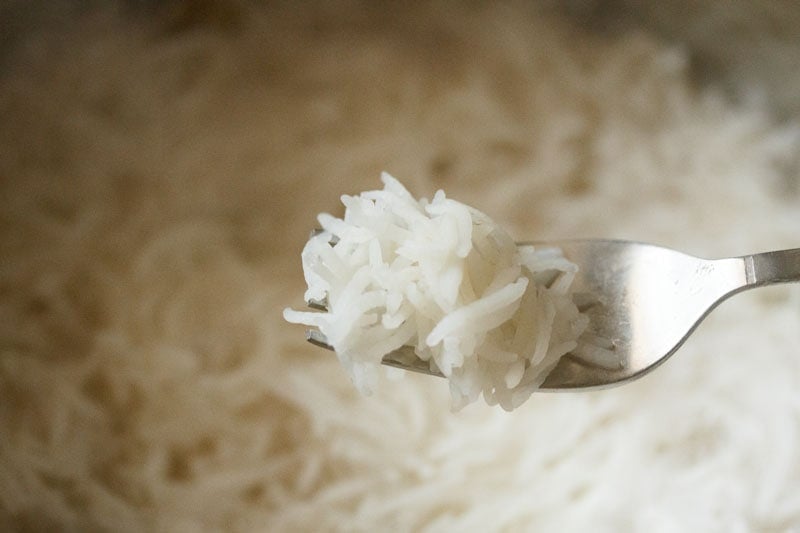
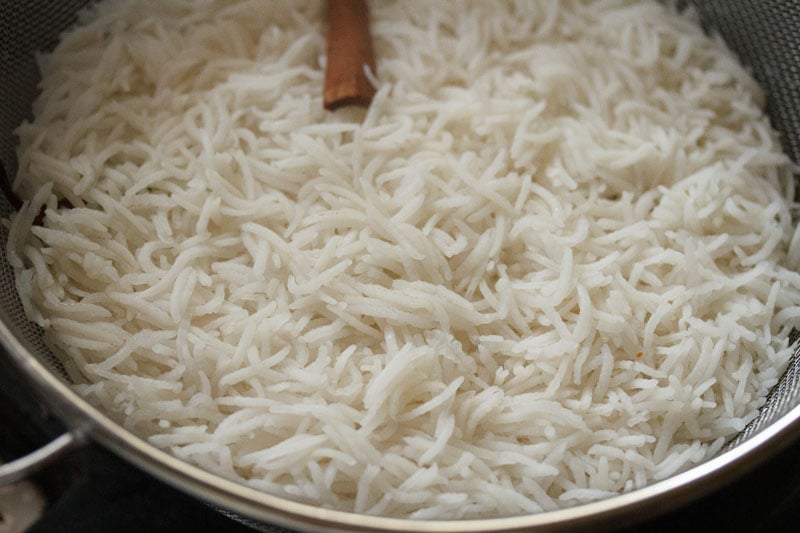
11. Drain the semi-cooked rice in a colander. You can also rinse them gently with water so that the grains stop cooking.
Make Biryani Gravy
12. In a 2-litre pressure cooker or a pan, heat 3 tablespoons of ghee, then add the following spices. Sauté the whole spices until they crackle. You can make the vegetable gravy in a pan as well.
- 1 teaspoon shah jeera (caraway seeds)
- 1 tej patta
- 3 green cardamoms
- 3 cloves
- 1 black cardamom
- 1 inch cinnamon
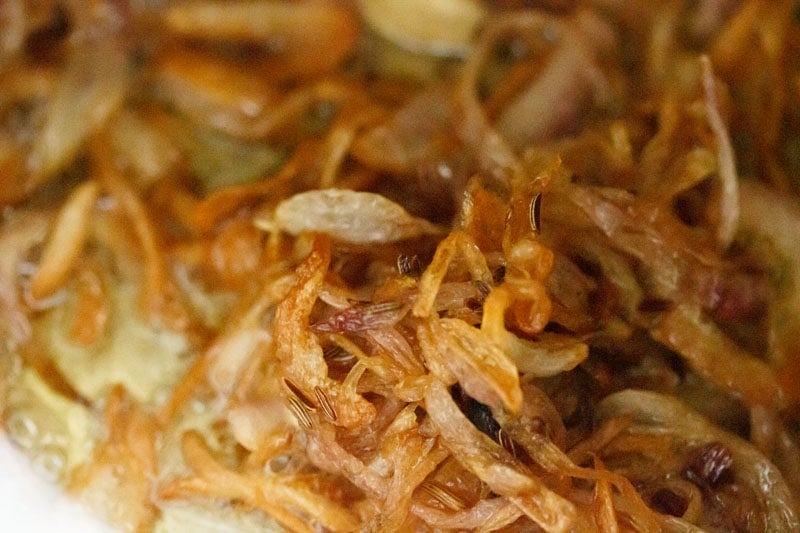
13. Next, add the sliced onions.
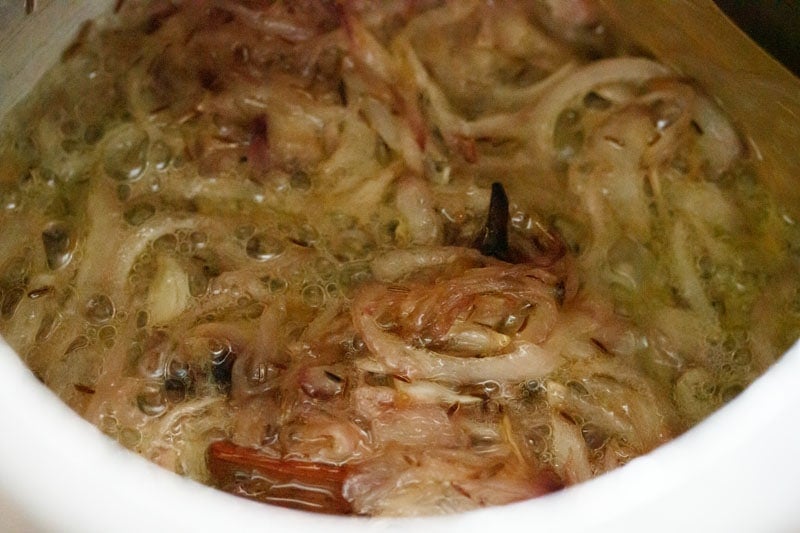
14. Stir and sauté the onions on a low to medium heat. Onions can take a long time to cook, so add a pinch of salt to quicken the cooking process.
Stirring often sauté the onions, so that they cook evenly.
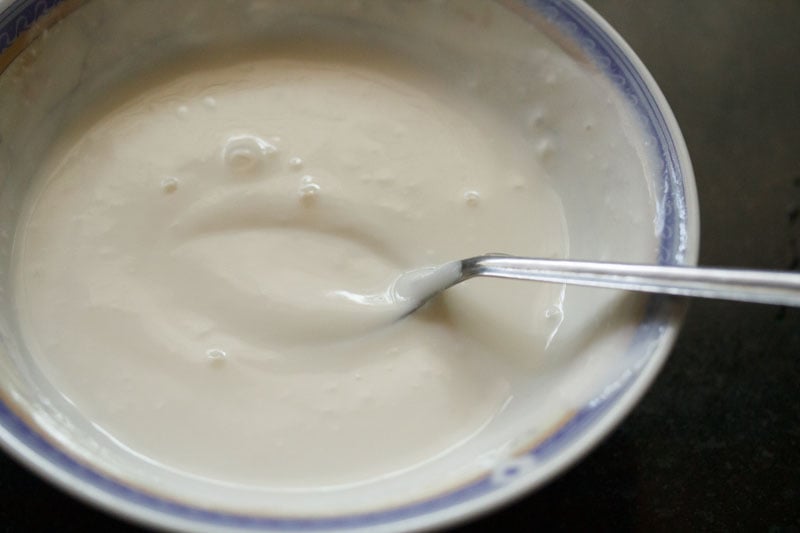
16. When the onions are cooking, take 1 cup fresh curd or yogurt in a bowl. Beat the curd with a spoon or whisk until it becomes smooth.
17. Sauté the onions until they become golden brown or caramelize. Try not to burn them.
18. Add the ginger-garlic paste and sliced green chilies. You can also finely chop the ginger-garlic and add if desired.
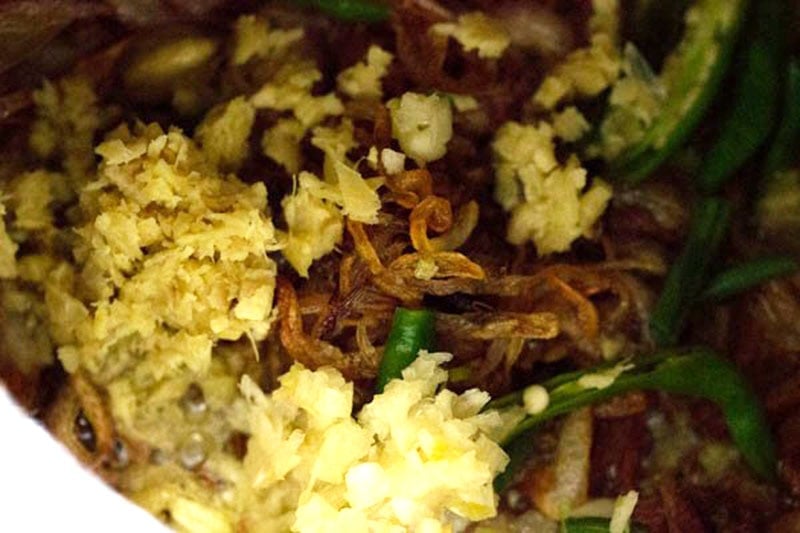
19. Sauté the mixture for some seconds until the raw aroma of ginger-garlic goes away.
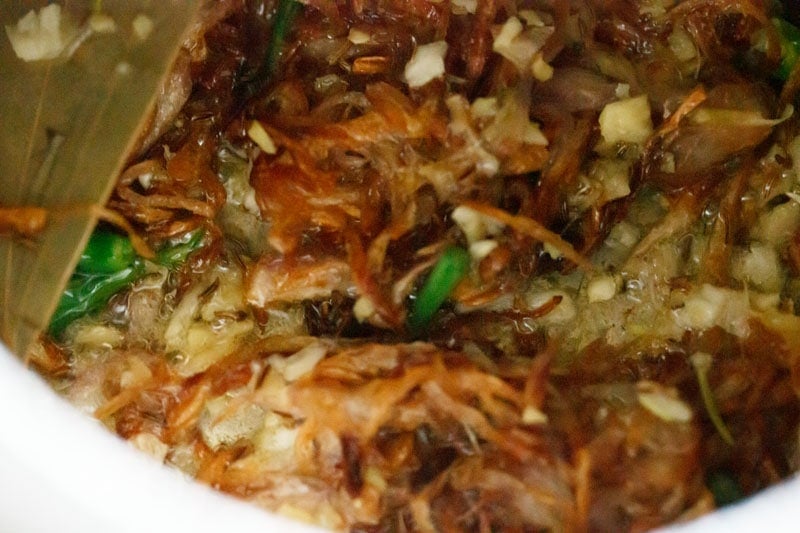
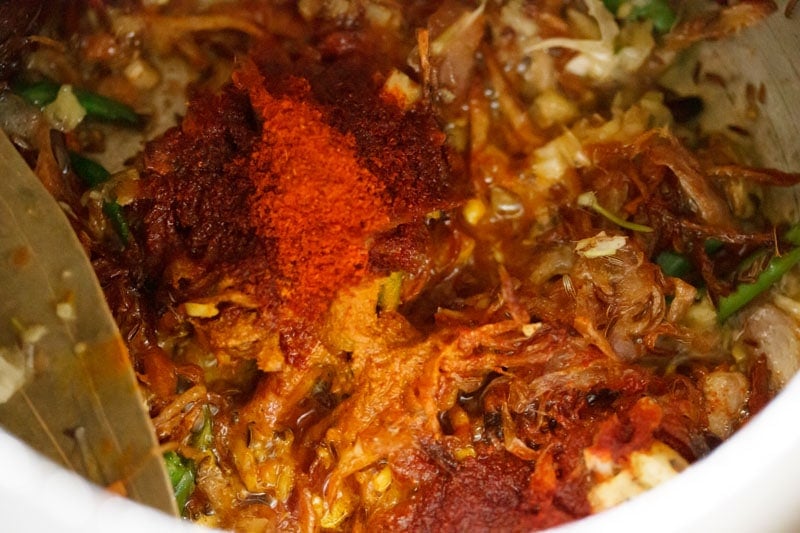
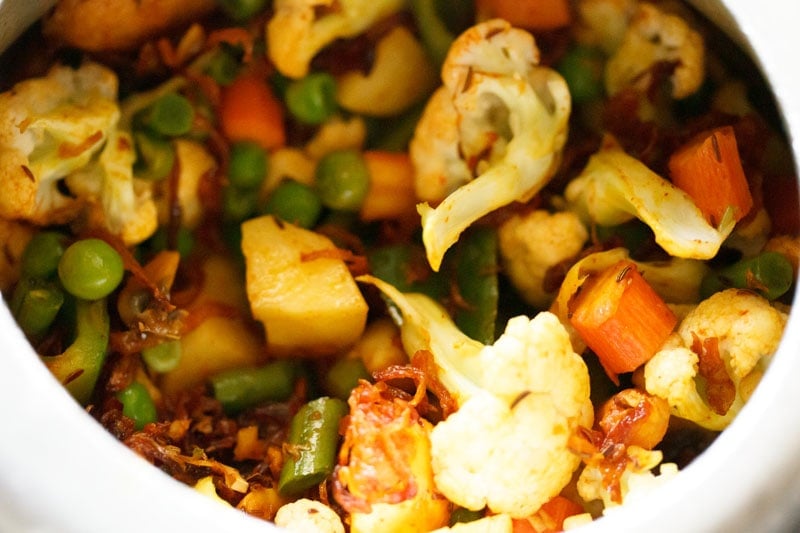
20. Add the ½ teaspoon turmeric powder and 1 teaspoon red chili powder or cayenne. Stir and mix well.
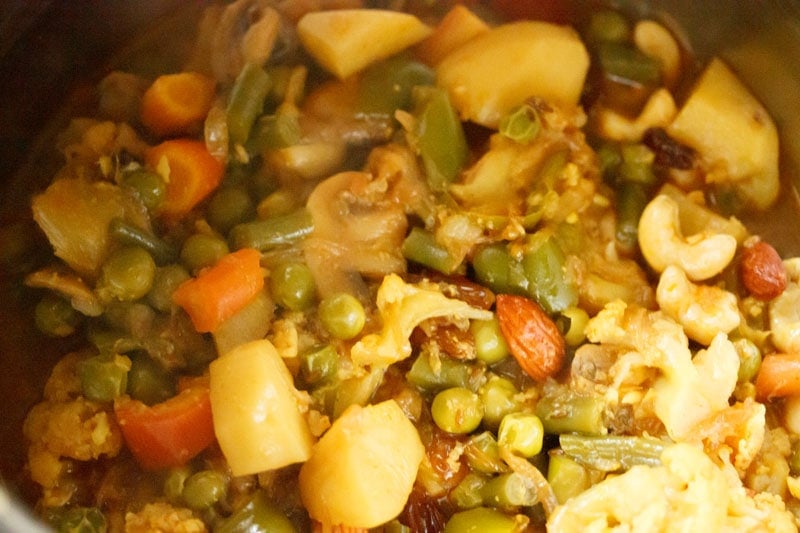
21. Next add the chopped veggies.
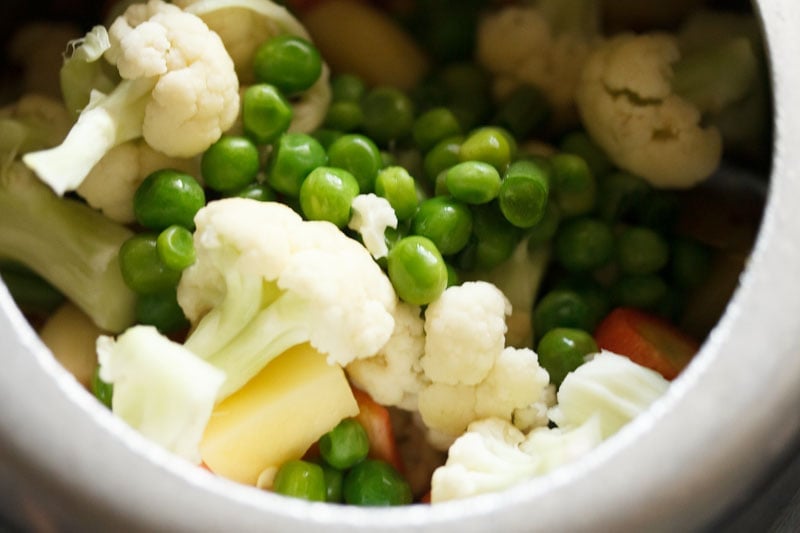
21. Mix thoroughly and sauté veggies for 1 to 2 minutes.
22. Lower the heat and add the beaten yogurt or curd. Stir as soon as you add the curd.
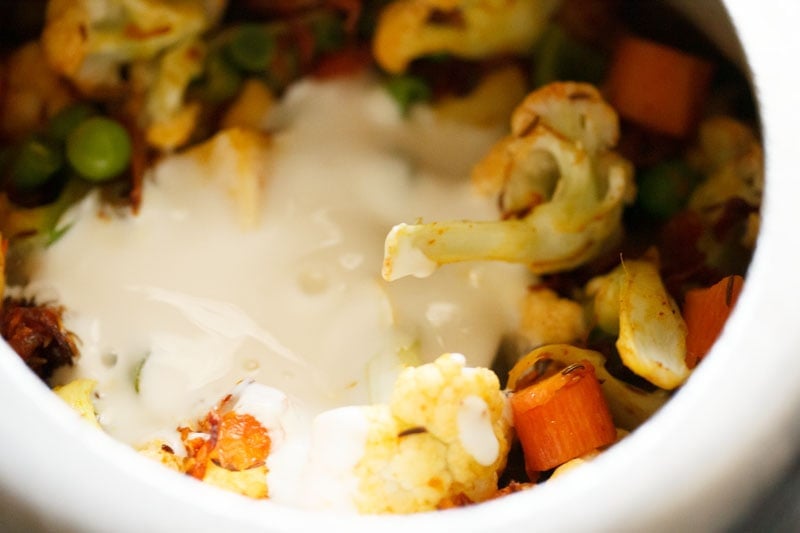
23. Then add ½ cup of water in the pressure cooker. If you decide to cook the veggies in a pot, add ¾ cup water.
24. Season with salt according to taste and mix again.
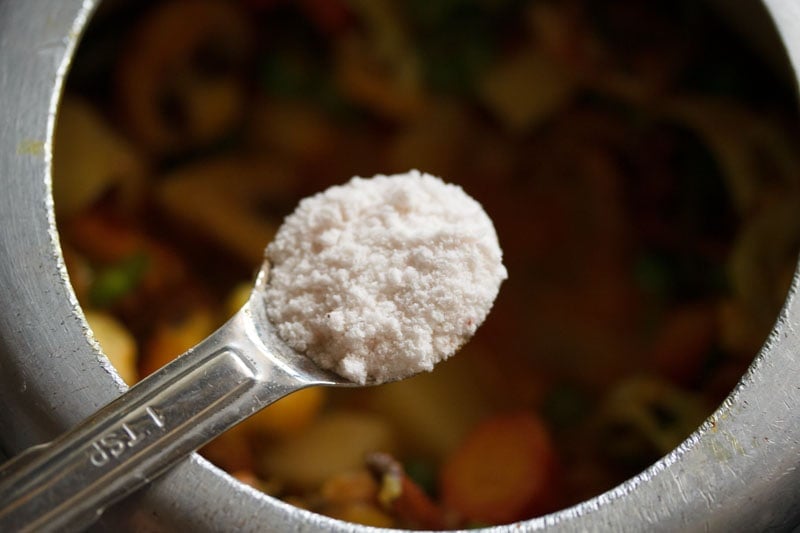
25. Pressure cook for 1 whistle or 3 to 4 minutes on medium heat. If cooking in a pot, then cook until the veggies are done. Don’t overcook the vegetables.
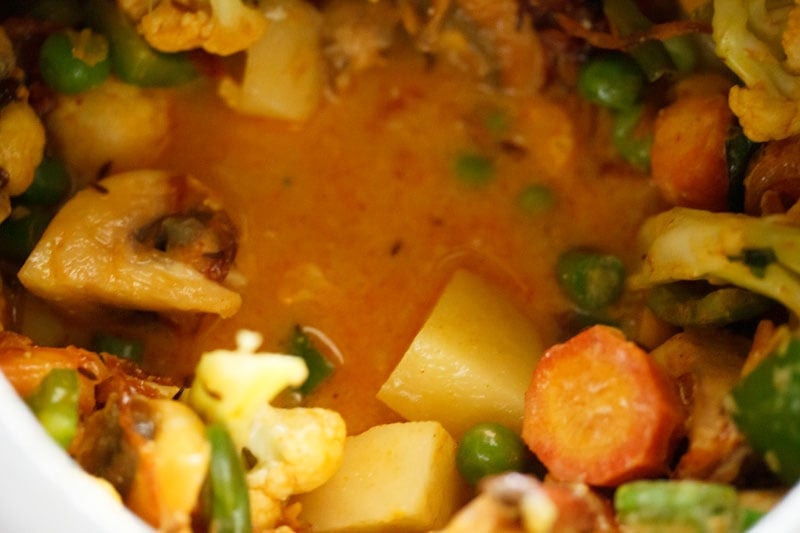
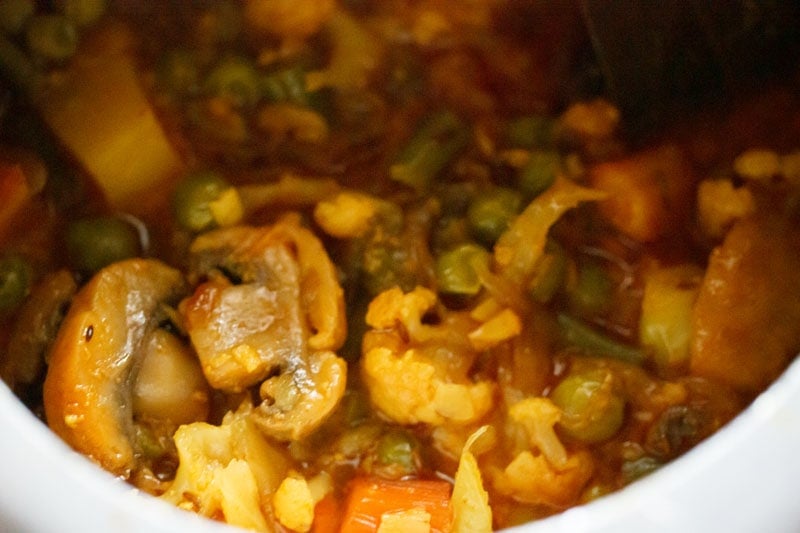
26. When the pressure settles down on its own, remove the lid and check the gravy.
- If the vegetables are not cooked well, then keep the pressure cooker on the stove top and simmer the vegetable biryani gravy without the lid, till the vegetables are tender.
- If there is too much water or stock in the gravy, then simmer till some water dries up. The vegetable gravy should have a medium or slightly thick consistency and should not be watery.
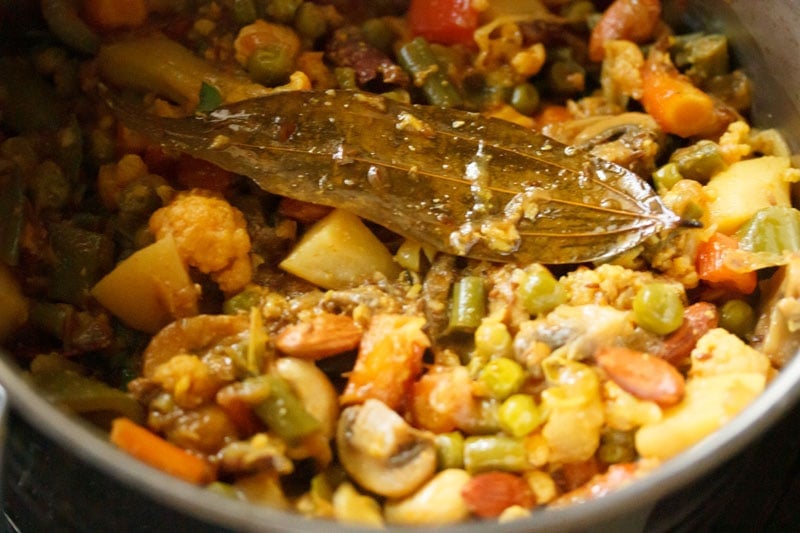
27. Add 2 tablespoons cashews, 1 tablespoons raisins and 2 tablespoons almonds (blanched or raw) to the vegetable gravy.
Tip: Do check the salt and add more if required. You can chop the nuts before adding.
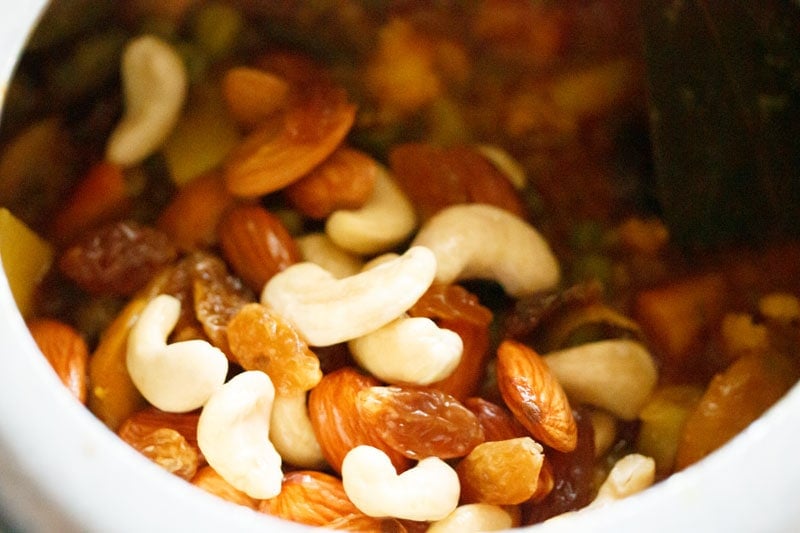
28. Mix, stir, and set aside.
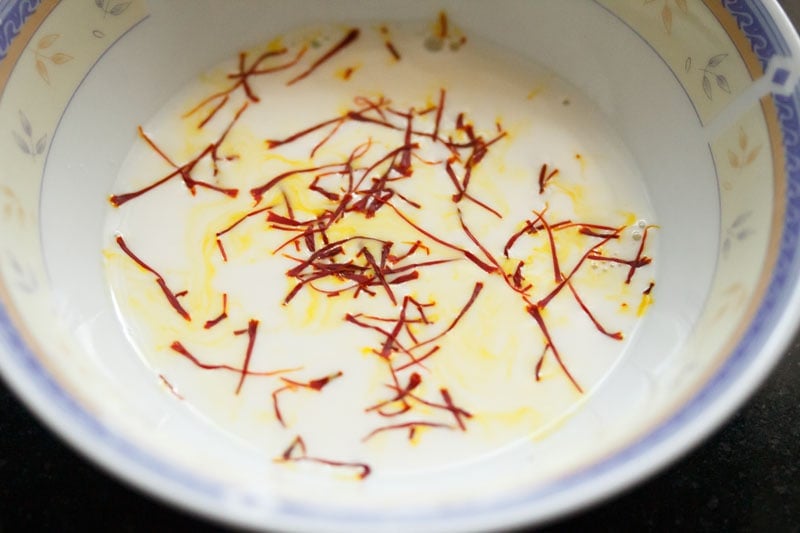
29. While the veggies are cooking, warm 4 to 5 tablespoons of milk in a microwave or in a small pan on the stove top. Add ¼ teaspoon of saffron strands. Stir and set aside.
Assemble and Layer Vegetable Biryani
30. Now in a thick bottomed pan, layer half of the vegetable curry first.
31. Then layer half of the semi cooked rice.
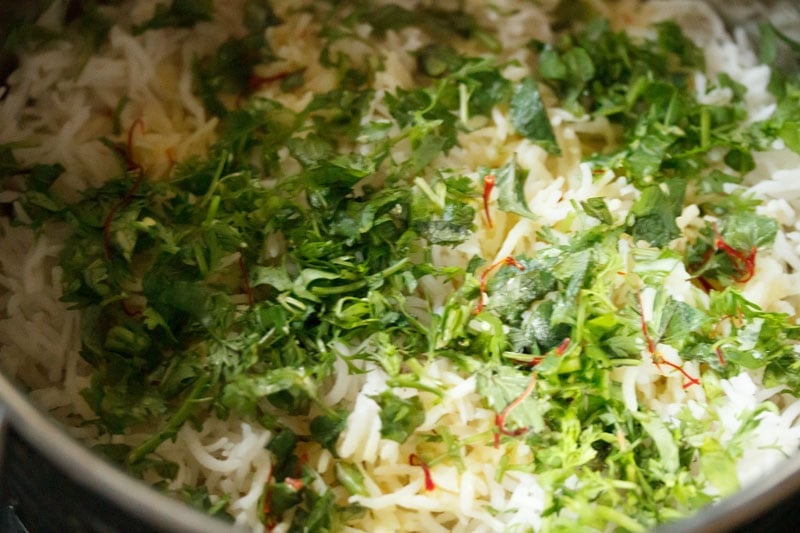
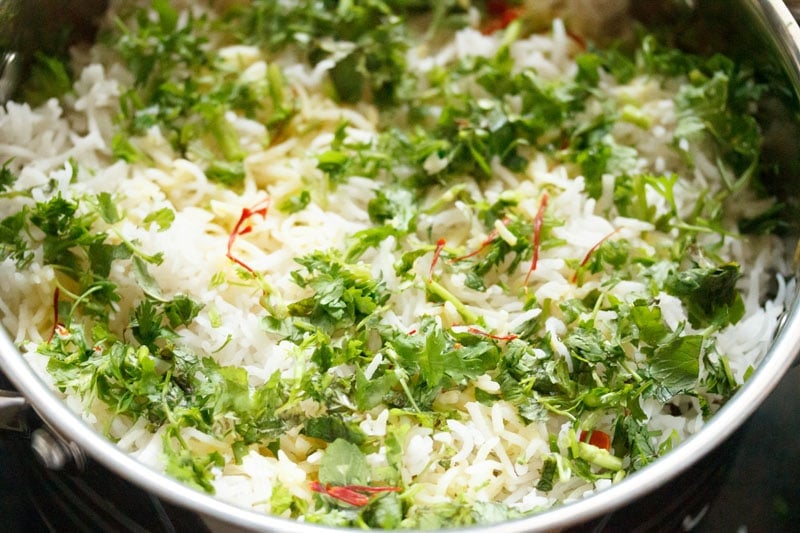
32. Sprinkle half of the chopped coriander (cilantro), mint leaves and saffron infused milk.
33. Layer the remaining gravy.
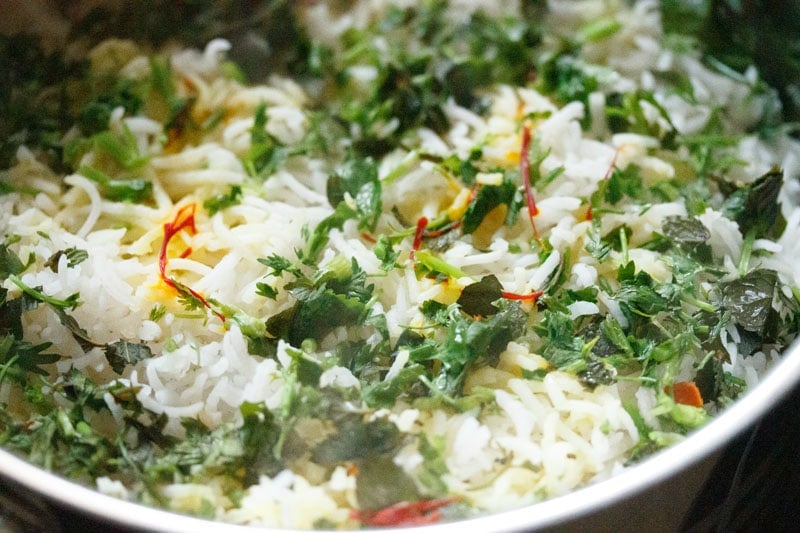
34. Layer the remainder of the rice, and sprinkle the remaining coriander leaves (cilantro), mint leaves, saffron milk on the top. You can also sprinkle 2 teaspoon of rose water or kewra water (pandanus extract) at this point.
Tip: If you’d like, you can even add ⅓ to ½ cup of golden fried onions (birista) if you have these. You can make 2 layers or 4 layers like I have done. But do remember that rice should be the top layer and the vegetable gravy should be the bottom layer.
Three Ways To Cook
Method 1
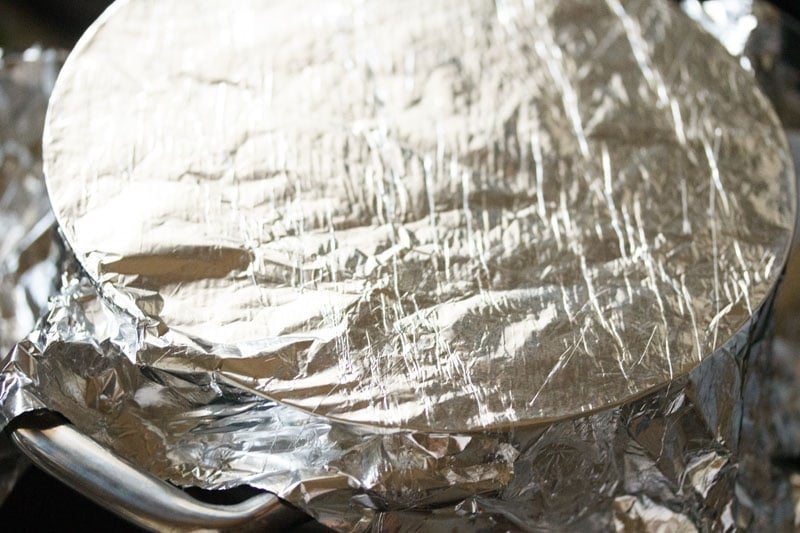
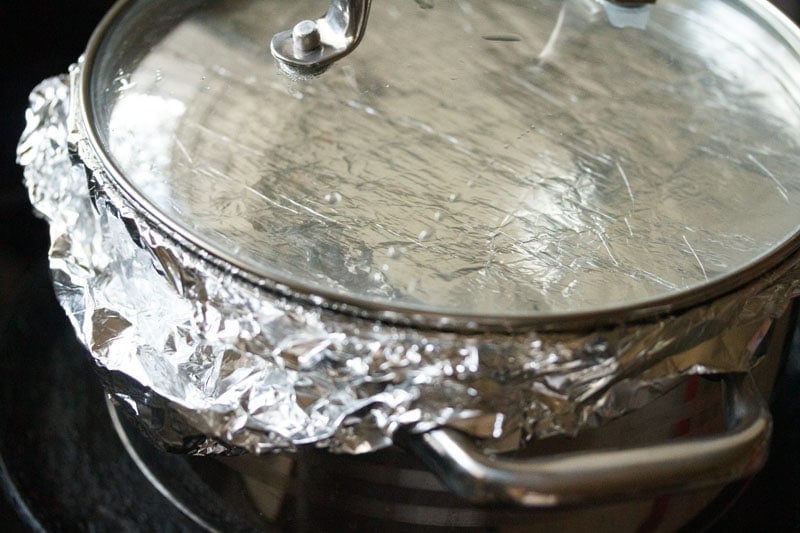
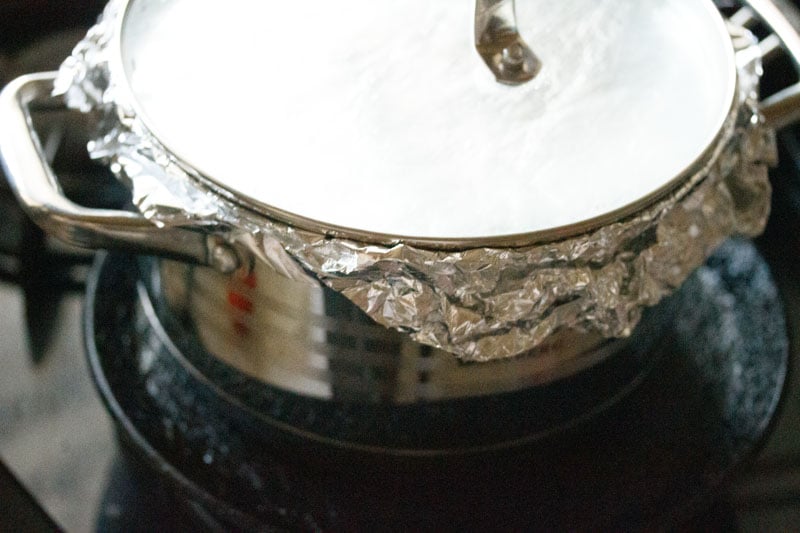
35. Seal and secure the pot with aluminium foil.
36. Then cover the pan/pot with a tight fitting lid.
Method 2
37. You can also seal the pan with a moist cotton cloth.

38. Then keep a lid on top.

39. Then keep a heavy weight on the lid.

40. Take a tawa (griddle/skillet) and heat it on medium heat. You can begin to preheat the tava when you start assembling the hyderabadi veg biryani.
Lower the heat when the skillet becomes hot, and keep the sealed veg biryani pan on the tawa. Keep the flame to the lowest and cook for 30 to 35 minutes.
Tip: You can also dum cook veg biryani for the first 15 minutes on direct low flame and then for the last 10 minutes, place the pan on the hot tawa or skillet and cook on a low flame.
Method 3 – Baking Biryani
41. Preheat the oven to 180 degree celsius for 15 minutes and then bake the vegetable biryani in a preheated oven for 30 to 40 minutes.
Remember to use an oven safe glass bowl or casserole dish like the pyrex bowl or use a dutch oven.
You have to assemble the vegetable biryani as mentioned above in the casserole dish or your dutch oven. Seal tightly with aluminium foil or an oven safe heat resistant lid and then bake.
Check Hyderabadi Dum Biryani
42. After 30 to 25 minutes, switch off the flame, and use a fork or spoon check the bottom layer of the biryani. There should be no liquids at the bottom.
If there are liquids, then continue to dum cook. After dum cooking, give a resting time of 5 to 7 minutes and later serve hyderabadi veg biryani.
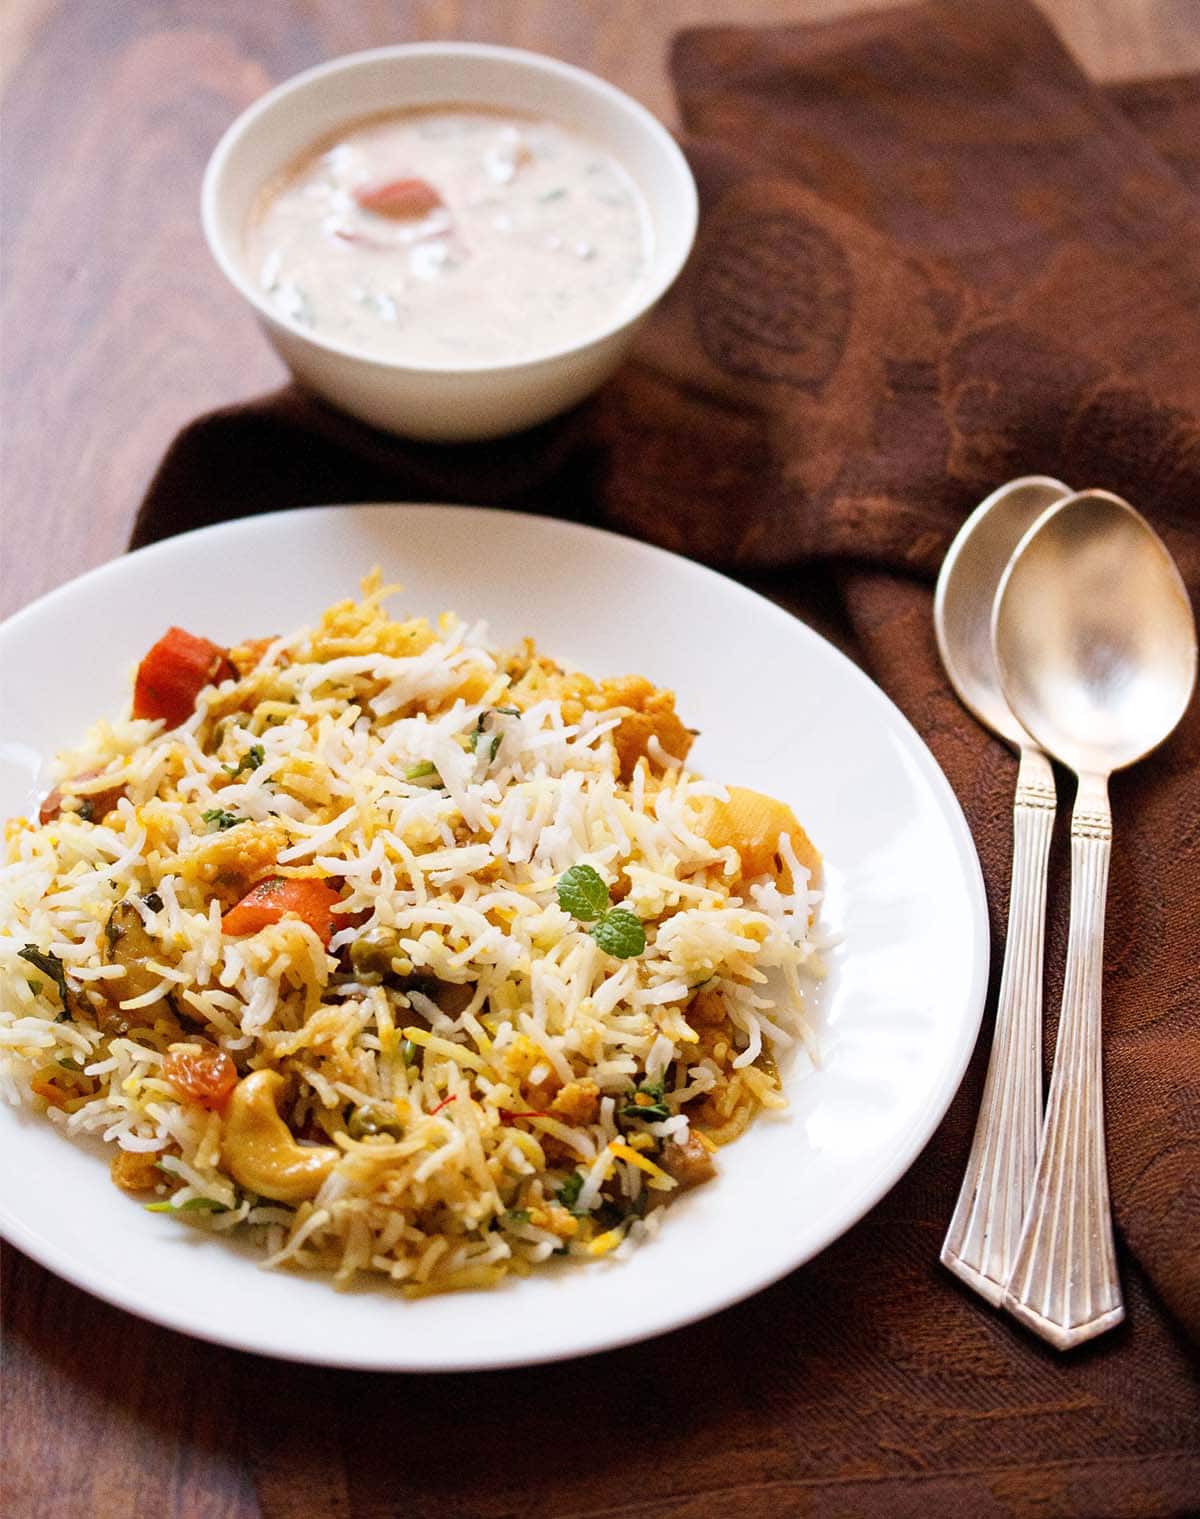
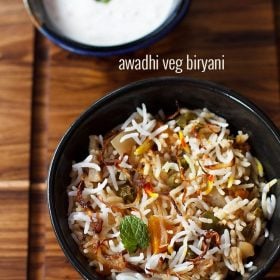
While serving the veg dum biryani, make sure you equally serve the vegetables as well as rice layers.
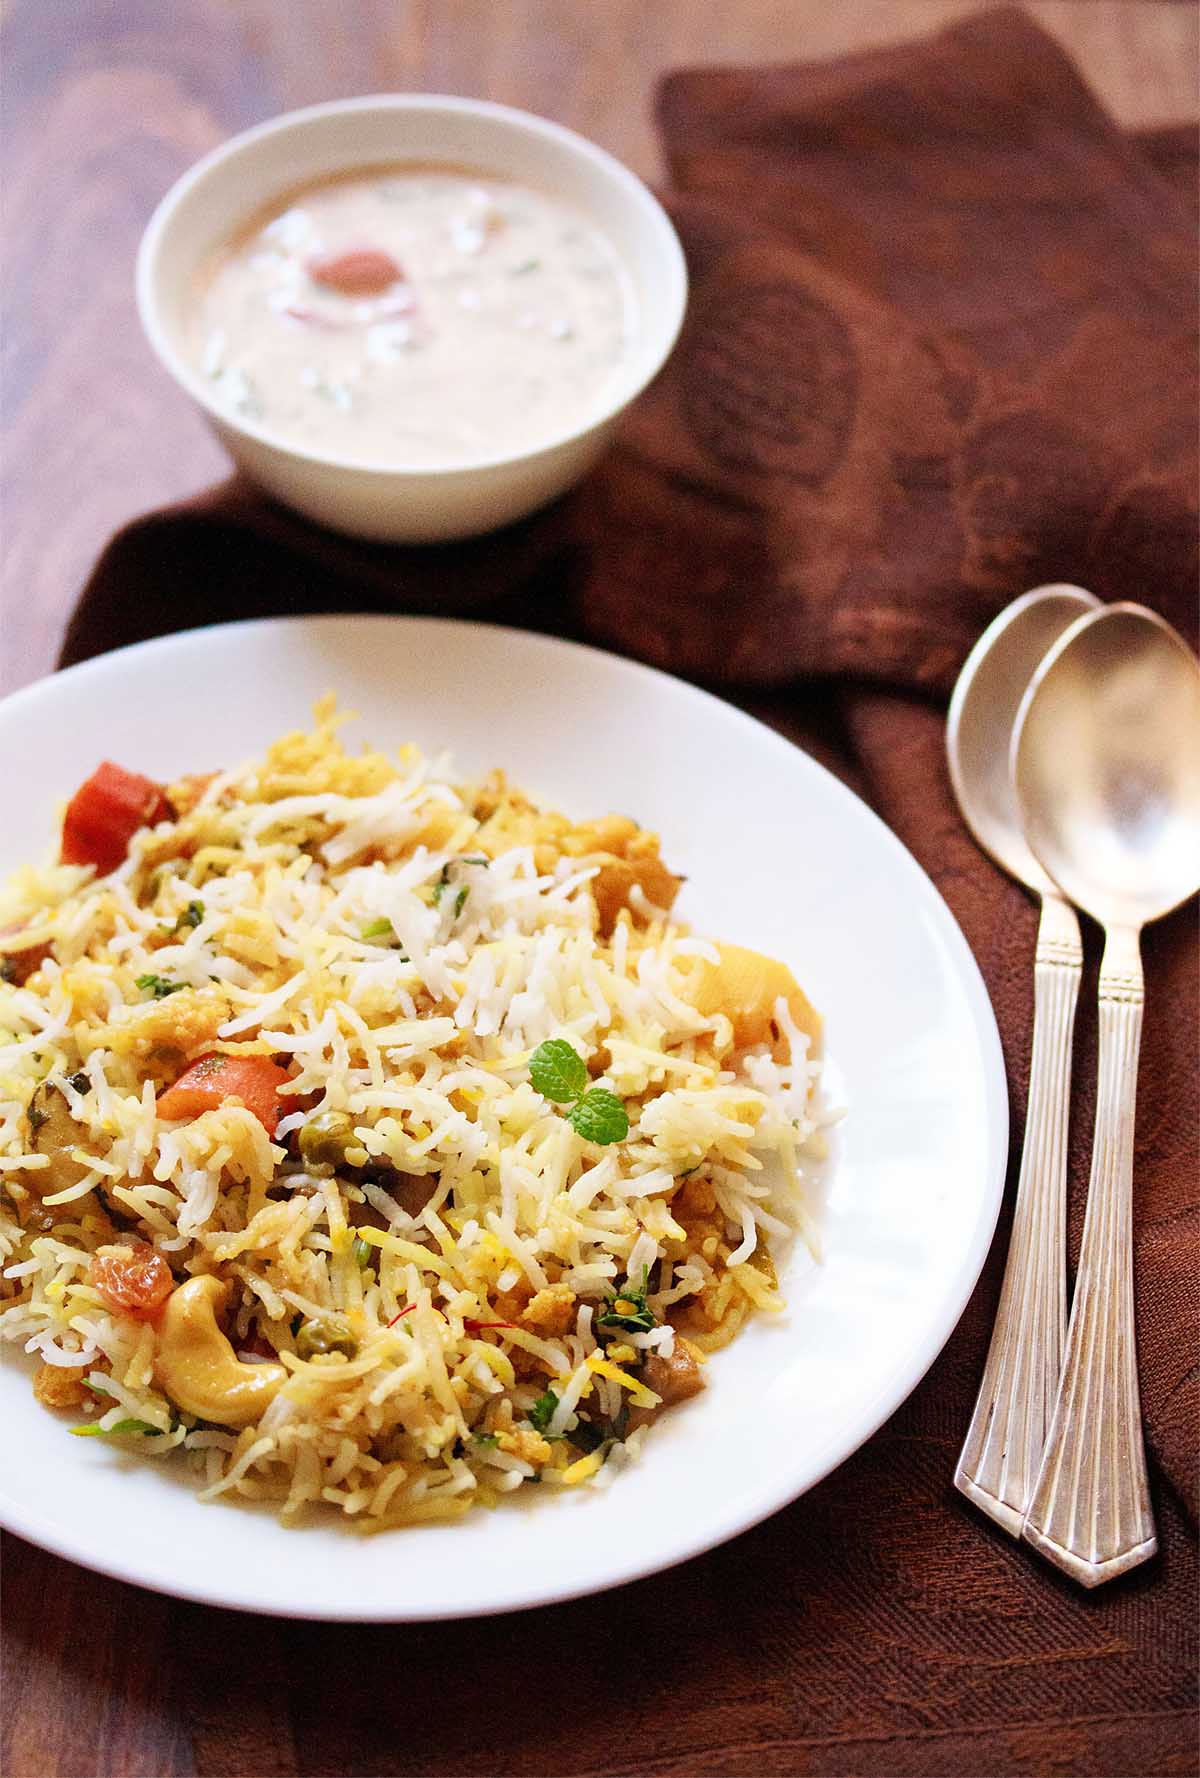
What do you eat with Biryani
There are various sides that pair best with a veg biryani. Biryani is usually accompanied with a raita (yogurt dip). The raita can be a simple onion raita or made with a mix of onion, tomatoes and cucumber.
While we personally love Cucumber Raita, Onion Tomato Raita and Boondi Raita, you could enjoy biryani with any savory raita of your liking.
You can also pair it with Kachumber Salad (onion-tomato salad), plain Curd (Yogurt), Mango Pickle, some lemon wedges or roasted papad.
The Hyderabadi veg biryani is usually served with Mirchi ka Salan (Green Chilly Curry) and raita. If desired you can serve biryani with a simple soupy Shorba gravy.
You can also enjoy veg biryani as it is without any sides or accompaniments.
Storage
Store the biryani leftovers in your refrigerator for a day only. While reheating steam for 5 minutes in a pan or Instant pot. You could even lightly sauté the veg biryani stirring frequently in a frying pan or skillet until warm or hot.
Ingredient Notes and Variations
- Rice: To make a biryani firstly you need good quality basmati rice – preferably aged basmati rice. Biryani is not mushy and the rice grains remain perfectly separate in the dish. For this recipe I included aged basmati rice.
- Sella Basmati Rice: I also make biryani with parboiled basmati rice (known as sella basmati rice in Hindi and converted basmati rice outside India) and it works wonderfully and much better than aged basmati rice. Biryani made with sella basmati rice has restaurant style flavors as many hotels and restaurants in India use this rice for making biryani as well as other rice based dishes like Pulao, Fried Rice and Jeera Rice (cumin rice).
- Cooking of rice: The rice grains are boiled until they are ¾ cooked. They will have a slight bite to them and will be slightly undercooked. Do not cook the rice 100% as then they will become mushy by the time the biryani is dum cooked.
- Spices: The lovely fragrance and aroma in a biryani comes from using whole spices. Thus the spices need to be fresh and in good condition.
- Curd (Yogurt): The vegetable curry is made with yogurt and so it is important that the yogurt must be fresh and not sour. The curd or yogurt should also be made from whole milk. Do not use fat free yogurt or curd made from toned milk as it will split while cooking.
- Biryani gravy: The curry or gravy for the veg biryani should have a medium to medium-thick consistency. It should not be watery like a stock or broth as this will lead to the rice becoming mushy or very soft after dum cooking.
- Vegan variation: Use almond milk yogurt or cashew milk yogurt. Replace ghee (clarified butter) with oil. You could use any vegetable oil or neutral tasting oil.
FAQs
In some variations, the semi-cooked rice or curry layers are topped with fried onions (also known birista) and fragrant ingredients like rose water, pandanus extract (kewra water) and saffron infused milk, ghee (clarified butter) are also sprinkled from the top.
Herbs like coriander leaves and mint are additional garnishes that bring in a bright pop of flavor and color.
Any biryani cooked with the method of dum cooking is a dum pukht biryani. It is made by making separate layers of the par-cooked rice and gravy.
This entire assembly of the semi-cooked rice and gravy with the various toppings, garnishings are sealed tightly in a clay pot and then slow cooked on low heat.
Authentically and traditionally a biryani is always slow cooked on dum. This cooking on dum gives the biriyani its uniqueness and originality.
This is how the biryani has the beautiful medley of the aromas, flavors and tastes from the variety of ingredients added in it. This hyderabadi veg biryani recipe is also a vegetarian dum pukht biryani.
In the Indian Cuisine, specifically in the North Indian cuisine, the traditional biryani is made with the dum pukht method of slow cooking in clay pots (also known as “handi” in India).
Of course nowadays many home cooks even bake biryani in the oven. In the step by step process shots above, I have explained both the dum cooking and oven baking methods – so that you can choose what suits you.
More Vegetarian Biryani Recipes To Try!
Rice Recipes
Rice Recipes
Rice Recipes
Please be sure to rate the recipe in the recipe card or leave a comment below if you have made it. For more vegetarian inspirations, Sign Up for my emails or follow me on Instagram, Youtube, Facebook, Pinterest or Twitter.
Veg Biryani Recipe
Ingredients
For soaking rice
- 1.5 cups basmati rice – 300 grams, preferably aged basmati rice
- 1 cup water for soaking rice
Veggies and herbs
- 1.5 cups cauliflower florets – 150 grams
- 1 cup chopped potatoes – 100 grams or 2 medium-sized
- ½ cup chopped carrots – 100 grams or 1 medium to large carrot
- ¼ cup chopped french beans – 50 grams or 11 to 12 french beans
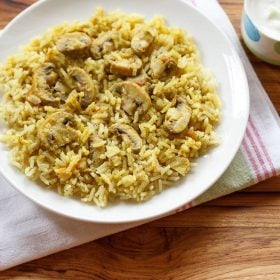
- 8 to 10 white button mushrooms sliced or chopped, (optional)
- ¼ to ⅓ cup chopped bell pepper – 50 grams or 1 small to medium (optional)
- ½ cup green peas – fresh or frozen
- 1 cup thinly sliced onions (heaped) – 115 grams onion or 1 large onion
- 1.5 tablespoons finely chopped ginger – 10 grams or 2 pieces of 2 inch ginger or 1 tablespoon ginger paste
- 1 tablespoon finely chopped garlic – 5 grams or 10 to 12 medium garlic cloves or ½ tablespoon garlic paste
- 2 green chilies – slit or sliced
For cooking rice
- 3 green cardamoms
- 1 black cardamom
- 3 cloves
- 1 inch cinnamon
- 1 tej patta (Indian bay leaf)
- 2 single mace strands
- 5 cups water
- 1 teaspoon salt or add as per taste
For biryani curry/gravy
- 3 tablespoons Ghee (clarified butter) – use 3 tablespoons oil instead
- 1 teaspoon shah jeera (caraway seeds)
- 1 tej patta (Indian bay leaf)
- 3 green cardamoms
- 1 black cardamon
- 1 inch cinnamon
- 1 cup Curd (yogurt), whisked – 200 grams
- ½ teaspoon turmeric powder
- 1 teaspoon red chilli powder or cayenne pepper or paprika
- ½ cup water for pressure cooking and ¾ cup water for cooking in a pan
- 2 tablespoons cashews
- 1 tablespoons raisins (without seeds)
- 2 tablespoons almonds – raw or blanched, peeled and sliced
- salt as required
For assembling and layering
- ⅓ cup chopped coriander leaves (cilantro) – 20 grams
- ⅓ cup chopped mint leaves – 5 grams
- 4 to 5 tablespoons milk
- ¼ teaspoon saffron strands
- 2 teaspoons kewra water (pandanus water) or rose water
Instructions
Soaking rice
- Pick and rinse basmati rice in running water till the water runs clear of starch. Soak the rice in 1 cup of water for 30 minutes.
- After 30 minutes drain the rice and set aside.
- When the rice is soaking prep all the veggies and other ingredients. Set aside.
Cooking rice
- Take a deep bottomed pan. Add water and heat the water on a high flame.
- When the water becomes hot, add the salt and following spices: tej patta, green cardamoms, cloves, black cardamom, cinnamon, strands of mace.
- Bring the water to a boil. Then add the soaked basmati rice.
- Just gently stir with a spoon or fork, after you add the soaked rice.
- Do not reduce the flame and continue to cook the rice grains.
- The rice has to be ¾ᵗʰ cooked. The grains should have a slight bite to them when cooked. The rice should not be fully cooked.
- Drain the rice in a colander. Gently fluff and keep aside.
Making vegetable curry/gravy
- In a 2-litre pressure cooker or a pan, heat ghee. Add the following spices – shahjeera, tej patta, green cardamoms, cloves, black cardamom and cinnamon. Sauté the whole spices till they crackle.
- Now add the onions. Stir and sauté them on a low to medium flame.
- Add a pinch of salt to quicken the cooking process.
- When the onions are cooking, take 1 cup fresh curd (yogurt) in a bowl and whisk the curd with a spoon or wired whisk till it become smooth.
- Sauté the onions till they become golden brown or caramelize.
- Then add the ginger-garlic paste and sliced green chillies. You can also finely chop the ginger-garlic and add.
- Sauté till the raw aroma of ginger-garlic goes away.
- Add the turmeric and red chili powder. Stir and mix well.
- Next add the chopped veggies. Sauté for a minute or two.
- Lower the heat and add the whisked curd (yogurt). Stir and mix well as soon as you add the curd. Then add ½ cup water in the pressure cooker. For cooking in a pan, add ¾ cup water.
- Season with salt and mix again.
- Pressure cook for 1 whistle on 3 to 4 minutes on medium heat. If cooking in a pot, then cook until the vegetables are tender. Don’t over cook the vegetables.
- Warm 4 to 5 tablespoons milk in a microwave or in a small pan on the stove top. Add ¼ teaspoon of saffron strands. Stir and keep aside.
- When the pressure settles down on its own, remove the lid and check the gravy.
- If the vegetables are under cooked, then keep the cooker on the stove top and simmer the vegetable biryani gravy without the lid, till the vegetables are tender.
- If there is too much of water or stock in the gravy, then simmer until some of the water evaporates and dries up. Note that the vegetable gravy should have a medium or slightly thick consistency and should not be watery.
- Now add cashews, raisins and almonds (blanched or raw) to the vegetable gravy. Mix and stir. Set aside. Do a taste test and check the salt in the vegetable gravy. Add more if needed.
Assembling and layering
- Now in a thick bottomed pan, layer half portion of the vegetable gravy first.
- Then layer half portion of the semi-cooked rice.
- Sprinkle half of the chopped coriander leaves (cilantro), mint leaves and saffron milk.
- Layer the remaining vegetable gravy.
- Layer the last portion of the rice. Sprinkle the remaining coriander leaves, mint leaves, and saffron infused milk on the top. Sprinkle rose water or kewra water.
- You can make 2 layers or 4 layers like I have done. But do note that rice should be the top layer and the vegetable gravy should be the bottom layer.
Dum cooking
- Now seal and secure the pot with an aluminium foil. Then cover with a lid. You can also seal the pan with a moist cotton cloth and then cover with a lid.
- Take a tava/griddle/skillet and heat it on medium flame.
- When the tawa become hot, then lower the flame. Keep the sealed veg biryani pan on the tawa.
- Keep the flame to the lowest and cook for 30 to 35 minutes. You can dum cook hyderabadi veg biryani for the first 15 minutes on a direct low flame and then for the last 10 minutes, place the pan on the hot tawa/skillet and cook on a low heat.
- Once done using a fork or spoon check the bottom layer of the biryani. There should be no liquids at the bottom. If there are liquids, then continue to dum cook for some more time.
- After dum cooking, give a resting time of 5 to 7 minutes and later serve the hyderabadi veg biryani.
Serving Suggestions
- While serving, make sure you equally serve the vegetables as well as the rice.
- There are various sides that pair best with a veg biryani. Biryani is usually accompanied with a raita (yogurt dip). You can choose to pair it with Cucumber Raita, Onion Tomato Raita and Boondi Raita, or you could enjoy biryani with any savory raita of your liking.
- You can also pair it with Kachumber Salad (onion-tomato salad), plain Curd (Yogurt), Mango Pickle, some lemon wedges or roasted papad.
- The hyderabadi veg biryani is usually served with Mirchi ka Salan (Green Chilly Curry) and raita. If desired you can serve biryani with a simple soupy Shorba gravy.
- You can also enjoy biryani as it is without any sides or accompaniments.
Storage
- Store the biryani leftovers in your refrigerator for a day only. While reheating steam for 5 minutes in a pan or Instant pot. You could even lightly sauté the biryani stirring frequently in a frying pan or skillet until warm or hot.
Notes
For Baking Veg Biryani
- You could also preheat the oven to 180 degree Celsius/356 degrees Fahrenheit for 15 minutes and bake the veg biryani in the oven for 30 to 40 minutes.
- Remember to use an oven safe glass bowl or casserole dish like the pyrex bowl or use a dutch oven.
- You have to assemble the vegetable biryani as mentioned above in the casserole dish or your dutch oven. Seal tightly with aluminium foil or an oven safe heat resistant lid and then bake.
Recipe Notes and Variations
- Ingredients: Do try to use all the ingredients as mentioned in the recipe.
- Rice: Use a good quality basmati rice – preferably aged basmati rice. You can even use Sella Basmati Rice which is parboiled basmati rice (known as sella basmati rice in Hindi and converted basmati rice outside India). For sella basmati rice, you will need to soak the rice grains for an hour. The cooking time will also increase for this variety of basmati rice.
- Cooking of rice: Cook the rice grains till they are ¾ᵗʰ done. They will have a slight bite to them and will be slightly undercooked. Do not cook the rice all the way as they will become mushy by the time the biryani is dum cooked.
- Spices: The lovely fragrance and aroma in a biryani comes from using whole spices. Thus the spices need to be fresh and in their shelf life.
- Curd (Yogurt): Use fresh yogurt that is slightly sweet and not sour. The curd or yogurt should also be made from whole milk. Do not use fat-free yogurt or curd made from toned milk as it will split while cooking.
- Biryani gravy: The curry or gravy for the biryani should have a medium to medium-thick consistency. It should not be watery like a stock or broth as this will lead to the rice becoming mushy or very soft after dum cooking.
- Vegan variation: Use almond milk yogurt or cashew milk yogurt. Replace ghee (clarified butter) with oil. You could use any vegetable oil or neutral tasting oil.
Nutrition Info (Approximate Values)
This Veg Biryani recipe from the archives was first published on July 2010. It has been updated republished on January 2023.

Thank you for.. amazing recipes. I have become a total fan of your recipes.
Thanks a lot.
lovely biriyani dassana – thanks a lot for the recipe
Amazing! One of the best Biryani recipe on the web. Thanks a lot.
Most welcome and thanks a lot.
Really enjoyed your recipes following your step by step is fantastic. Thanks for your guidance and support given to beginners.
Great and thanks for this wonderful feedback. Glad that the step-by-step is helpful.