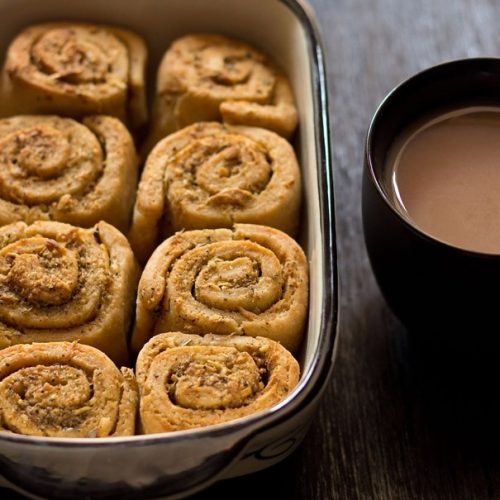
Deliciously savory and perfect for pairing with soups or stews, these Pull Apart Garlic Bread Rolls are as much fun to look at as they are to eat! Made with whole wheat flour and without any eggs, these soft and pillowy dinner rolls are a real crowd-pleaser.
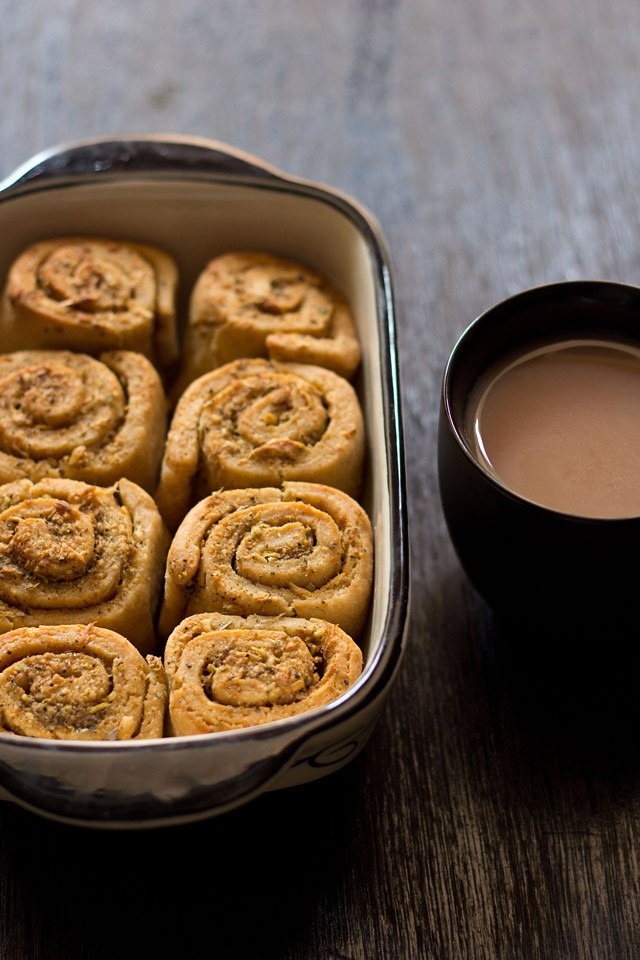
Table of Contents
About Pull Apart Garlic Bread
These pull apart garlic bread were inspired from Nag’s blog Edible Garden — ever since I saw them, I just knew I had to make them!
I modified Nag’s recipe using primarily whole wheat flour (atta) and just a little all-purpose flour (maida), but you can easily make with wholly all-purpose flour or a 50/50 split depending on your preferences.
When I was making the garlic butter mixture for the rolls, I used up some Nutralite I had kicking around in the fridge. You are welcome to use either dairy butter, vegan butter, or your choice of margarine.
As a visual learner, I found Divya’s Easy Cooking blog to be quite useful. She has many illustrative pictures that, in tandem with Nag’s blog, really helped me to understand the method of rolling, folding, and cutting these savory garlic rolls. If you’re in need of more help with bread baking, I suggest her blog!
After baking these garlic rolls, I have made many different kinds of bread rolls like pesto rolls and cinnamon rolls. I have experimented making them with whole wheat bread dough, brown bread dough, as well as Pizza dough, and Focaccia. It turns out that the method works for all of them!
How To Make Pull Apart Garlic Bread
If you are new to bread baking, I know it can be a bit intimidating. If you follow along with my step-by-step photos, it’ll be like I’m right there in the kitchen with you, cheering you along!
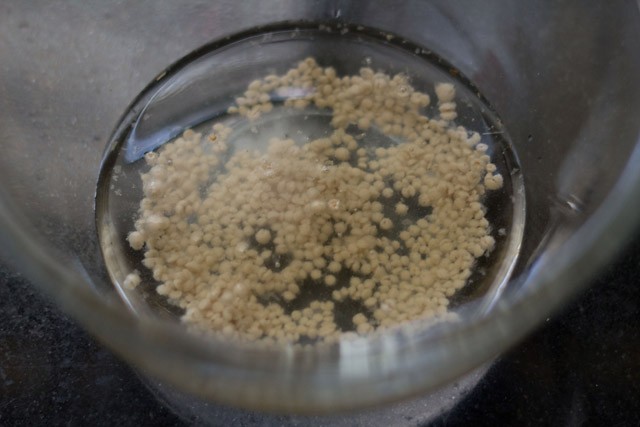
Proof Yeast
1: Mix ½ tablespoon sugar and 1 teaspoon dry active yeast in warm water. Allow the mixture to sit at room temperature for 10 to 12 minutes.
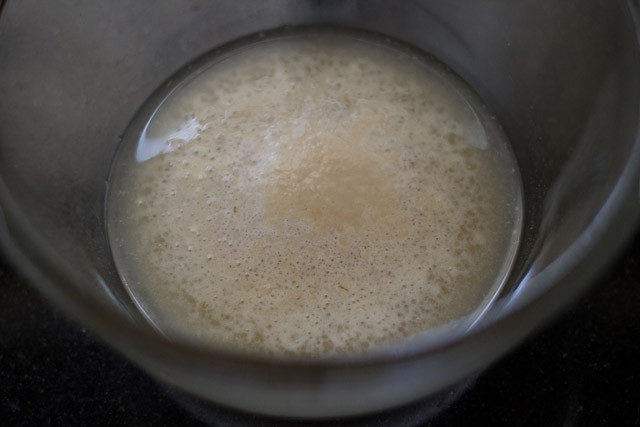
2: The yeast solution will become bubbly and frothy after 10 minutes. This means the yeast is alive and ready to go! If your solution doesn’t look like mine, your yeast is probably dead and you’ll need to start with a new packet.
DO NOT TRY TO MOVE FORWARD WITH THE RECIPE IF YOUR YEAST DOESN’T BUBBLE AND FROTH. It simply will not work!
Make Bread Dough
3: Add the 1.5 cups whole wheat flour, 2 tablespoons all-purpose flour, ½ teaspoon salt, and 1 tablespoon oil to the bowl with the yeast mixture.
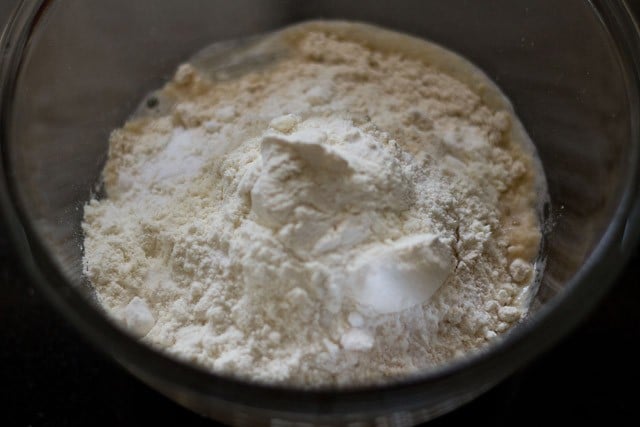
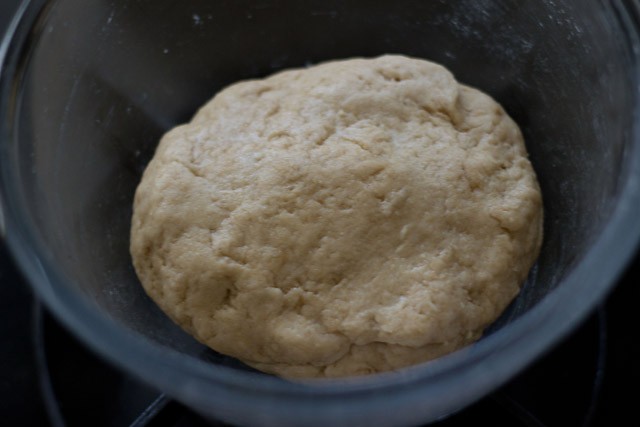
4: Knead into a smooth, soft, and springy dough.
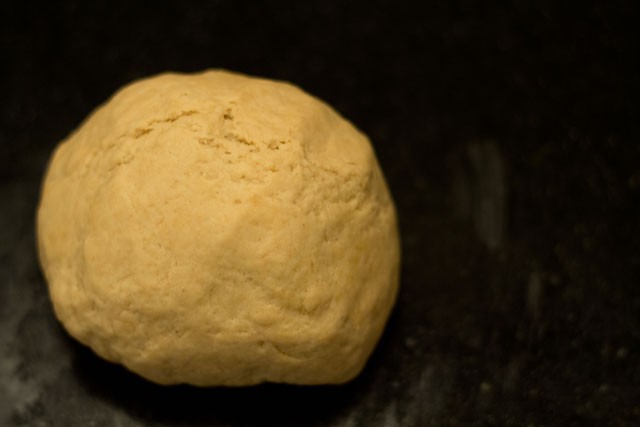
First Rise
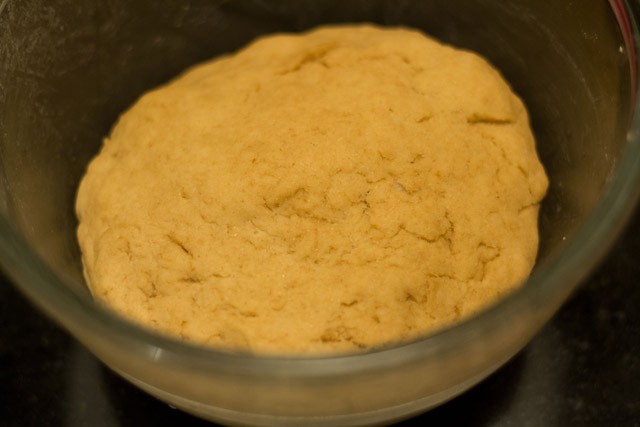
5: Rub oil on the whole exterior of the dough, cover with a clean kitchen towel, and set in a warm, draft-free place to rise, approximately 1:30 to 2 hours until leavened.
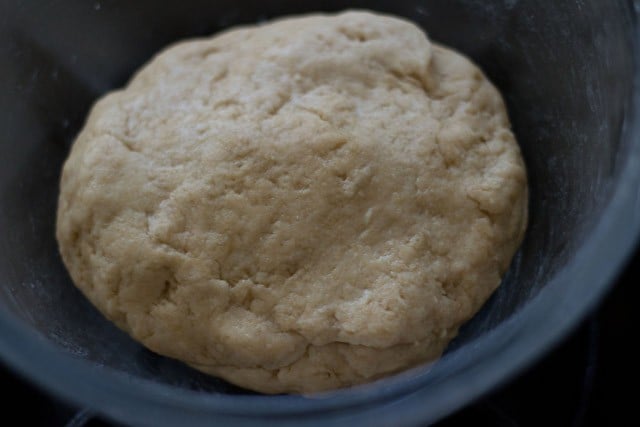
6: The dough should be roughly double in size after leavening.
Assemble Garlic Rolls
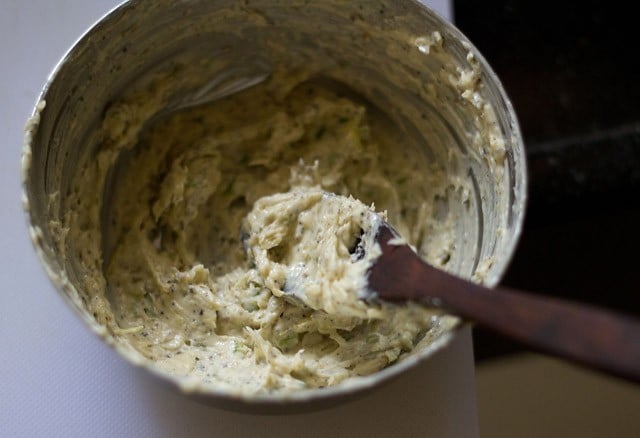
7: Make the garlic butter: beat 2 tablespoons softened butter (plant-based or dairy) and ½ tablespoon sunflower oil or olive oil with a spoon till light and fluffy.
Add all the following spices and herbs and mix well:
- ½ to ⅔ tablespoon minced or finely chopped garlic or finely crushed garlic
- 1 teaspoon finely chopped celery
- ¼ teaspoon dry oregano
- 2 light pinch of pinch carom seeds, optional
- 1 or 2 teaspoons nutritional yeast, optional
- salt as required
- ground black pepper as required
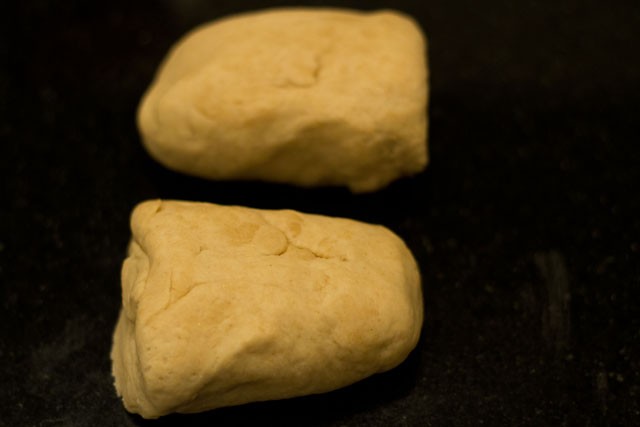
8: Lightly punch down the dough before making the rolls on a work surface.
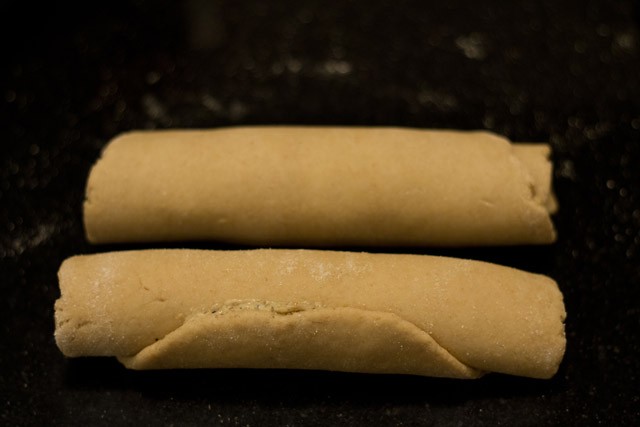
9: Divide the dough into two roughly equal parts.
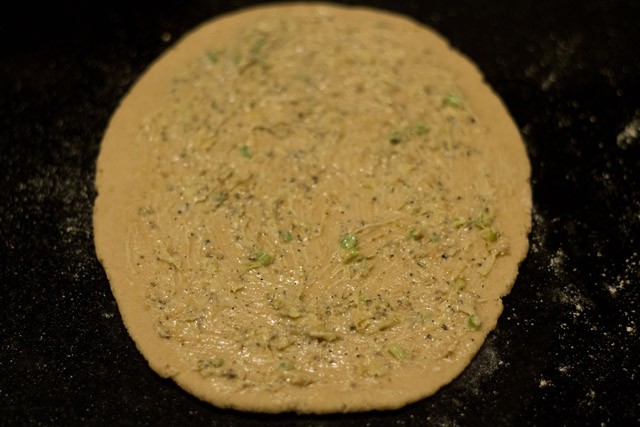
10: Dust your work surface with some dry flour. Take one part of the dough and roll to a round or rectangle that is about ½ inch thick.

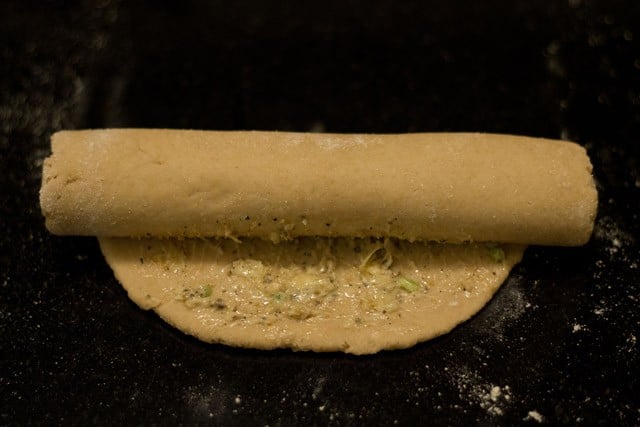
11: Spread ⅓ of the garlic butter spread evenly on the dough.
12: Roll the dough till the end.
13: Repeat this process with the second piece of the dough. Now both the rolls are ready to be sliced.
Slice
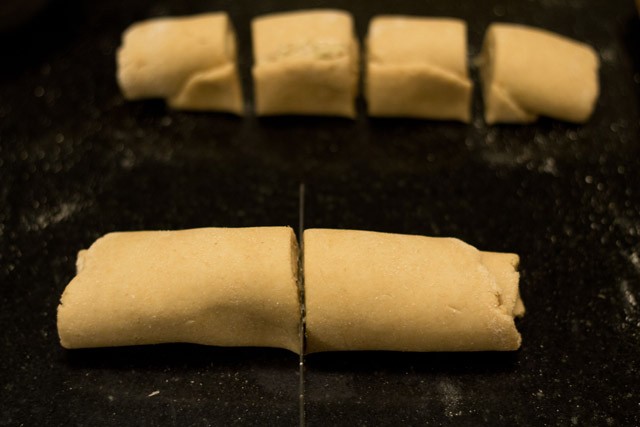
14: First give a cut from the center, and then equally cut the two parts. You should now have 4 equal slices of the rolled dough spirals. Repeat with the second log.
Second Rise
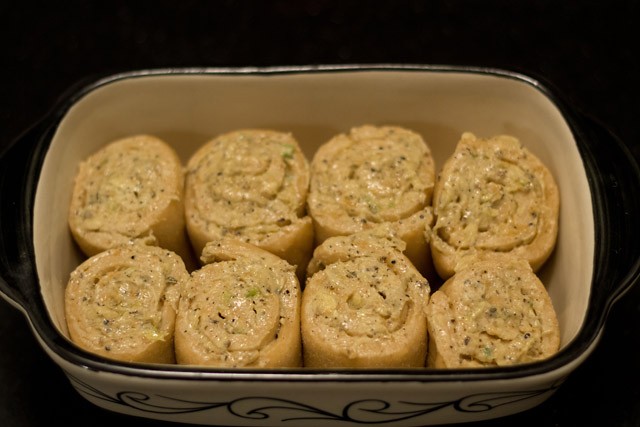
15: Grease a pan with softened butter or olive oil in which all the 8 rolls will fit snugly, without too much room on any side. Place the rolls with the cut edges facing upwards in the pan. Brush their tops with remaining garlic butter.
Cover with a clean kitchen towel and place in a warm, draft-free area to rise again. After about 30 to 40 minutes they should have doubled in size.
Bake and Enjoy!
16: Bake in a pre-heated oven for 30 to 35 minutes at 180 degrees Celsius/356 degrees Fahrenheit till the tops are golden and the garlic rolls sound hollow when tapped. Since I have a slow oven it took me 40 mins to bake the rolls.
Keep in mind that temperatures varies across various ovens and it can take less or more time for the garlic rolls to bake in your oven.
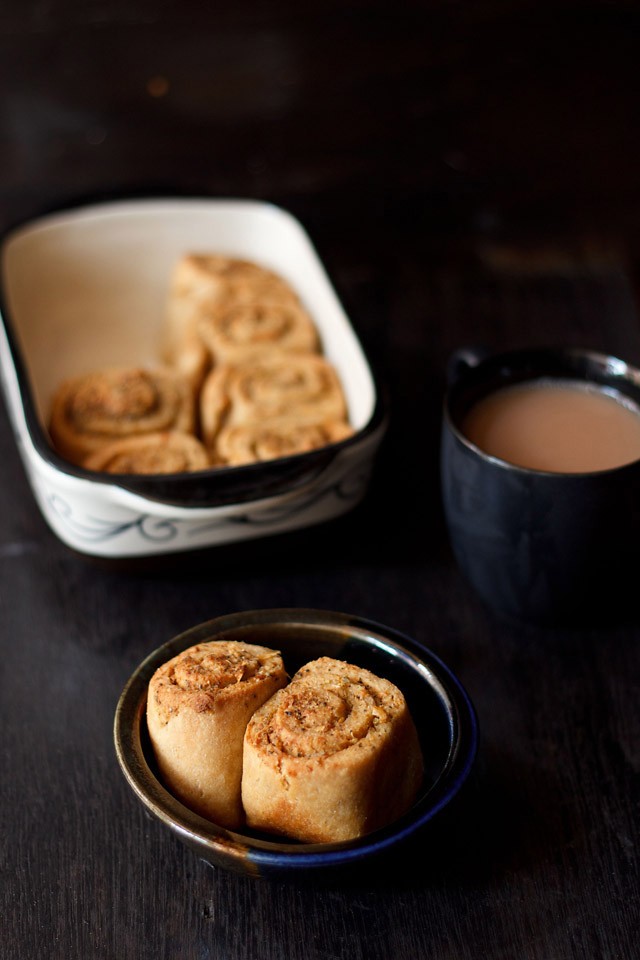
Serve them warm with your afternoon tea or coffee for a yummy snack, or serve them with soup, stew, or pasta as a dinner roll. Enjoy!
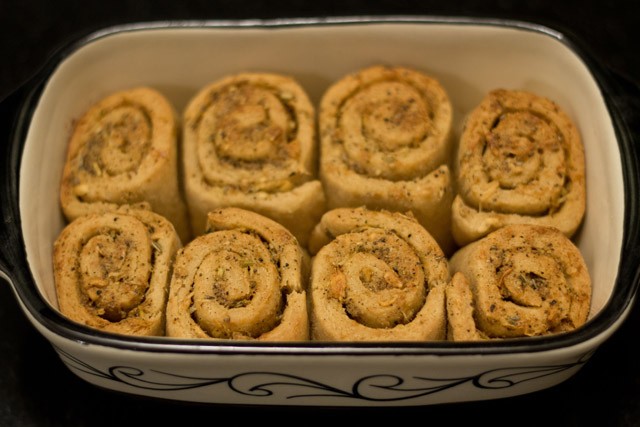
Here’s one more photo to inspire you to make these awesome and delicious pull apart garlic bread 🙂

Expert Tips
- Proof your yeast. The most important thing to remember about making these garlic rolls is that you’re dealing with live organisms. Dried yeast will remain dormant until you rehydrate them and give them a little food in the form of sugar. If your yeast is good, the mixture will foam and froth. If your yeast is expired, it will not. DO NOT MOVE FORWARD WITH THE RECIPE IF YOUR YEAST HAS EXPIRED. You will end up with a rock rather than a pillow!
- Give your bread a cozy spot to rise. Rising time is greatly affected by temperature. If you are living in a cool climate, I suggest using your oven as a proofing box. With the oven off, set a bowl at the very bottom and fill it with boiling water. Pop your covered bread dough bowl on a rack, then close the door. The water will give off enough heat to provide the perfect climate for your bread to rise!
- Roll tightly. As with making cinnamon rolls, you need to roll your garlic rolls nice and tightly. If you don’t, they’ll have a tendency to lose shape and bake unevenly.
FAQs
Sure! Just be sure to chop them very finely and to sauté them very well until there is no liquid left in the pan.
Absolutely! It will go beautifully with this recipe.
Yes. Add about ½ teaspoon of instant or rapid rising yeast. You’ll just need to cut back the rising time to about 45 minutes or an hour.
Yes, but I suggest that you wrap them in foil to start. Convection ovens have a tendency to brown the tops quite quickly, leading you to believe the bread has finished cooking while the middles are still soft. Remove the foil in the last 5 minutes of baking to get a beautiful browned top with perfectly cooked centers.
They are the very best quality when they are fresh from the oven, but you can keep any cooled leftovers in an airtight container for 3 to 4 days.
Yes! Just increase to 2 teaspoons please.
More Bread Recipes To Try!
Bread Recipes

Bread Recipes
Bread Recipes
Please be sure to rate the recipe in the recipe card or leave a comment below if you have made it. For more vegetarian inspirations, Sign Up for my emails or follow me on Instagram, Youtube, Facebook, Pinterest or Twitter.
Pull Apart Garlic Bread | Garlic Rolls
Ingredients
For the dough
- 1.5 cup whole wheat flour
- 2 tablespoon all-purpose flour
- 1 teaspoon dry active yeast
- 150 to 160 ml water – approx ⅔ cup water *check notes
- ½ tablespoon sugar
- 1 tablespoon oil – any neutral oil or olive oil
- ½ teaspoon salt or add as required
For the garlic spread
- 2 tablespoons dairy-free butter or dairy butter
- ½ to ⅔ tablespoon minced garlic or finely chopped garlic or finely crushed garlic
- 1 teaspoon finely chopped celery
- ¼ teaspoon dry oregano
- 2 pinch carom seeds – optional
- 1 or 2 teaspoon nutritional yeast – optional
- ½ tablespoon sunflower oil or olive oil
- salt as required
- ground black pepper as required
Instructions
Making dough
- Mix the the sugar and yeast in warm water. Allow to sit at room temperature for 10 to 12 mins.
- After the yeast solution bubbled and frothy, add the flours, salt and oil to the bowl of yeast mixture.
- Mix well and knead to a smooth and soft dough.
- Rub or brush oil on the whole dough and keep covered for up to 1:30 to 2 hours until leavened.
Assembling and shaping garlic rolls
- Beat the butter with a spoon till light and fluffy. Add all the spices & herbs along with salt. Mix well.
- Check the seasoning in the garlic spread and add more of the herbs, spices or salt if needed.
- Lightly punch the dough before making the rolls on a work surface. Divided the dough into two parts.
- Take one part of the dough and on a lightly dusted flour, roll to a round or rectangle till you get ½ inch width in the rolled dough
- Spread the garlic butter evenly on the dough. Roll the dough completely.
- Make a similar roll with the other part of the dough.
- First give a cut from the center on each rolled dough and then equally cut the two parts. So you have now 4 equal slices from the rolled garlic dough.
Baking Garlic Pull Apart Bread
- Grease a baking pan or tray in which all the 8 rolls will fit. Place the rolls in the pan touching each other with the open sides facing up.
- Brush their tops with remaining garlic butter. Cover and let the rolls double up for 35 to 40 minutes.
- You can also sprinkle some sesame seeds on top of the rolls.
- Bake in a preheated oven for 30 to 35 minutes at 180 degrees Celsius/356 degrees Fahrenheit till the tops are golden. Remember to preheat the oven for 15 minutes at the same temperature of 180 degrees Celsius/356 degrees Fahrenheit.
- Serve garlic rolls with tea or coffee.
Notes
- Here I have added ⅔ cup water. However depending on the quality and texture of flour, you may have to add less or more. So add accordingly to get a smooth, soft and pliable dough.
- If the yeast mixture does not become bubbly and frothy, throw it away and start again.
- Note that the approximate nutrition info is for 1 garlic roll made with dairy-free butter.
Nutrition Info (Approximate Values)
This Pull Apart Garlic Bread Rolls post from the archives first published in August 2013 has been republished and updated on 3 May 2022.

Hi Dassana
I love all your recipes—they are detailed and encourages novices like me.
I don’t have an OTG and when I bake my bread in convection mode, the top of the bread has a very slight brown hue and is cooked well. I try and extend it to another five minutes and still it is a faded brown. What can I do to get a brown hue?
Thanks in advance
Hi Sulekha. Could be that in your microwave oven the heating element when using the convection mode, is either placed at one side or behind. Since the heating element is not at the top, this causes the browning to be less as compared to regular ovens or OTG where the heating element is placed on the top.
If the bread or cake is cooked perfectly then browning does not make much of a difference unless you want a crusty texture outside.
Hi dassana,
I like your recipes very much. Actually am a fan of your recipes.
I want to know whether can I add mushrooms and capsicum to this recipe along with garlic and herbs
Maria
thanks maria. you can add mushrooms and capsicum. just saute mushrooms in some oil till the moisture from them goes away and then add in the garlic spread. chop mushrooms finely. for capsicum also you can saute them in some oil or you can roast them in an oven. alternatively in a pan you first saute capsicum in some oil and then add mushrooms. continue to saute till all the water from the mushrooms evaporates and the mixture becomes dry. chop capsicum also finely.
Hi, is there any substitute for yeast?? If any plz let me know
in this recipe there is no substitute for yeast.
Hi I tried baking a garlic bread roll (whole log) in pressure cooker as detailed by u in ladi pav receipe – it’s taken 1and 1/2 and still the top is not browned and don’t know if it’s cooked till the top and so I had to roll the log in the pan to get the other side browned
Any suggestions where I might have gone wrong
Also my pan is of the same height as the pressure cooker and the lid above it would that make a difference?
nahid, there should be some space between the pan and the top of the cooker. this helps in browning the bread or cake from top in the pressure cooker. it should not take so much time. just eat a small piece and see if it is baked well or not. i think the bread roll must have baked in this much time.
Hi Dassana,
Can I add a bit of cheese along with the butter spread before i roll it? Will it go with this recipe? I want to adapt your recipe to make it cheesy.
Thanks,
Sukanya
yes sukanya you can add cheese. it goes very well.
Dear Dassana ,
Loved the garlic and cinnamon rolls that I made without adding the maida
Have become your ardent fan .
Today my whole wheat bread broke while unmoulding . Could it be that it was still too warm ? Can you guide please .
Renu
renu, bread should always be removed when its completely cooled at room temperature. even at times i have tried to remove hot and warm breads and they have broken. so just let the loaf cool down and then you remove it from the pan.
good to know that rolls came out good. thanks renu 🙂
Hi Ma’am. Your recipes are almost always fool proof and I love to try them out! 🙂 My family is not a fan of garlic, so I want to try Cinnamon rolls. Have you posted a recipe for it? If not, will the dough recipe be the same as this one? And only the cinnamon filling will change?
Love and thanks,
Priyanka
thanks priyanka. i do plan to add cinnamon rolls. same dough recipe, but just sprinkle cinnamon + sugar on the dough. also spread some butter before sprinkling sugar + cinnamon mixture.
I made these to pair up with lasagna. I have never before in my life actually made bread before, ever. It was very amusing watching the yeast do its’ thing 🙂 I think that I made my dough too thin when I was rolling it out but it didn’t affect the taste or the look! Next time I wont roll out my dough so thin and my rolls will be a bit heftier like the ones in your picture. Since I was eating these with lasagna I added dried parsley and basil, I didn’t have carom seeds or celery so I just omitted those. Unfortunately after I had put my bread in the oven I had to leave RIGHT after the 35 minutes so I turned off the oven and left my rolls in there because they looked like they still needed a little time, they got kind of crunchy on the outside but were soft and yummy on the inside. I will make these again and hopefully I won’t have to leave them unattended again! Thank you for this easy-to-follow recipe 🙂
thanks paulina. the more one bakes bread, the more one learns. even i have learned over a period of time 🙂
Without using yeast can we make the bread?
yes you can, but the method is longer and takes more time.
Please could you share that one ?
will do pooja. have got many requests for the same.
Hi! i have been reading ur blog for sometime now and keep trying something. today i made the garlic rolls and they came out very well. my daughter loves such food and i packed them up for her tiffin . thank u very much and keep writing
welcome pooja. glad to know this. thanks for sharing positive feedback.
Hi, tried the recipe today. Came out lovely and house smells awesome….thank you for sharing. Now just waiting for the tea to get done…:)
welcome archana. glad to know this.
Hi dassana, thanks for all healthy bread recipes ,I am trying all one by one n my wheat bread come out excellent. In garlic bread roll can I use instant dry yeast n wat is the amt..pls let me know urgently.
you can use instant yeast. add about 1/2 to 3/4 tsp of instant yeast.
hi..made the wheat garlic rolls..tasted heavenly..but I guess I went wrong somewhere as the centres were a bit undercooked and soggy..specially the outer ring ,,the tops were getting crispier and brown..I baked them at 180c for 35 mins..your advice on this pls as I need to make them again soon:)
the centers were not cooked tanvi. whereas the tops got cooked quickly. this usually happens in convection ovens. i suggest to cover the top with a foil and then bake. you can cover after 10 minutes of initial baking. or cover right in the beginning and towards the end about 5 minutes before you remove, you bake them without the foil, so that the tops get browned.
hi. dassana, tried this recipe just now …. came out really good. taste was fantastic too. thanks a ton for this savoury bake dish.
welcome rashmi. thanks for sharing positive feedback.
Dear Dassana
have been going thru the receipes on your site…and am just hooked on to them…and have been forwarding the link to my friens….was planning to try the brown bread today…but came across the garlic rolls instead…my boys simply love garlic bread…hope they ll like these too…hope these will be good for the school tiffin as well!!!
Totally appreciate your effort!!!
thanks hetal for your appreciation and recommending the site to your friends. i hope you like this recipe. garlic bread rolls will be good for tiffin.
Hi, Tried your whole wheat bread, came out amazing! Thanks for the recipe. Got more bold to bake breads now and wanted to try this. Here you have used active dry yeast. I am using instant yeast, should i still allow it to sit for 1.5-2 hours? Any other variation required in the process?
thanks sudha for the feedback. if using instant yeast, then reduce the leavening time. just keep the time to 45 minutes to 1 hour.
Tried this recipe… My son loves garlic bread.. Thanks for sharing such a yummy recipe … Now my son can hv these garlic rolls anytime which are so much healthier …
welcome gunjan. thanks for sharing positive feedback. good gesture from your side to go for healthy homemade food.
Hello! I want to compliment you on this recipe in particular; my children all loved these more than store-bought! I also want you to know that your site is terrific; so well-curated and featuring easy-to-understand and beautiful images, and recipes that are so thoughtful. Thank you for all you do!
welcome aishya. glad to read your positive feedback on recipes. thanks for sharing your feedback.
Hi Dassana..how are you. I have a question what if i want to make this bread or rolls in microwave. Even though i have a inbuilt oven here but i am travelling to India next month and am planning to make these wth my parents and in.laws but they have microwave with grill options and no convention mode….
anamika, i am fine and hope the same for you. you can try baking them in the grill option. just alter the time, because i don’t know how long it will take to bake them in the grill option.
Hi! Will these still be good an hour or two after baking? I would like to bring them to a BBQ but not sure how to do it. Maybe not a wise idea?
Thanks!
Ann
welcome ann. yes they will be good but the crispness will go away.
Hi Dassana, thanks for this lovely recipe. I love cakes n breads since childhood…which we used to get it from outside or my mother used to prepare cake placing the pan in the tava filled with sand…. Its now my time trying to bake on my own using the new technology….
I tried ur white bread, whole wheat bread…they came really good but need to work on that as it was not that soft as we get it from shop.
I tried this garlic bread rolls…..it came fantastic….beautiful… N the best taste which is unforgettable… My hubby …daughter …my friend everyone liked it. ….. Loved it a lot…
Due to ur easy step by step method ur recipe made all of us learn properly. Thank u so much 🙂
Shilpa v kulkarni
welcome shilpa. glad to know your experience. if the yeast froths well then the white bread or whole wheat will be soft. so the quality of yeast matters. i have seen few disasters with poor quality yeast.
Can we use instead of dry yeast , fresh yeast and how much amount?
you need to add 2 tsp of fresh yeast.
I tried this today…..But it became chewy and didn’t rise..Was more like hard rusk! The yeast didn’t rise in warm water right at the beginning.I should have not used that mixture.I remember reading in your blog to throw away yeast that has not become bubbly.I took a chance…But I shouldn’t have.The dough didn’t rise either.So guess it was a mistake right at the beginning.The flavour was lovely.This was because of the yeast right?I followed all the steps you mentioned.
yes deepa, its due to the yeast. if the yeast does not bubble at all then there is no point in making breads. initially i would have this issue with the kind of yeasts that we get in india. sometimes even when they were still within their expiry period, they would not froth. and yes like you i also took chances a couple of times. the bread loaf just remains hard. use a good quality yeast. i use the mauripan/gloripan brand of instant yeast and they are good. also their dry active yeast is very good. even muksha brand is good. blue bird is also ok.
I used blue bird yeast.Had used the same pack for the wheat naans and the bread the other day.Those came out well.Anyway will be careful next time….Thanks so much
blue bird is okay. but muksha is better than blue bird. and mauripan is better than muksha. in fact try using instant yeast. the time taken is less and the results are also good. plus the water can be at room temperature too.
Can I use extra virgin olive oil instead of butter?
deepa, yes you can but you might need to add less olive oil than the amount of butter mentioned in the recipe.
Mam thank you so much for the receipe.rolls came out crunchy outside and soft and fluffy inside.my family loved it.in my place i did not get dry oregano leaves so i tried methi leaves.my doubt about convection and preheating is clear now.
i would love to try your receipes.this week iam making schezwan sause with rice.
mam iam extremely sorry about the miscommunication.
thanks saigayathri for the feedback. you got the right texture of the rolls. they can be be slightly crisp to more crisp from outside. depends upon the oven and baking time. methi leaves work very well. since i have made methi bread, i know. also if you don’t have oregano, you can also use pizza seasoning. this gives a typical pizza flavor and taste. indian herbs like coriander can also be added. but the taste will be different. in fact you can also add ajwain (carom seeds) or jeera (cumin seeds). no need to be sorry. happens at times 🙂
Me gonna try today! A small clarification as am new to baking iam not sure about a baking methods.i have a sharp microwave oven which says baking plus convection and has the options of pre heating and temp setting.ca i proceed with this or do i have look for a baking stove or something.pls clarify what t means as pre heating.
you can easily bake in the convection mode of the microwave oven. you can proceed with your oven. preheat your oven in the convection mode. 180 degrees celsius works fine. preheat for 10 minutes and place the garlic rolls. preheating is heating the oven empty. 10 to 15 minutes the oven has to heated empty before you place the food. just to let you know we get a lot of comments. so it takes a couple of days to answer them. generally we try to answer them on the same day, but it does not happen always. we did not delete your comment. it was in the queue waiting to be answered 🙂
Tried these yday.. was not sure how they would look after baking.. turned them over and to the sides, and baked for a few mins on each side to make sure all sides were baked evenly..
Came out awesome.. All I got was a small piece to taste.. my older son finished up the whole batch!
Am inspired and going to try the whole wheat bread today.
Thank you 🙂
welcome ranjani and big thanks for this awesome feedback on garlic bread rolls. your son has complimented your baking so you should bake more 🙂
Made two batches of these tonight! I used the optional savoury yeast for the garlic spread and forgot to add salt and it turned out just right and soft (I use wholemeal flour)!!
thanks stephanie for sharing positive feedback and your inputs.
Nice recipe..plz tell me have u baked this in OTG?
yes gunjan.
Hi Dassana,
I tried out this recipe today, and it turned out yum!
Thanks a ton for sharing.
I must say, your explanation is apt, and the pictures are so well taken, that I couldn’t wait to try out the recipe myself! A temptation I couldn’t resist! 🙂
The measures for the bread is just perfect!
I slightly tweaked the recipe and added cheese, it tasted yum.
When I cut the rolled dough, the cuts were not as flat and stiff as the ones i see in your pictures. I guess the dough was loose. Yet, it baked well.
Thanks again! 🙂
thanks mythili for your feedback. cheese would go well. the texture of the dough depends on the amount of water and the kneading done.
Hi..Which brand of yeast u use. I use blue bird the shelf life is very less. Once open need to use in one go else will not give result.Need suggestion
i use mauripan/gloripan brand. this is a good brand. i don’t use blue bird as the yeast quality is not good.
Hello, your recipe sounds really good but I have no clue how many grams or how many ounces 11/2 cups is????
So please could you tell me asap otherwise I will have to find a different recipe because I was going to use this recipe tomorrow!
Thanks x
Yes, I have used whole wheat bread recipe.
And one more thing I want to know that I made this garlic bread rolls the taste is good but we are feeling wheat taste as well like uncooked chapati I baked properly 35-40 minute. Please advise.
Thanks
the whole wheat bread recipe has been tried by some readers. so i think, its the quality of yeast. the yeast must have not proofed well. again that is the reason the rolls were like uncooked chapati and you are getting the wheat taste. the dough has not leavened well and one of the culprit is the yeast. the rolls are really soft and baked well. so i suggest to buy a good quality yeast and also the yeast should become frothy and bubbly when proofed. it there is no bubbling or frothing, then throw the solution and start again.
Hi Dassaana.
Yesterday i tried whole wheat bread .It came out but not as soft as we buy from market.
did you use the whole wheat bread recipe from the blog?
Hii..Dassana I like yor bread…u explain very well..is ther any substitute for celary? How it is taste? ? Thanks:)
there is no substitute for celery. i cannot describe how celery tastes. no indian herb comes close to its taste. you can the garlic bread without celery.
Recently came across ur website must say it’s very good esp the photos at every step are very helpful when trying new recipe.
Tried bread it comes out well.
For garlic bread rolls somewhat it was tasting like baati of dal- baati dish. Do we bake them quite LNG so they become crisp or these are soft.
Pls confirm
these do not taste like baati. they are not baked that long. they are baked for about 30-35 mins. they are soft and not very crisp. a slight crisping is there but not like dal baati.
Hi,
I have seen ur posts and got interest in baking.
I am planning to start baking for my kid, so planning to buy otg, as iam interested in baking and grilling vegetables iam not not looking for microwave with convection. We are a family of 3.
I have searched for few models, i found one model with convection.
Is convection in otg required for baking?? without convection in otg can we get perfect bakes??
pls help me out, can u pls suggest which brand and capacity otg would be suitable for 3 members.
thanks a lot,
Hema
hi hema, OTG is based on convection mode of cooking. OTG is oven toaster grill. so you can bake, grill or toast. basically there are three modes of transferring heat – conduction, convection and radiation. OTG is built on the convection principle.
microwave oven uses two basic modes for cooking – microwave and convection. so in a microwave oven there may or may not be a convection mode. i don’t understand when you say that you found a model with convection. OTG is a convection oven. so i guess what you are referring to is a microwave oven with convection.
i hope i have cleared your doubts about convection and OTG. prestige, philips, bajaj are good brands. i have a philips oven (which the owner of the house kept) which is basic and has just two compartments. for three people this is enough. but if you plan to do extensive baking, then you may need to go for a better oven. i am also planning to buy a new oven. still not decided which one. 🙂
Hi, i dont have a oven /OTG. can we make it in mocrooven . I have one with convection
you have to use the convection mode of your microwave oven for baking anything be it breads or cakes. please read your oven’s manufacturer’s booklet on how to use the convection mode.
Thank you Dassana for your receipes. Have been hooked to your site for the past few months and have tried out a few of them. They all turned out well and have been appreciated by my husband and daughters. What I really appreciate is the way you make cooking look simple and also your use of healthy options like whole wheat flour whenever possible instead of maida.
thanks bindu for this motivating comment. its important to eat healthy considering the stressful time we are living… where air, water and food is all getting contaminated.
hi,
prepared,result is Just wow!!!! preparing today also. thank u for perfect recipe.
thanks seema
Indeed a coincidence Dassana. Nice step by step pictures you have here. And perfect rolls.
looks lovely dassana. great idea to use whole wheat flour for the rolls. thank for the mention 🙂
thanks and welcome nags
Oo yum!! These look amazing, you can never go wrong with garlic butter!
I really love how you’ve made it like rolls. There is nothing like a home made hot bread.
i love these.. i had also tried these and now they are a regular at home…love ur clicks.. as always..:).. i have a post on them too..
uff! these look heavenly! i have never made bread at home but am inspired to try these. have you ever made bread/rolls with other kinds of flour like ragi flour for instance? thanks for the pictures, they help all us visual cooks. 🙂
thanks aparna for the encouraging comment. i did make ragi bread a couple of times. i also tried making bread with multi grain flour. but not posted any recipes.
Oh my! the smell your house would have filled of while baking these. yum!
Thanks for the mention Dassana,I’m humbled!
These rolls have never let me down.Whenever I am in the mood to bake bread,I somehow always end up baking this one,reason being it turns out perfect every time.Love it that you’ve baked with whole wheat,I’m trying to do the same these days.Got to try your Focaccia.
welcome divya. when i want to make something more interesting than bread, i just end making stuffed bread rolls.
Lovely swirly buns. one of my favourites.
On your ingredients did you mean 11/2 cups or did you mean 1 & 1/2 cups ? Thankyou
its 1 and 1/2 cups of whole wheat flour. in grams it is about 195 grams.